Leveling Overallocated Resources
In the previous section, you read about resource allocation, learned what causes overallocation, and manually resolved an overallocation. Resource leveling is the process of delaying or splitting a resource’s work on a task to resolve an overallocation. The options in the Level Resources dialog box enable you to set parameters about how you want Project to resolve resource overallocations. Project will attempt to resolve such overallocations when you choose to level resources. Depending on the options you choose, this might involve delaying the start date of an assignment or task or splitting the work on the task.
| Note | Although the effects of resource leveling on a schedule might be significant, resource leveling never changes who is assigned to tasks, or the total work or assignment unit values of those assignments. |
For example, consider the following tasks, all of which have the same full-time resource assigned:
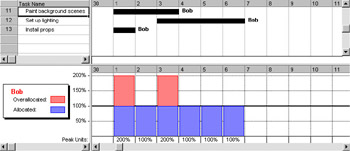
In this split view, the Resource Graph view appears below the Gantt Chart view. On day 1, the resource is overallocated at 200 percent. On day 2, the resource is fully allocated at 100 percent. On day 3, he is overallocated at 200 percent again. After day 3, the resource is fully allocated at 100 percent.
When you perform resource leveling, Project delays the start dates of the second and third tasks so that the resource is not overallocated, as shown in the following figure:

Note that the finish date of the latest task has moved from day 6 to day 8. This is common with resource leveling, which often pushes out the project finish date. Before leveling, there was a total of eight days of work, but two of those days overlapped, causing the resource to be overallocated on those days. After leveling, all eight days of work are still there, but the resource is no longer overallocated.
Resource leveling is a powerful tool, but it does only a few basic things: it delays tasks, splits tasks, and delays resource assignments. It does this following a fairly complex set of rules and options you specify in the Resource Leveling dialog box. (These options are explained in the following exercise.) Resource leveling is a great fine-tuning tool, but it cannot replace your good judgment about resource availability, task durations, relationships, and constraints. Resource leveling will work with all this information as it is entered into your project plan, but it might not be possible to fully resolve all resource overallocations within the time frame you want unless you change some of the basic task and resource information.
| Tip | To learn more about resource leveling, type About resource leveling into the Search box in the upper right corner of the Project window. |
In this exercise, you level resources and look at the effects on assignments and the project finish date.
-
On the Window menu, click Remove Split.
-
On the View menu, click Resource Sheet.
The Resource Sheet view appears. Note that several resource names appear in red and display the Overallocated icon in the Indicators column.
Troubleshooting If you do not see the Overallocated icon for any resources, try the following: On the Tools menu, click Level Resources. In the Resource Leveling dialog box, make sure that Day By Day is selected in the Look for overallocations on a … basis box and then click OK.
-
On the Tools menu, click Level Resources.
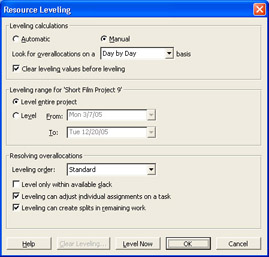
The Resource Leveling dialog box appears. In the next several steps, you will walk through the options in this dialog box.
-
Under Leveling calculations, make sure that Manual is selected.
These settings determine whether Project levels resources constantly (Automatic) or only when you tell it to (Manual). Automatic leveling occurs as soon as a resource becomes overallocated.
Tip All settings in the Resource Leveling dialog box apply to all project plans you work with in Project, not to just the active project plan. Using automatic leveling might sound tempting, but it will cause frequent adjustments to project plans whether you want them or not. For that reason, we recommend you keep this setting on Manual.
-
In the Look for overallocations on a ... basis box, make sure that Day by Day is selected.
This setting determines the time frame in which Project will look for overallocations. If a resource is overallocated at all, its name will be formatted in red. If it’s overallocated at the level you choose here, Project will also show the Overallocated indicator next to its name.
Tip On most projects, leveling in finer detail than day by day can result in unrealistically precise adjustments to assignments.
-
Make sure that the Clear leveling values before leveling check box is selected.
Sometimes you will need to level resources repeatedly to get the results you want. For example, you might initially attempt to level week by week, and then switch to day by day. If the Clear leveling values before leveling check box is selected, Project removes any existing leveling delays from all tasks and assignments before leveling. If, for example, you previously leveled the project plan and then added more assignments, you might clear this check box before leveling again so that you wouldn’t lose the previous leveling results.
-
Under Leveling range for ‘Short Film Project 9’ make sure that Level entire project is selected.
Here you choose to level either the entire project or only those assignments that fall within a date range you specify. Leveling within a date range is most useful after you have started tracking actual work and you want to level only the remaining assignments in a project.
-
In the Leveling order box, make sure that Standard is selected.
You control the priority Project uses to determine which tasks it should delay to resolve a resource conflict. The ID Only option delays tasks only according to their ID numbers: numerically higher ID numbers will be delayed before numerically lower ID numbers. You might want to use this option when your project plan has no task relationships or constraints. The Standard option delays tasks according to predecessor relationships, start dates, task constraints, slack, priority, and IDs. The Priority, Standard option looks at the task priority value before the other standard criteria. (Task priority is a numeric ranking between 0 and 1000 that indicates the task’s appropriateness for leveling. Tasks with the lowest priority are delayed or split first.)
-
Make sure that the Level only within available slack check box is cleared.
Tip Remember that to clear a check box means to remove a check from the check box, and to select a check box means to put a check in it. You can toggle the selection state of a check box by clicking it.
Clearing this check box allows Project to extend the project’s finish date, if necessary, to resolve resource allocations.
Selecting this check box would prevent Project from extending the project’s finish date in order to resolve resource overallocations. Instead, Project would use only the free slack within the existing schedule. Depending on the project, this might not be adequate to fully resolve resource overallocations.
-
Make sure that the Leveling can adjust individual assignments on a task check box is selected.
This allows Project to add leveling delay (or split work on assignments if Leveling can create splits in remaining work is also selected) independently of any other resources assigned to the same task. This might cause resources to start and finish work on a task at different times.
-
Make sure that the Leveling can create splits in remaining work check box is selected.
This allows Project to split work on a task (or on an assignment if Leveling can adjust individual assignments on a task is also selected) as a way of resolving an overallocation. Your screen should look similar to the following illustration:
Tip This tip describes enterprise project management (EPM) functionality. If you have Project Professional, you’ll see additional items in the Level Resources dialog box that relate to enterprise resource features enabled by Project Server. For more information, see Part 4, “Introducing Project Server.”
-
Click the Level Now button.
-
Project asks whether you want to level the entire pool or only selected resources. Leave Entire Pool selected, and click OK.
Project levels the overallocated resources.
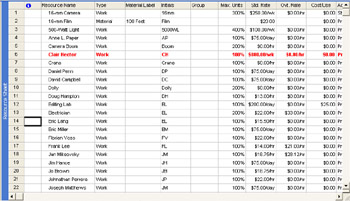
Notice that the Overallocated indicators are gone, although some resource names still appear in red. This means that some resources are still overallocated hour by hour (or minute by minute) but not day by day.
Next you will look at the project plan before and after leveling, using the Leveling Gantt view.
-
On the View menu, click More Views, click Leveling Gantt, and then click the Apply button.
Project switches to the Leveling Gantt view.
-
Click the name of task 8, Apply for filming permits.
-
On the Standard toolbar, click the Go To Selected Task button.
This view gives you a better look at some of the tasks that were affected by leveling:
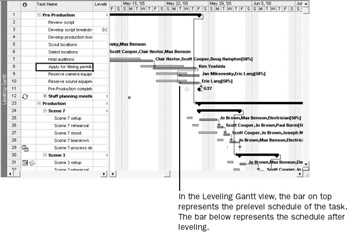
Notice that each task now has two bars. The green bar on top represents the preleveled task. You can see a task’s preleveled start, finish, and duration by pointing to a green bar. The blue bar on the bottom represents the leveled task.
Project was able to resolve the resource overallocations. For this particular project, leveling pushed out the project finish date by two days.
EAN: 2147483647
Pages: 199