Manually Resolving Resource Overallocations
In this exercise and the next, you will continue to focus on resource allocation—how the task assignments you have made affect the workloads of the people and equipment resources of the project. In this exercise, you will manually edit an assignment to resolve a resource overallocation. In the next exercise, you will automatically resolve resource overallocations.
Manually editing an assignment is just one way to resolve a resource overallocation. Other solutions include the following:
-
Replace the overallocated resource with another resource using the Replace button in the Assign Resources dialog box.
-
Reduce the value in the Units field in the Assignment Information or Assign Resources dialog box.
If the overallocation is not too severe (for example, 10 hours of work assigned in a normal eight-hour workday), you can often leave the overallocation in the schedule.
| Tip | To learn more about resolving resource overallocation problems, type Resolving resource overallocation into the Search box in the upper right corner of the Project window. The Search box initially contains the text Type a question for help. |
In this exercise, you will use the Resource Allocation view to examine one overallocated resource’s assignments and edit the assignment to eliminate the overallocation.
-
On the Window menu, click Remove Split.
-
Click the Show/Hide Project Guide button on the Project Guide toolbar.
The Project Guide closes, leaving the Resource Usage view visible.
-
On the View menu, click More Views, click Resource Allocation, and then click the Apply button:
Project switches to the Resource Allocation view. This view is a combination view that displays the Resource Usage view in the top pane and the Leveling Gantt view in the bottom pane.
-
In the Resource Usage view, scroll vertically through the Resource Name column.
Note that several names appear in red. These are overallocated resources.
-
In the Resource Name column, click the name of resource 14, Eric Lang.
-
Click the plus sign next to Eric Lang’s name to display his assignments.
-
On the Standard toolbar, click the Go To Selected Task button.
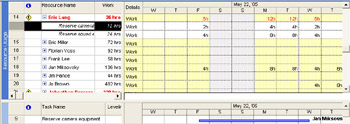
Your screen should look similar to the following illustration:
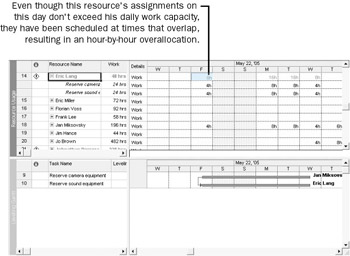
In the upper pane you see that Eric is assigned full-time to two tasks that both start on Friday, May 20. He is overallocated for the duration of both tasks. In the lower pane, you see the Gantt bars for the specific tasks that have caused Eric to be overallocated on these days. For tasks 9 and 10, Eric is assigned eight hours of work on each task Monday and Tuesday. This results in 16 hours of work per day, which is beyond Eric’s capacity to work.
You might also notice that Eric is assigned a total of eight hours of work on Friday, and then again on the following Wednesday. These values also appear in red, indicating that Eric is overallocated on those days as well. This is because the two tasks are scheduled to start at the same time Friday and end at the same time Wednesday. So even though Eric has a total of eight hours of work assigned on Friday and Wednesday, he really has two four-hour assignments in parallel. This is an overallocation.
Next you will manually resolve this overallocation.
-
In the Resource Name column, click Eric’s first assignment, Reserve camera equipment.
-
On the Standard toolbar, click the Assignment Information button.
The Assignment Information dialog box appears.
-
Click the General tab.
-
In the Units box next to Eric’s name, type or click 50%, and then click OK to close the Assignment Information dialog box:
Eric’s daily work assignments on this task are reduced to two or four hours per day, but the task duration increased. You’d like to reduce the work but not extend the duration of the task. Note the Smart Tag indicator that appears next to the name of the assignment. You will use the Smart Tag to change the scheduling effect of the new assignment units.
-
Click the Smart Tag Actions button.
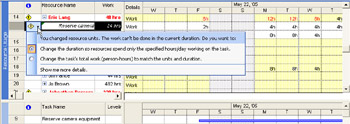
Look over the options in the list that appears. Your screen should look like the following illustration:
-
In the Smart Tag Actions list, click Change the task’s total work (person-hours) to match the units and duration.
Project reduces Eric’s work assignments on the task and restores the task to its original duration.
However, Eric is still overallocated. To remedy this, you will reduce his assignment units on his second task.
-
In the Resource Name column, click Eric’s second assignment, Reserve sound equipment.
-
On the Standard toolbar, click the Assignment Information button.
The Assignment Information dialog box appears.
-
Click the General tab if it is not already visible.
-
In the Units box next to Eric’s name, type or click 50%, and then click OK to close the Assignment Information dialog box.
-
Click the Smart Tag Actions button.
-
In the Smart Tag Actions list, click Change the task’s total work (person-hours) to match the units and duration.
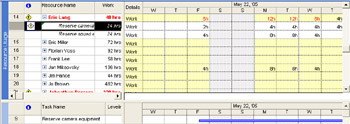
Your screen should look like the following illustration:
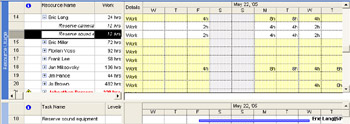
Eric’s total assignments on Monday and Tuesday are now reduced to eight hours each day. He is fully allocated on these days. By manually editing Eric’s assignments to reduce his work on these days, you have resolved his overallocation. There are other resource overallocations in the short film project that you can resolve automatically with resource leveling, however. You will do this in the next section.
EAN: 2147483647
Pages: 199