Viewing Assignment Details in a Resource Pool
One of the most important benefits of using a resource pool is that it allows you to see how resources are allocated across projects. For example, you can identify resources that are overallocated across the multiple projects to which they are assigned.
Let’s look at a specific example. As you might have noticed in the previous section, the resource Ken Bergman, who was not overallocated in either of the individual project plans, did appear overallocated after Project accounted for all of his assignments across the two project plans. When Ken’s assignments from the two sharer plans were combined, they exceeded his capacity to work on at least one day. Although Ken most likely was aware of this problem, the project manager may not have known about it without setting up a resource pool (or hearing about the problem directly from Ken).
In this exercise, you look at the information in the resource pool.
1. Double-click the title bar of the Resource Pool 19 window.
The resource pool window is maximized to fill the Project window. In the resource pool, you can see all of the resources from the two sharer plans. To get a better view of resource usage, you will change views.
2. On the View menu, click Resource Usage.
The Resource Usage view appears.
3. In the Resource Name column, click the name of resource 6, Ken Bergman, and then scroll the Resource Usage view to display all of Ken’s assignments below his name.
4. On the Standard toolbar, click the Scroll To Task button. ![]()
The timescale details on the right side of the Project window scroll horizontally to show Ken Bergman’s earliest task assignments. The red numbers (for example, 16 hours on Friday through Monday, May 9 through 19) indicate days on which Ken is overallocated. Next, you will display the Resource Form to get more detail about Ken’s assignments.
5. On the Window menu, click Split.

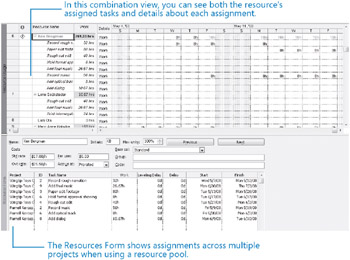
In this combination view, you can see all resources in the resource pool and their assignments (in the upper pane), as well as the selected resource’s details (in the lower pane) from all sharer plans. You can see, for example, that the Record rough narration task to which Ken is assigned is from the Wingtip Toys Commercial 19 project, and the Record music task is from the Parnell Aerospace Promo 19 project. Ken was not overallocated in either project, but he is overallocated when you see his assignments across projects in this way.
If you want, click different resource names in the Resource Usage view to see their assignment details in the Resource Form.
6. On the Window menu, click Remove Split.
| Tip | In a resource pool, the Resource Form is just one way to see the details of specific assignments from sharer plans. Other ways include inserting the Project or Task Summary Name columns into the table portion of the Resource Usage view. (On the Insert menu, click Column.) |
EAN: 2147483647
Pages: 247