Getting Familiar with File Types
A document’s file type is determined by the extension used in its file name, and it defines which actions you can perform on the document. For example, a text document—that is, a document with a name that ends with .txt—has two actions: Open, which displays the document in Notepad; and Print, which sends the document to the Windows XP default printer. (Technically, the Print action opens Notepad, loads the document, selects File, Print, and then closes Notepad. This all happens in the blink of an eye.) Each file type has a default action that runs when you double-click a document of that type. (For text files, the default action is Open.) When a file name is selected in Windows Explorer, the default action appears in bold type on the File menu and on the document’s shortcut menu.
File types that have associated actions are said to be registered with Windows XP (because this data is stored in the registry). To see the list of Windows XP’s registered file types, start Windows Explorer, select Tools, Folder Options to display the Folder Options dialog box, and then select the File Types tab. As you can see in Figure 7-3, the Registered File Types list shows the extensions for each registered file type. When you select one of these items, the Details section of the dialog box shows the application (if any) that opens the file type.
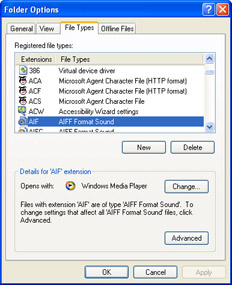
Figure 7-3: The File Types tab displays a list of Windows XP’s registered file types.
Modifying Actions for an Existing File Type
If an existing file type uses an action you don’t like, it’s easy enough to change it. For example, if you create lots of HTML files, you might prefer them to open in Notepad instead of Microsoft Internet Explorer. The next few sections show you how to modify file type actions.
Changing the Application Associated with a File Type
Use the Open With list to display the Open With dialog box, as we discussed in Chapter 3. Remember to select the Always Use The Selected Program To Open This Kind Of File check box. Note, too, that you can also get to the Open With dialog box via the File Types tab. Use the Registered File Types list to select the file type you want, and then click the Change button.
Changing a File Type Action
Follow these steps to change a file type action:
-
Use the File Types tab to select the file type you want to work with, and then click the Advanced button. The Edit File Type dialog box appears.
-
Use the Actions list to select the action you want to change, and then click Edit. The Editing Action For Type dialog box appears.
-
Use the Action text box to change the name of the action (this is optional), and use the Application Used To Perform Action text box to enter the full path of the application you want to use for the action. Here are some notes to bear in mind:
-
If the path of the executable file contains a space, be sure to enclose the path in quotation marks, like so:
"C:\Program Files\My HTML Editor\editor.exe"
-
If you’ll be using documents that have spaces in their file names, add the "%1" parameter after the path:
"C:\Program Files\My HTML Editor\editor.exe" "%1"
-
If you’re changing the Print action, be sure to include the /P switch after the application’s path, like this:
"C:\Program Files\My HTML Editor\editor.exe" /P
-
Creating a New Action for a File Type
Instead of replacing an action’s underlying application with a different application, you might prefer to create new actions. In our HTML file example, you could keep the default Open action as it is and create a new action—called, for example, Open For Editing—that uses Notepad (or another text editor) to open an HTML file. When you select an HTML file and open the File menu, or right- click an HTML file, the menu that appears will show both commands: Open (to invoke Internet Explorer) and Open For Editing (to invoke Notepad). To create a new action for an existing file type, follow these steps:
-
Use the File Types tab to select the file type and then click Advanced to display the Edit File Type dialog box.
-
Click New to display the New Action dialog box.
-
Use the Action text box to enter a name for the action.
Insider Secret In the Action text box, if you precede a letter with an ampersand (&), Windows XP designates that letter as the menu accelerator key. For example, entering Open For &Editing defines E as the accelerator key. You can then press this letter’s key to select the command on either the File menu or the shortcut menu.
-
Use the Application Used To Perform Action text box to enter the full path of the application you want to use for the new action. (Follow the guidelines that we outlined in the previous section.)
-
Click OK.
Changing the Default Action
To change a file type’s default action, follow these steps:
-
Use the File Types tab to select the file type and then click Advanced to display the Edit File Type dialog box.
-
Select the action in the Actions list.
-
Click Set Default; you should now be able to see the selected action displayed in bold type. (If there is but a single action listed, the Set Default button will not be active.)
-
Click OK.
| Insider Secret | When you’re working in Windows Explorer, you occasionally may find that you need to do some work at the command prompt. For example, the current folder may contain multiple files that need to be renamed, a task that’s most easily done within a command line session. Selecting Start, All Programs, Accessories, Command Prompt starts the session in the %UserProfile% folder, so you have to use one or more CD commands to get to the folder you want to work in. An easier way would be to create a new action for the Folder file type that launches the command prompt and automatically displays the current Windows Explorer folder. To do this, select Folder in the File Type column in the Registered File Types list on the File Types tab, click Advanced, and click New. Type Command Prompt in the Action text box, and enter the following in the Application Used To Perform Action text box cmd.exe /k cd "%L" The %L placeholder represents the name of the folder in which the command prompt will appear. Using %L directs Windows XP to display the folder’s long path at the prompt. Note, too, that you can’t edit or delete the new action in the Edit File Type dialog box. If you need to make changes to the action, use the following registry key: HKCR\Folder\shell\ |
Creating a New File Type
Windows XP defines well over 200 file types, but that isn’t nearly enough to cover every possible extension. For example, many applications come with text files named Read.me or Readme.1st. It would be handy to associate these text files with Notepad. That’s not a problem because Windows XP lets you define new file types and create actions for them.
| Tip | If you use Microsoft Word, the .doc extension is associated with Word rather than WordPad. If you like to create small notes in WordPad, it’s a pain to double-click these files and have them open in Word. Instead, you should create a new file type for WordPad documents (using an extension of, say, .pad or .wpd). |
If all you want is to set up an association between a particular file extension and an application, use the Open With list. That is, right-click a file that uses the extension, select Open With, and then select the application you want to use. Again, remember to select the Always Use The Selected Program To Open This Kind Of File check box.
If you need to define more than just the Open action for a new file type (for example, you might also want a Print action for the file type), you need to use the File Types tab. Here are the steps to follow:
-
On the File Types tab, click the New button. The Create New Extension dialog box appears.
-
Enter the new extension in the File Extension text box.
-
If you want the new file type to have the same actions as an existing file type, click Advanced and use the Associated File Type list to select the file type you want to use.
-
Click OK.
If you didn’t associate the new file type with an existing file type, use the Change and Advanced buttons on the File Types tab to modify the new file type’s actions, as we discussed in the previous section. However, if you did associate the new file type with an existing file type, you should select the new entry in the Registered File Types list, click the Advanced button, and ensure that the listed actions are appropriate for this new file type, and that the correct action—if any—is selected as the default.
As a consultant, I am obliged to carry my office around with me in the form of a laptop. This represents both an asset and, sometimes, a liability. Like many computer-using professionals, I have to back up my laptop files to limit my liability from losses in the unfortunate event that my laptop is stolen or damaged. Any number of software programs and backup devices can be configured to do this, but I have an even easier way, and it’s built right into Windows XP.
The feature is called offline files, and what I do is set up a network- shared folder on the computer in my home and also set up my laptop to work with those files offline. After creating the original set of new files on the home computer and saving them in that network-shared folder, I can then use this feature on my laptop to store all of my documents in the “offline files” folder on the laptop, and that folder is automatically synchronized every time I connect to my home network. In this way, I always have an up-to-date version of my files on both my laptop and my home computer! The steps to accomplish this synchronization are as follows:
-
On the laptop computer, turn off Fast User Switching if it’s currently selected; see Chapter 5, “Managing Logons and Users,” for details. (You can’t use offline files while Fast User Switching is selected.)
-
On the laptop, open Windows Explorer and select Tools, Folder Options to display the Folder Options dialog box.
-
On the Offline Files tab, select the Enable Offline Files check box, as shown in Figure 7-4.
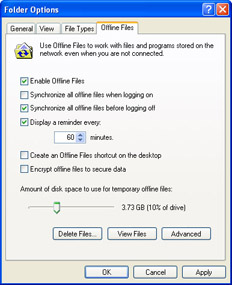
Figure 7-4: : Select the Enable Offline Files check box to establish support for offline files. -
Select Synchronize All Offline Files Before Logging Off to get a full synchronization. A full synchronization ensures that you have the most current version of every shared network file that you work with offline. Alternatively, leave this check box cleared for a quick synchronization. A quick synchronization ensures that you have complete versions of your offline files, although they may not be the most current versions. You might select a quick synchronization if you are the only person working on a file or if you do not need the most current version of a file.
-
Set the other options, as needed, and then click OK.
Here are some notes to bear in mind when working with offline files on the laptop:
-
Making a file or folder available offline. Open Windows Explorer, navigate to the home computer’s listing of files and folders, right-click the shared folder or file you want to work with on the laptop, and then select Make Available Offline. The first time you do this, the Offline Files Wizard appears so that you can set some options for offline files. In subsequent operations, Windows XP just synchronizes the folder or file by placing it in your laptop computer’s Offline Files folder.
-
Synchronizing offline files. In Windows Explorer, select the Tools, Synchronize command, select the check boxes beside the items you want to synchronize in the Offline Files list, and then click Synchronize.
-
Viewing a list of all offline files. In Windows Explorer, select the Tools, Folder Options command, select the Offline Files tab, and click View Files.
-
Making a network file or folder unavailable offline. In Windows Explorer, right-click the shared network file or folder and then clear the Make Available Offline command. Note that when an entire folder is selected and made available for offline processing, you cannot subsequently select any of the individual files in that folder to make them unavailable.
—Geoff Winslow
-
EAN: 2147483647
Pages: 126