A Dozen Little-Known Windows Explorer Techniques
Since everyone has to perform file and folder maintenance chores, Windows Explorer (or its My Computer incarnation) is probably one of the most familiar of the programs that come with Windows XP. However, like any reasonably complex program, Windows Explorer has hidden nooks and crannies that few people have seen. This section presents our list of 12 of the most useful of these little-known Windows Explorer facts.
Viewing Extra Details
Windows Explorer’s Details view (displayed when you select View, Details) is the preferred choice for power users because it shows you not only the name of each file but also its size, type, and the date it was last modified. These particulars are useful, to be sure, but Windows XP’s version of Windows Explorer can display many more file tidbits, including the following:
-
For Music files Windows Explorer can show the duration, the bit rate at which the song was recorded, and sometimes even the artist and album name.
-
For Images Windows Explorer can show the image dimensions and, for digital camera images, the date the picture was taken and the camera model used.
-
For Microsoft Office files Windows Explorer can show the author name, document title, subject, comments, and number of pages.
To see these and other extra details, select View, Choose Details. The Choose Details dialog box that appears (see Figure 7-1) enables you to select the check boxes for the details you want to see, as well as rearrange the column order. Note, too, that you can also choose details by right-clicking any column header in Details view.
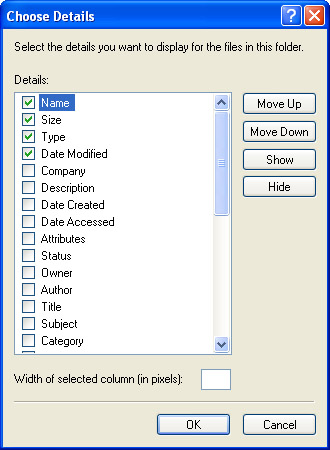
Figure 7-1: Use the Choose Details dialog box to add or remove columns in Windows Explorer’s Details view.
Choosing “No To All” When Copying or Moving
When you copy or move a file and the destination folder has a file with the same name as a file in the original folder, the Confirm File Replace dialog box appears and asks whether you want to replace the file in the destination folder with the one being copied or moved. If you’re moving multiple files and there are multiple potential file replacements in the destination folder, the dialog box will have a Yes To All button that you can click to avoid being prompted about each file.
That’s fine if you want to replace every file, but what if you don’t want to replace any files? Rather than clicking No for each prompt, hold down the Shift key and click No. This tells Windows Explorer not to replace any files, so it’s the next best thing to having a No To All button.
Determining Selection Size
When you select one or more files and folders, the Windows Explorer status bar (which is turned off by default; select View, Status Bar to see it) shows you how many objects you’ve selected and the total size of the selected objects. However, the status bar numbers don’t take into account any objects that might be inside a selected folder or subfolder. To allow for subfolders and their contents, right-click the selection and then select Properties. In the property sheet that appears, Windows Explorer shows you both the actual Size of the selected objects and the Size On Disk of the objects.
| Insider Secret | What’s the difference between the Size and Size On Disk values? Windows XP stores files in discrete chunks of hard disk space called clusters, which have a fixed size. This size depends on the file system and the size of the partition, but 4 KB is typical. The important thing to remember is that Windows XP always uses full clusters to store all or part of a file. Suppose, for example, that you have two files, one that’s 2 KB and another that’s 5 KB. The 2-KB file will be stored in an entire 4-KB cluster. For the 5-KB file, the first 4 KB of the file will take up a whole cluster, and the remaining 1 KB will be stored in its own 4-KB cluster. So the total size of these two files is 7 KB, but they take up 12 KB on the hard disk. |
Running Windows Explorer in Full-Screen Mode
If you want the largest possible screen area for the contents of each folder, you can place Windows Explorer in full-screen mode by holding down Ctrl and clicking the Maximize button. (If Windows Explorer is already maximized, you first need to click the Restore button.) This mode takes over the entire screen, removes the text from the toolbar buttons, turns off the title bar, menu bar, status bar, and Address bar, and hides the Folders list. (To choose a menu command, hold down Alt and press the menu’s accelerator key, such as Alt+F for the File menu; to see the Folders list, move the mouse pointer to the left edge of the screen.) To restore the window, click the Restore button.
| Tip | You can customize the Windows Explorer toolbar to display a Full Screen button. Right-click the toolbar and then select Customize to display the Customize Toolbar dialog box. In the Available Toolbar Buttons list, click Full Screen and then click Add. |
Making Quick Backup Copies
Before working on a file, you might want to make a backup copy just in case something goes wrong. A quick way to do this is to select the file, press Ctrl+C, and then Ctrl+V. This makes a copy of the file with Copy of preceding the name in the same folder as the original file. Note, too, that you can also use this trick with folders.
Dragging and Dropping via the Taskbar
This is a two-for-one tip:
-
Drag a file to a hidden window. If you want to drag a file from Windows Explorer and drop it on a window that you can’t see (because one or more other windows are on top of it), first hover the mouse over that window’s button on the taskbar. After a second or two, Windows XP will bring that window to the foreground, so you can then drop the file on the window.
-
Drag a file to the desktop. If you want to drag a file from Windows Explorer and drop it on the desktop (either to place it in the Recycle Bin or to create a desktop shortcut), and the desktop is covered, first hover the mouse over an empty area of the taskbar. After a second or two, Windows XP will minimize all open windows, leaving the desktop exposed. Drop the file on the desktop or on an application icon, not on the taskbar.
Customizing the Send To Command
Windows Explorer’s Send To command (displayed when you select File, Send To or when you right-click a file name and then select Send To) displays a menu of locations, such as My Documents, or your floppy drive. If you select one of these menu items, Windows Explorer moves or copies the selected files or folders to that location. Interestingly, most of the Send To items are shortcuts that reside in the %UserProfile%\SendTo folder. (The exceptions are the Send To items that represent your floppy disk, writable CD drive, or other removable media.) This means that you’re free to add your own shortcuts to this folder, and they’ll appear on the Send To menu. For example, you could add a shortcut for a target folder, drive, or network drive that you use frequently. However, there’s no reason you have to restrict the Send To commands to folders and disk drives only. Since you can create shortcuts for just about anything in Windows XP, you can populate the Send To folder with any number of interesting destinations, including printers, the Recycle Bin, and even executable files (for sending documents to open in that program). To add such a destination, right-click and drag a resource—a printer entry from Control Panel, an application’s executable file in Windows Explorer, and the like—and then drop the resource in the %UserProfile%\SendTo folder, selecting Create Shortcuts Here from the shortcut menu.
Searching Faster with the Indexing Service
Windows Explorer’s Search tool (accessed by selecting View, Explorer Bar, Search, or by clicking the Search button) enables you to search for files based on name, modification date, and size. But the most powerful Search feature is the ability to search based on the contents of files. Enter a search term into the A Word Or Phrase In The File text box, and Windows Explorer will match the word or phrase with those files that contain the text. This process works well if you’re searching only a few documents, but if you have hundreds or even thousands of documents, the search can be very slow. To speed things up considerably, use the Indexing Service, which indexes the files’ contents so that the search process examines just the index rather than the files themselves.
To use the Indexing Service, start the Search tool to open the Search Companion in the left pane, click Change Preferences, click With Indexing Service, and then select the Yes, Enable Indexing Service option.
Running Windows Explorer from the Command Line
For extra control over how Windows Explorer starts, you can use a few command-line options in the Run dialog box or from the command prompt. Here’s the syntax:
EXPLORER [/N]|[/E],[/ROOT,[folder]] [/SELECT,subfolder]
/N | Starts Windows Explorer without the Folders list. |
/E | Starts Windows Explorer with the Folders list. |
/ROOT,folder | Specifies the folder that will be the root of the new Windows Explorer view. (In other words, folder will appear at the top of the Folders list.) If you omit this switch, the desktop is displayed as the root. |
/SELECT,subfolder | Specifies the subfolder of the root folder to display in the Folders list. If you don’t also include the /ROOT switch, the subfolder is selected only in the contents pane. |
| Note | If you run the EXPLORER command without any switches, Windows XP launches My Computer. |
For example, if you want to open Windows Explorer with C:\Windows as the root and you want the C:\Windows\System32 folder displayed in the contents pane, use the following command:
explorer /e, /root,c:\windows /select,c:\windows\system32
Here’s another example that opens Windows Explorer with the current user’s profile folder selected:
explorer /e, /root, /select,%userprofile%
| Tip | A quick way to start Windows Explorer is to press |

Moving the My Documents Folder
The default location of the My Documents folder is %UserProfile% \My Documents. This is not a great location because, in general, it means that your documents and Windows XP are on the same hard disk partition. If you have to wipe that partition in order to reinstall Windows XP or some other operating system, you’ll need to back up your documents first. Similarly, you may have another partition on your system that has lots of free disk space, so you may prefer to store your documents there. For these and other reasons, moving the location of My Documents is a good idea. Here’s how:
-
In Windows Explorer, right-click My Documents and then select Properties. The property sheet for My Documents appears.
-
On the Target tab, use the Target text box to enter the drive and folder where you want your documents stored. (Or click Move to select the folder using a dialog box.).
-
Click OK. (If Windows Explorer asks if you want to create the new folder and then to move your documents to the new location, click Yes in both cases.)
Restricting Windows Explorer’s Features with Group Policies
If other people use your computer, you might want to disable certain features of Windows Explorer to prevent problems. For example, you might want to remove the Folder Options command from the Tools menu, hide certain drives, or disable Windows XP’s CD burning features. You can do all of this and much more via the Group Policy editor. Select User Configuration\Administrative Templates\Windows Components\Windows Explorer, and enable the policies you want to work with (see Figure 7-2).
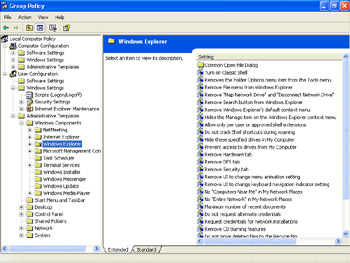
Figure 7-2: Use the Windows Explorer policies to customize Windows Explorer for the current user.
Working with Compressed Folders
When you download files from the Internet, they often arrive as ZIP files (they use the .zip extension). These are compressed archive files that contain one or more files that have been compressed for faster downloading. Windows XP offers built-in support for these files, but calls them compressed folders. Why a “folder”? Because a ZIP file “contains” one or more files, just like a regular folder. As you’ll see, this makes it easy to deal with the files within the ZIP file, and it enables Windows XP to offer a few useful compression and decompression features.
To see what’s inside a ZIP file, double-click it. Windows XP opens a new folder window that shows the name of the ZIP file in the Folders list and the files within the ZIP file in the Contents list. From here, use the following techniques to work with the archived files:
-
To extract some or all of the files, select them, drag them out of the compressed folder, and then drop them on the destination folder.
-
To extract all the files, select File, Extract All to launch the Extraction Wizard.
-
To run a file (such as a program’s setup file) from the compressed folder, double-click the file. Likewise, if the file is an object file and you double-click that file name, the program associated with the object file’s extension is started and the object is opened in that application program.
Besides viewing existing ZIP files, Windows XP also enables you to create new ZIP files via either of these two methods:
-
Select the objects you want to store in the ZIP file and then run the File, Send To, Compressed (Zipped) Folder command. Windows XP creates a ZIP file with the same primary name as the first selected file. For example, if the first file is Project.doc, the compressed folder is Project.zip.
-
Create a new, empty ZIP file by selecting the File, New, Compressed (Zipped) Folder command. Windows XP creates a new ZIP file with an active text box for the new file name. Edit the name and press Enter. You can then drag the files you want to archive and drop them on the ZIP file.
| Tip | If you don’t want just anyone to be able to extract files from a ZIP, Windows XP enables you to encrypt a ZIP with a password. To do this, double-click the ZIP to open it, and then select File, Add A Password. Use the Add Password dialog box to enter a password (twice) and click OK. |
EAN: 2147483647
Pages: 126