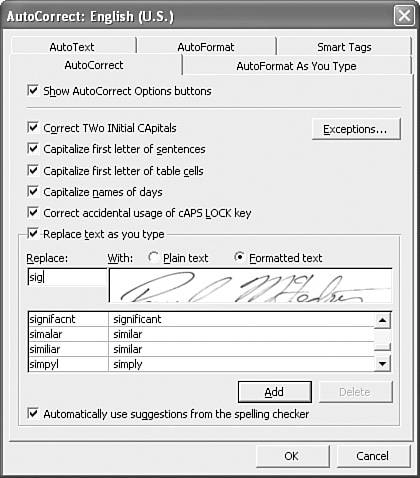
AutoCorrect Tricks
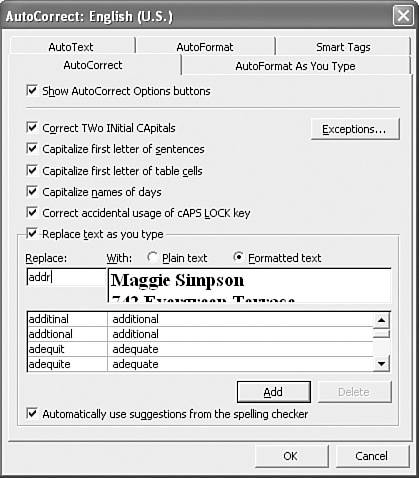
| The economists tell us that productivity has increased dramatically over the past 10 years or so. They have many explanations for this rise (they are economists, after all), but as far as I know, no one has studied what I believe is the real reason productivity is up: the AutoCorrect feature that has been part of Word for most of those 10 years. This likely sounds preposterous to you, and of course, it is. But not by much. We're all now so used to AutoCorrect that we forget (and certainly don't notice) that several times each day we still spell "the" as "teh," "other" as "otehr," and "different" as "differnet"; in each case, AutoCorrect is there to catch and repair the blunders. Without any fanfare, AutoCorrect quietly adds the proper accents to "cliché" and "café," fixes finger fumbles such as "I;ll" and "showinf," and sorts out nonsense such as "andt he" and "sot hat." If you type a lot, this probably happens dozens of times a day, perhaps even hundreds if your eye-finger coordination isn't what it used to be. Imagine how much time it would take out of your busy day to have to go back and fix all those typos? One shudders to think about it. So AutoCorrect is certainly a useful productivity booster, whether the economists realize it yet or not. But it can be made even better, as the next few sections show. Reversing AutoCorrectIf AutoCorrect changes a word and you prefer to keep your original spelling, you can reverse the correction immediately by pressing Ctrl+Z or selecting Edit, Undo AutoCorrect. However, this works only if the correction was the last action performed in the document. If you did anything else after the correctiontyped or deleted text, applied formatting, and so onthe Undo command won't work. Luckily, you can still reverse the correction by placing the mouse pointer over the word until you see an underline appear. Move the mouse over the underline to reveal the AutoCorrect Smart Tag. Click the Smart Tag and then click Change Back to "text," where text is the uncorrected version of the text, as shown in Figure 1.1. Figure 1.1. Click the AutoCorrect Smart Tag to reverse the correction.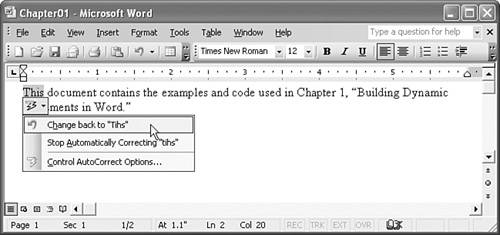
Note, too, that you can also tell Word to stop making this correction permanently by clicking Stop Automatically Correcting "text", where text is the original text.
Moving AutoCorrect Entries to Another ComputerIf you've spent seemingly endless hours adding your own AutoCorrect entries (and perhaps also deleting some of the default entries), it can be daunting to contemplate replicating your customized list on another computer. Fortunately, you don't have to go to all that much trouble because Word 2003 comes with an AutoCorrect Utility that automates this process. The idea is that you first back up your existing AutoCorrect entries to a file, and then you apply that file to the other computer. To use the AutoCorrect Utility, open the Support.dot template found in the following folder: C:\Program Files\Microsoft Office\Office11\Macros
Click the AutoCorrect Backup macro button to launch the AutoCorrect Utility, shown in Figure 1.2. Click Backup to gather the AutoCorrect entries. When the Save As dialog box appears, choose a location for the backup file and then click Save. (Note that the default AutoCorrect Backup file is about 600KB, so you should be able to fit yours on a floppy, if necessary.) Figure 1.2. In the Support.dot template, click the AutoCorrect Backup macro button to launch the AutoCorrect Utility.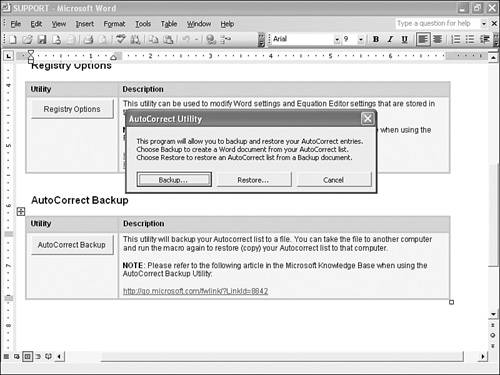 Now move to the other computer, open Support.dot, and click the AutoCorrect Backup button. Click Restore and then click Yes when the macro asks if you want to continue. In the Open dialog box, select the AutoCorrect Backup file and then click Open.
Entering Boilerplate Text AutomaticallyDo you have a phrase, a sentence, or even multiple paragraphs that you use regularly? Typing these bits of boilerplate text can be tedious and it's certainly time-wasting. To stop throwing away those precious seconds and minutes, you can convince Word to store the boilerplate and then recall it with a few keystrokes. You can do this using either AutoCorrect or AutoText. Using AutoCorrect to Enter Boilerplate TextHere's how to store and use boilerplate text with Word's AutoCorrect feature:
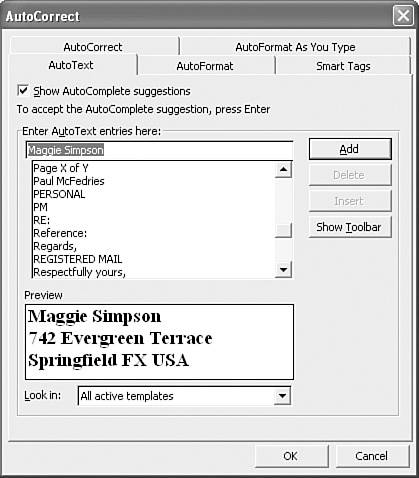
To use the boilerplate, type the abbreviation you entered in step 5 and then type a space or punctuation mark, or press Tab or Enter. Using AutoText to Enter Boilerplate TextInstead of using AutoCorrect for boilerplate, you can use Word's AutoText feature. The difference is that with an AutoText entry you need to type the first few characters of the boilerplate text. Word then displays an AutoComplete balloon showing you the rest of the text, and you press Enter to complete the text. Some people prefer this route because it doesn't require remembering various abbreviations, as does the AutoCorrect technique. Here's how to store and use boilerplate text with Word's AutoText feature:
To use the boilerplate, type the first few letters of the text and then press Enter. You can also access AutoText entries via the AutoText toolbar. Right-click any toolbar and then click AutoText to display the toolbar, as shown in Figure 1.5. Click All Entries, click an AutoText category, and then click the entry you want to insert. Figure 1.5. For easy access to AutoText entries, display the AutoText toolbar.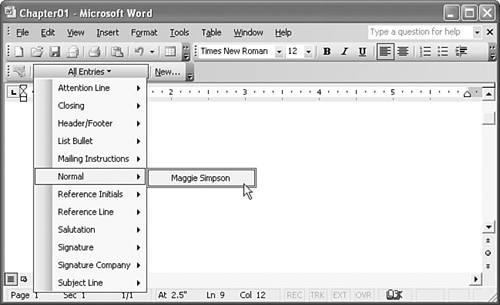 Note, too, that you can add an AutoText entry by selecting the text, clicking the AutoText toolbar's New button, and entering the text in the Create AutoText dialog box.
Creating a Customizable AutoCorrect EntryMost boilerplate text is static and can be inserted into documents without modification. However, you may occasionally use boilerplate text that requires customization. For example, you might need to replace a date within the boilerplate with the current date. You could insert the boilerplate and then edit the date by hand, but our goal in this chapter is to create dynamic documents. To that end, you can handle this kind of customization chore by replacing the boilerplate text that requires customization with a field that performs the customization automatically. For example, by replacing the date with a { DATE } field, AutoCorrect automatically uses the current date each time you insert the boilerplate text.
For an even higher level of customization, you can get Word to prompt you (or a user) to insert the required data. You do this by replacing the boilerplate text that requires customizing with the { FILLIN Prompt } field, where Prompt is a message that prompts the user. When AutoCorrect inserts the boilerplate, it displays a dialog box to prompt for the required data. Using AutoCorrect to Insert Your SignatureOne of AutoCorrect's most powerfulbut, inexplicably, one of its least usedfeatures is its capability to insert graphics. You can associate any image with a bit of text, and AutoCorrect will replace that text with the image. There are many uses for this, but perhaps the handiest is inserting a scanned version of your signature. This is a great way to "sign" any document that you're going to fax or distribute without it being printed. Here are the steps to follow:
Creating Border Lines On-the-FlyIf you want to display a border between two paragraphs, one way to do it (as shown in Figure 1.7) is to drop down the Outside Border tool and then click the Top Border button (assuming the cursor is in the second of the two paragraphs; if it's in the first paragraph, click the Bottom Border tool instead). Figure 1.7. Use the Outside Border tool to add a border between paragraphs.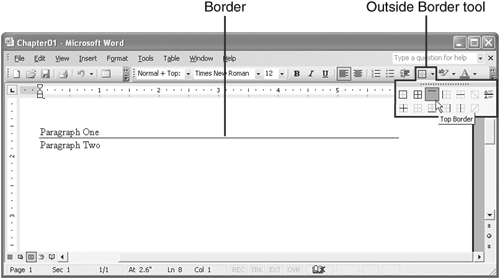 If you're a dedicated keyboardist, you can avoid the mouse clicking entirely and insert the same line by pressing hyphen () three or more times and then pressing Enter. Either technique works nicely as long as you want the default border, which is a thin, straight line. If you want a different stylefor example, a thicker line or a wavy lineyou need to select Format, Borders and Shading and then choose your options in the Borders and Shading dialog box. Or do you? Interestingly, the +Enter keyboard shortcut has five cousins that produce different line styles:
Figure 1.8 shows the resulting lines. Figure 1.8. Examples of borders you can create on-the-fly using your keyboard.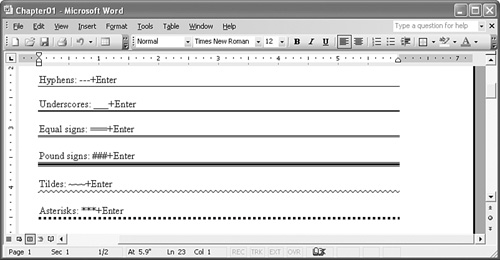
Creating Table Cells On-the-FlyWord offers some powerful tools for building document tables. But if all you need is one or more cells in a single row, you can create a table with just a few keystrokes. The secret here is that Word interprets the following keys as the instruction to make a single table cell: +--+ That is, if you type a plus sign (+), two hyphens (), another plus sign (+), and then press Enter, Word converts your typing into a table cell. For multiple cells in the same row, just extend the idea. For example, pressing Enter after entering the following text creates a one-row table with four cells: +--+--+--+--+ For wider cells, type more hyphens, as in this example: +--+----+--------+----------------+ For multiple-row tables, enter the plus signs and hyphens on consecutive lines, as in this example that creates a table with three rows and four columns: +--+--+--+--+ +--+--+--+--+ +--+--+--+--+ Figure 1.9 shows several tables created using this method. Figure 1.9. Examples of tables that you can create on-the-fly using your keyboard.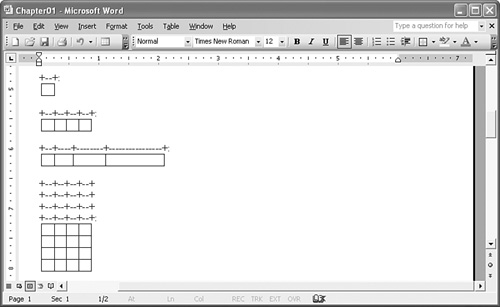
Creating Custom Bulleted Lists On-the-FlyWhen you need a bulleted list, the usual route is to select Format, Bullets and Numbering, and use the Bullets and Numbering dialog box to set up the list. However, AutoCorrect also enables you to create bulleted lists on-the-fly. The easiest way to go about this is to first type any of the following characters (to type an em dash, press Ctrl+Alt+-, the minus sign on your numeric keypad): * o (em dash) > > => Then press Tab or the spacebar, enter the first bullet text, and press Enter. (If you use the lowercase o as the starting character, you must press Tab to create the bulleted list.) Word converts the paragraph into a bulleted list and starts a second bullet. Figure 1.10 shows the various bullet styles created by each character in the left column. Figure 1.10. Examples of bullets you can create on-the-fly using your keyboard.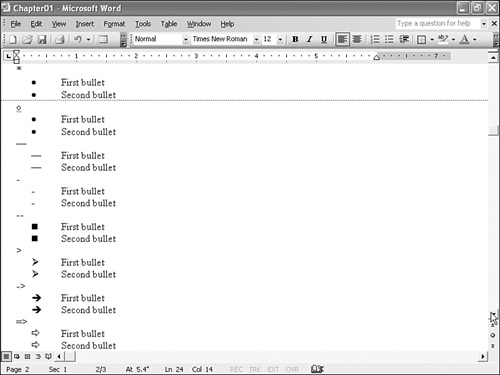
This also works if you want to use a picture as the bullet. Select Insert, Picture, From File, and use the Insert Picture dialog box to select the image you want to use. Note that the following folder contains a number of images suitable for bullets: C:\Program Files\Microsoft Office\Media\Office11\Bullets Click Insert to add the picture to the document. Press Tab or the spacebar, type the bullet text, and then press Enter to convert the text into a list with the picture as the bullet.
|
EAN: 2147483647
Pages: 129