| Word maintains a collection of properties for each document, and these properties represent metadatadata about the document itself. The default properties include the document's title, subject, author, and statistics such as the number of characters, words, paragraphs, and pages. Word generates the values of many of these properties automatically. For example, Word calculates all the statistics based on the document content, and the default values for the Author and Company properties are the values you entered when you installed Word. The other properties you fill in by hand by selecting the File, Properties command and clicking the Summary tab. Change Your Name and Company Office stores the default Author and Company values in the Registry. To change the Author value, select Tools, Options, click the User Information tab, and then change the Name value. The default Company name is trickier to change. First, open the Registry Editor and navigate to the following branch (see Appendix A "Working with the Windows Registry"): [View full width] HKEY_LOCAL_MACHINE\Software\Microsoft\Windows\CurrentVersion  \Installer\ \Installer\  UserData\S-1-5-18\Products\9040111900063D11C UserData\S-1-5-18\Products\9040111900063D11C
Edit the RegCompany setting with the new company name you want to use. Now navigate to the following branch: HKEY_CURRENT_USER\Software\Microsoft\Office\11.0\Common\UserInfo
Rename the Company setting (to OldCompany, for example). The next time you start Word, any new documents you create will use the new company name as the Company property. |
Creating a Custom Document Property You can also create your own custom properties, and you can set these up to be filled in either automatically or manually. For example, if you are passing a document among a number of people, you may want to keep track of who last read the document. To do that, you could create a "Last Read By" property and have each user fill in his or her initials. Here are just a few other custom property ideas: The name of the person who edited or proofread the document. The date the document was completed. The department the document belongs to. The project that the document is part of. The current status of the document. A telephone number to call for more information about the document.
Before creating your custom property, you need to decide whether you want the value of the property to be generated automatically by content within the document itself. In Word, custom property values are generated by the current values of bookmarks. Therefore, you must first create a bookmark: 1. | Select the text that you want to use as the bookmark.
| 2. | Select Insert, Bookmark to display the Bookmark dialog box.
| 3. | Type a name for the bookmark in the Bookmark Name text box.
| 4. | Click Add.
|
View Your Bookmarks Using a bookmark as a dynamic property value placeholder works only if the other users (or you, in a few weeks, when you've forgotten you've done all this) update the bookmark text in the appropriate spot. You can help ensure that this happens by turning on Word's bookmark indicators, which are gray brackets that surround the text. To turn on these indicators, select Tools, Options, click the View tab, and activate the Bookmarks check box. |
With that done, you can create the custom property by following these steps: 1. | Select File, Properties to display the document's Properties dialog box.
| 2. | Click the Custom tab.
| 3. | Type a name for the property in the Name text box (or select one of the existing names provided by Word in the list).
| 4. | Use the Type list to choose a data type for the property: Text, Date, Number, or Yes or No.
| 5. | If you want the property value generated automatically by a bookmark, activate the Link to Content check box.
| 6. | Specify the value of the property as follows:
If you activated Link to Content, use the Value list to choose the name of the bookmark you want to associate with the property. Otherwise, enter the property value in the Value text box.
| 7. | Click Add. Word adds the property to the Properties list. Figure 1.11 shows an example.
Figure 1.11. A custom document property named BookTitle is added to the document and linked to the TitleOfBook bookmark. 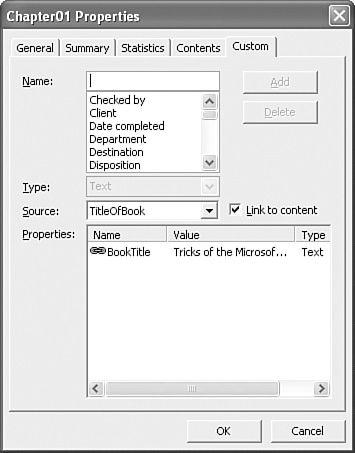
| 8. | Click OK.
|
Prompting for User Input If you're relying on users to enter the data necessary to update a custom property, you can get Word to prompt the user to enter the data by using a FILLIN field. See "Prompting the User for Input," later in this chapter. |
Searching via Document Properties One of the main advantages of using custom properties is that they enable you to organize documents based on those properties. Specifically, you can use the Search task pane to search for documents that not only include a custom property but also have that property set to a particular value. Follow these steps: 1. | Select File, File Search to display the Basic File Search task pane.
| 2. | Click Advanced File Search to switch to the Advanced File Search task pane.
| 3. | Use the Property list to choose the property you want to include in the search. If your custom property doesn't appear in the list, type the property name into the text box.
| 4. | In the Condition list, choose an operator. (For example, to find those documents in which the property exactly matches a certain value, choose the is (exactly) operator.
| 5. | Use the Value text box to enter the property value you want to search for.
| 6. | Click Add to add the criteria to the search expression. Figure 1.12 shows an Advanced File Search pane ready to search on the BookTitle custom document property.
Figure 1.12. Use the Advanced File Search pane to search for files based on document properties. 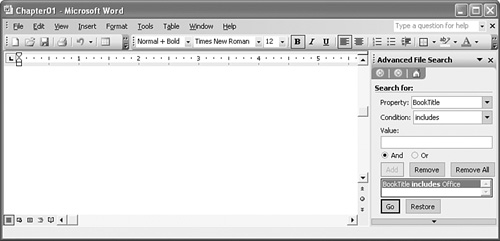
| 7. | Repeat steps 36 to add other criteria. (Be sure to click And or Or before adding the criteria to the expression.)
| 8. | Fill out the rest of the search options, as needed.
| 9. | Click Go. Word searches for documents that match your criteria.
|
|