Using Fields to Insert Dynamic Data
| The real secret to creating truly dynamic documents in Word is a little-known and even less understood feature called the field. A field is a miniprogram that generates or calculates a result and then displays that result in your document or stores it in a bookmark. Each field consists of code that resides inside a placeholder that you can put anywhere inside your document. Word has dozens of these codes, and they all generate data based on various kinds of information, such as the following:
The dynamism of the field comes from the fact that any of this information can change over time. When it does, the result displayed by the field also changes when the field is updated. Even if you've never used fields directly (or haven't even heard of them), you've probably worked with fields at least indirectly. For example, if you select Insert, Date and Time, you're actually inserting a field that displays the current date or time (or both, depending on the format you select in the Date and Time dialog box). Similarly, if you've ever inserted page numbers, a table of contents, or a cross-reference, you've inserted a field in each case. These examples serve as a reminder for an important field caveat: Fields can be amazingly powerful, but remember that Word often provides easier and more direct methods for accomplishing a field-related task. In general, if a field or field equivalent is also available via a menu command, a toolbar button, or some other part of the Word interface, you should always use the interface method. It saves times and reduces the chances that you'll make a mistake. Inserting a FieldBesides using Word's built-in features (such as the Insert menu's Date and Time or Page Numbers commands) to insert fields, you can also add fields to your document using two other methods: using the Field dialog box and manually, as discussed in the next few sections. Using the Field Dialog BoxThe Field dialog box is the quickest and safest way to insert a field, because it acts as a front end for the 70-odd Word fields and their myriad properties and switches. (A switch is extra code added to the field that determines the look or behavior of the field.) Here are the general steps to follow to insert a field:
Understanding Field Code SyntaxBefore you learn how to insert a field manually, you need to know the syntax used by field codes. The Field dialog box can help. First, here's the general syntax: { FIELD instructions } The braces serve to enclose the field code. The FIELD part is the name of the field. This is usually seen with all uppercase letters, but field names aren't case sensitive. (In this book, I use the all-uppercase format in the code examples. However, when I discuss fields in the main text, I'll use the initial caps or inner caps format: Date, EditTime, and so on.) The instructions part consists of the elements that control the behavior of the field and the look of its result. They correspond to the controls displayed in the Field Properties and Field Options areas of the Fields dialog box. There are often several items in the field instructions, and these items can include document elements (such as the name of a bookmark) and switches. Most instructions are not case sensitive, but a few are, as you'll see a bit later (for example, see Table 1.1).
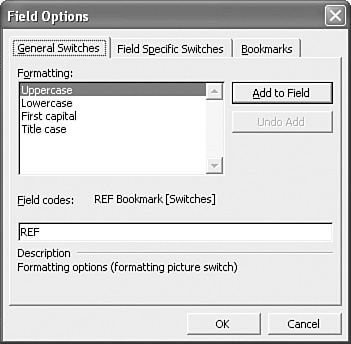
The Ref field, for instance, displays the value of a bookmark. Among the many switches you can add to this field, the \* lower switch formats the displayed text as lowercase, and the \h switch sets the field as a hyperlink (that is, Ctrl+clicking the field takes you to the bookmark). Here's the field code that displays the value of a bookmark named FileName in lowercase as a hyperlink to the bookmark: { REF FileName \* lower \h } To help you learn not only the field names but also the instructions that go along with each field, open the Field dialog box, select the field, and then click the Field Codes button. The dialog box changes to show the field code and the general syntax for the field, as shown in Figure 1.14. Figure 1.14. Click Field Codes to see this version of the Field dialog box.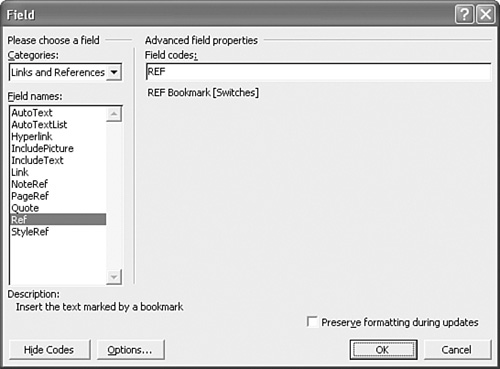 To add further instructions to the code, click Options to display the Field Options dialog box, the layout of which depends on the field. Figure 1.15 shows the Field Options dialog box for the REF field. Figure 1.15. Click Options to display the Field Options dialog box for the selected field. For most fields, the Field Options dialog box has two tabs: General Switches and Field-Specific Switches. As the name implies, the items in the Field-Specific Switches tab are specific to the field you're working with. The General Switches are used in multiple fields, and they fall into three categories: format, numeric picture, and date-time picture. The format switches all begin with the characters \* (followed by a space) and they handle character formatting, case conversion, and number conversion, as detailed in Table 1.1. A numeric picture switch begins with the characters \# (followed by a space). You use it to specify how you want Word to display a numeric result. You build a numeric picture switch using the symbols described in Table 1.2.
If you want to include a word or phrase within the results, you must enclose the entire numeric picture in quotation marks. For example, the following switch adds the phrase ° Celsius to the result: \# "#0.0° Celsius"
If you want to use a different numeric picture for a result depending on whether it's positive, negative, or zero, use the following syntax: \# positive;negative;zero The three parts, separated by semicolons, determine how various numbers are presented. The first part defines how a positive number is displayed; the second part defines how a negative number is displayed; and the third part defines how zero is displayed. For example, the following switch specifies different pictures for positive, negative, and zero results (note the parentheses specified for the negative result): \# $0;($0);0 If you leave out the zero picture, a zero result uses the positive picture: \# $0;($0) A date-time picture switch begins with the characters \@ (followed by a space). You use it to specify how you want Word to display a date or time result. You build a date-time picture switch using the symbols described in Table 1.3.
Inserting a Field ManuallyIf you know the code for the field you want to insert and that code is relatively simple, it's often fastest to insert the field by hand. To do that, move the cursor to where you want to insert the field and then press Ctrl+F9. As you can see in Figure 1.16, Word inserts a new, empty field that includes only the braces. Type the code between the braces, as shown in Figure 1.17. When you're done, press F9 to update the field and display its result. Figure 1.16. Press Ctrl+F9 to start a new field.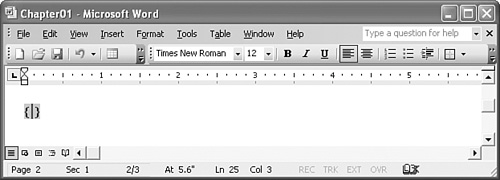 Figure 1.17. Type the field code between the braces.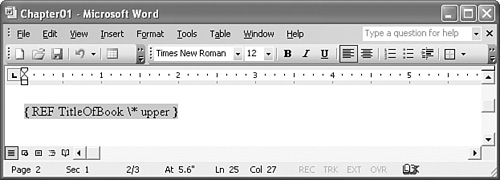 Viewing and Navigating FieldsAfter you insert a field, Word displays the field results. If you want to do further work with any of a document's field, you need to be able to view and navigate the fields, as described in the next two sections. Toggling Field CodesIf you want to view a field's underlying code, you need to toggle the field from showing its results to showing its code. You can use either of two methods:
Navigating a Document's FieldsBefore you can work with a field, you need to navigate to it within the document. This isn't a problem if you're dealing with only a couple of fields and you know exactly where they are. You just click inside the field and Word marks the occasion by shading the full field result. If you need to select the entire field (to move it or delete it, for example), either use your mouse to click and drag over the entire field, or move to the right of the field and press Backspace.
However, fields have a nasty habit of blending in with the surrounding text; it's easy to lose fields and have trouble finding them. Toggling all the document's fields to code can help, but many people find it easier to navigate from field to field. Word gives you two techniques to work with:
As you navigate, Word selects each field. Unfortunately, these techniques don't wrap. That is, after you've navigated to the last field in a document, pressing F11 doesn't take you to the first field in the document; similarly, pressing Shift+F11 in the first field doesn't take you to the last field. Updating a FieldFields are dynamic, which means that the data underlying the field can change. For example, if you insert a field to show the current date, the underlying data changes each day. However, Word does not automatically update the field result. To update fields on-the-fly, use any of the following techniques:
Updating All Fields with a MacroWhen you're working with fields, it's common to need to update all of a document's fields at once. One way to do this is to select the entire document and press F9. This works, but it's a hassle because not only must you perform the extra step of selecting the entire document, but that extra step also means that you lose your current cursor position. To avoid this problem, create a VBA macro that updates all the document's fields. Press Alt+F11 to open the VBA Editor, add a module to the Normal project, and then enter the sub-procedure shown in Listing 1.1 (see Figure 1.18). Figure 1.18. Add the UpdateAllFields procedure to the Normal project to make it available for all your documents.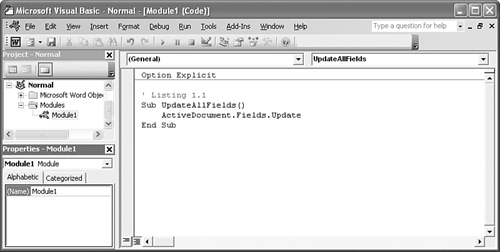 Listing 1.1. A Macro to Update All the Fields in the Active DocumentSub UpdateAllFields() ActiveDocument.Fields.Update End Sub Assign this macro to a toolbar button or keyboard shortcut. (I use Ctrl+Alt+Shift+F9.)
Updating Fields When Opening a DocumentIt's often useful to update all of a document's fields when the document is opened. Word doesn't do that by default, but you can create a macro that does. Launch the VBA Editor and open the project that corresponds to your document. In the project's Microsoft Word Objects branch, double-click the ThisDocument object. In the code window that appears, select Document in the object list and select Open in the event list. Add the following statement to the Document_Open() stub that appears: ThisDocument.Fields.Update Figure 1.19 shows the completed code. Figure 1.19. Add this code to your document's Open event to update all fields each time the document is opened.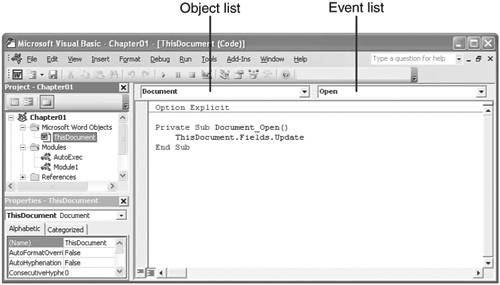
Updating Fields by Field TypeRather than updating all the fields in a document, you might prefer to update only fields of a particular type. For example, the EditTime field displays the total time, in minutes, that the document has had the system focus (and, presumably, has been edited) since the document was created. This is the same as the Total editing time value displayed in the Statistics tab of the document's Properties dialog box (select File, Properties). If you want to track the total editing time, it's often convenient to add the EditTime field to the document rather than opening the dialog box. But if you have other fields in the document that you'd rather not update at the same time, it would be useful to be able to update only the EditTime field. You can do this quite simply using a VBA macro. In VBA, Word's field types are implemented as constants with the following form: wdFieldFieldType Here, FieldType is the type of field, such as EditTime. So the constant for the EditTime field is wdFieldEditTime. To put this to use, Listing 1.2 provides some code that updates only the EditTime field. Listing 1.2. Updating the EditTime FieldSub UpdateEditTime() Dim f As Field For Each f In ThisDocument.Fields If f.Type = wdFieldEditTime Then f.Update Exit For End If Next 'f End Sub This procedure runs through all the fields in the document and looks for one where the Type property is wdFieldEditTime. When the property is found, the Update method refreshes the field and then exits the For loop.
Updating Fields by NameIf you have a specific field you want to update, looping through all the fields to find the field's type is often inefficient. If you know the field's position within the document, you can specify the position as the index number of the Fields collection in a VBA macro. For example, the following statement updates the first field in the active document: ActiveDocument.Fields(1).Update However, that's a bit of a blunt instrument because the index numbers of the fields change as fields are added and deleted. A better solution is to reference fields by name. You can't do this directly, but you can assign a bookmark to a field and then use the bookmark's name. For example, suppose you select the EditTime field and insert a bookmark named TotalEditTime. Then the following statement will update the field: ActiveDocument.Bookmarks("TotalEditTime").Range.Fields.Update Preventing Updates by Locking a FieldAt times, you might not want a field updated. For example, you may have edited the field result, so updating the field will overwrite your changes. Similarly, if you're updating all the fields in a document, you might want to skip those fields that prompt for information. Use the following techniques to lock and unlock the current field:
Converting a Field Result to TextYou might decide that the current field result should remain permanent. For example, you might have novice users working with the document, and you don't want them getting confused by or editing the field codes. Instead of locking all the fields, a better solution is to convert the current field results to plain text. You do that by selecting one or more fields and then pressing Ctrl+Shift+F9. Keyboard Shortcuts for FieldsTable 1.4 provides a reference to the various keyboard shortcuts that you can use to work with fields. The table also gives the Word command equivalent for each action, in case you want to create custom toolbar buttons for those field techniques you use most often.
Putting Fields to Good UseWord 2003 has a huge repertoire of fieldsmore than 70 in all. A full accounting of all the fields would require a chapter several times the length of this one. In any case, no such accounting is necessary because Word's online Help provides an excellent field reference. Instead, the next few sections highlight a few of the most useful fields and take you through some examples that show the fields in their best and most practical light. Viewing Total Editing Time Updated in Real-TimeEarlier I mentioned the EditTime field, which reflects the total amount of time, in minutes, that the document has been edited (or at least has held the system focus). The total amount of time that a document has been edited is useful for freelancers, lawyers, consultants, and other professionals who bill for their time. Knowing how long you have spent working on a document enables you to provide a more accurate accounting of your time. If you have a time budget that you're trying to stick to, you may find yourself constantly checking the document's properties to view the Total editing time value. Rather than wasting time performing that chore, add the EditTime field to your document. Here's some code that displays the total editing time with the word minutes added for clarity: Total Editing Time: {EDITTIME \# "0 minutes" \* mergeformat } Now all you have to do is update the field to check the total editing time. If even that sounds like a hassle, you can add a relatively simple macro to the document that will update the EditTime field in real-time. Open the VBA Editor and insert a module in the document's project. Add the code in Listing 1.3 to the module. Listing 1.3. Updating the EditTime Field in Real-time Sub UpdateEditTime() Dim f As Field For Each f In ThisDocument.Fields If f.Type = wdFieldEditTime Then f.Update Exit For End If Next 'f Application.OnTime Now + TimeValue("00:01:00"), _ "Chapter01.Module1.UpdateEditTime" End Sub This procedure runs through all the fields in a document looking for one where the Type property is wdFieldEditTime, which corresponds to the EditTime field. When the property is found, the Update method refreshes the field. The key to the real-time updating is the Application.OnTime statement, which sets up the UpdateEditTime procedure to run again in one minute.
Running a MacroIf you have a macro that you want to make available for yourself or other users, you can assign it a shortcut key or a toolbar button. But what if you want an in-text reference to a macro? That is, what if you want some text or an image that the user can double-click to launch the macro? You can do this using a MacroButton field: { MACROBUTTON MacroName DisplayText } Here, MacroName is the name of the macro you want to run, including the project name and module name; DisplayText is the text the user double-clicks to launch the macro. (You can also launch the macro by clicking the field and then pressing Alt+Shift+F9.) For example, the following code creates a MacroButton field that displays Update Editing Time and runs the Chapter01.Module1.UpdateEditTime macro: { MACROBUTTON Chapter01.Module1.UpdateEditTime Update Editing Time } Figure 1.20 shows the field in a document with surrounding text. In this case, I've underlined the field text and changed the text color (it's blue) to ensure that the reader knows what text to double-click. Figure 1.20. In this example, double-clicking the MacroButton field runs the UpdateEditTime macro to update the EditTime field.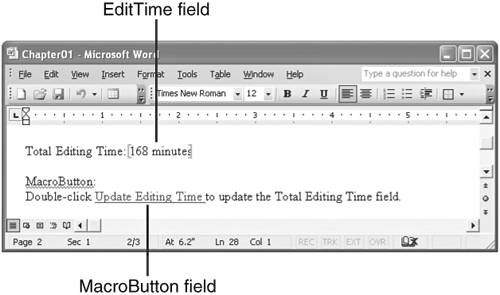 Another way to do this is to display a small image instead of text. You do this by inserting an InsertPicture field as the MacroButton field's DisplayText property: { INSERTPICTURE FileName } Replace FileName with the full path and filename of the image you want to use. If the path contains spaces, replace each backslash (\) with double backslashes (\\). Here's an example: { MACROBUTTON Chapter01.Module1.UpdateEditTime { INSERTPICTURE Figure 1.21 shows the result. Figure 1.21. Use the InsertPicture field within a MacroButton field to have the user double-click an image to run the macro.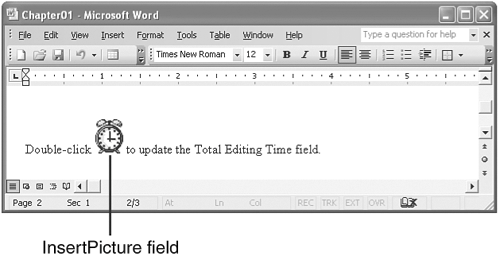 Creating "Click-and-Type" Text PlaceholdersAnother use for the MacroButton field is to create "click-and-type" text placeholders. Figure 1.22 shows some examples of what I mean. I created this document using Word's Professional Fax template. As you can see, there are placeholders such as [Click here and type name]. The idea is that you click the placeholder and then type the required text. Figure 1.22. Word's Professional Fax template includes "click-and-type" text placeholders.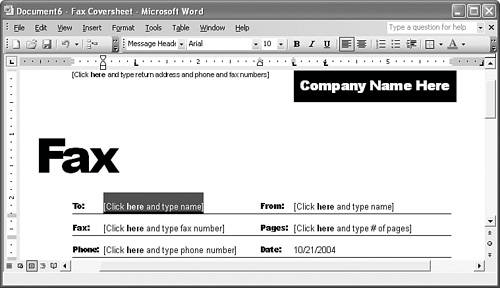 Interestingly, look what happens when you click one of these placeholders and then press Shift+F9, as shown in Figure 1.23. Figure 1.23. The placeholders are really just MacroButton fields that reference a nonexistent macro.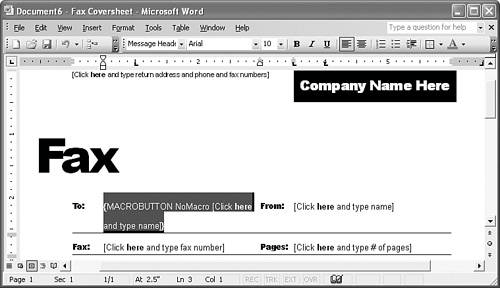 As you can see, the placeholder is actually a MacroButton field: { MACROBUTTON NoMacro [Click here and type name] } The NoMacro option refers to a nonexistent macro. When you click within the field and begin to type, the field is replaced by the text.
Creating a Shortcut Menu of AutoText EntriesWord's AutoText feature comes with a handy AutoComplete option. When you type the first few letters of the AutoText entry, a banner appears with the complete entry, and you press Enter to insert the full entry. (To ensure that this option is turned on, select Tools, AutoCorrect Options, display the AutoText tab, and make sure the Show AutoCorrect Suggestions check box is activated.) This is useful, but it requires knowing the available AutoText entries. The other problem is that you might prefer to choose from among a selection of AutoText entries. You can do this via the menu bar by selecting Insert, AutoText, selecting a style such as Salutation, and then selecting the entry you want. However, Word gives you a much easier way to do this, and it also solves the problem of knowing the first characters of the AutoText entries. The solution is the AutoTextList field, which, when right-clicked, displays a menu of AutoText entries from a particular style: { AUTOTEXTLIST LiteralText [\s Style] [\t Tooltip] }
LiteralText is the text that is displayed as a prompt inside the document. The optional Style Name is an AutoText style such as Salutation or Closing. If you omit this option, Word displays all the AutoText entries. The Tooltip text option specifies the text that appears in a banner when the user hovers the mouse pointer over the field. Following is an AutoTextList field example that displays the literal text Choose salutation and displays a list of the AutoText entries in the Salutation category: { AUTOTEXTLIST "Choose salutation" \s Salutation \t "Right-click to Figure 1.24 shows the list that appears when the user right-clicks the field. Figure 1.24. Use an AutoTextList field to give the user a list of related AutoText entries when he or she right-clicks the field.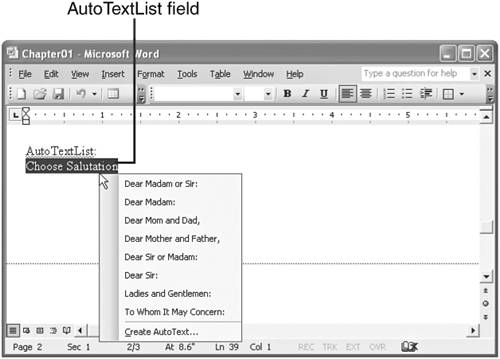
Building a Formula FieldMost fields return predefined results, such as document properties or the current date and time. If you have a custom calculation that you want to appear in your document, you need to build a formula field. All formula fields have the same general structure: an equal sign (=), followed by one or more operandswhich can be a literal value, the result of another field, the contents of a bookmark, a table reference, or a function resultseparated by one or more operatorsthe symbols that combine the operands in some way, such as the plus sign (+) and the greater-than sign (>). These field formulas come in two varieties: arithmetic and comparison. Arithmetic formulas are by far the most common type of formula. They combine operands with mathematical operators to perform calculations. I've summarized the mathematical operators used in arithmetic formulas in Table 1.5.
For example, suppose you want to know the average number of words per page in your document. That is, you need to divide the total number of words (as given by the NumWords field) by the total number of pages (as given by the NumPages field). Here's a formula field that does this: {= { NumWords } / { NumPages } } A comparison formula is an expression that compares two or more numeric operands. If the expression is true, the result of the formula is 1. If the statement is false, the formula returns 0. Table 1.6 summarizes the operators you can use in comparison formulas.
For example, suppose you want to know whether a document's current size on disk (as given by the FileSize field) is greater than 50,000 bytes. Here's a comparison formula field that checks this: {= { FileSize } > 50000 } Finally, Word also offers a number of functions that you can plug into your formula fields. Table 1.7 lists the available functions.
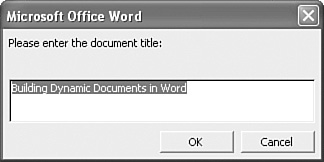
Suppose you want to know whether your document has more than 1,000 words (as given by the NumWords property) or more than 100 lines (as given by the DocProperty Lines field). Here's a formula field that checks this using the OR function: { = OR( { NumWords } > 1000, { DOCPROPERTY Lines } > 100) } Calculating Billable Time ChargesYou saw earlier that you use the EditTime field to return the total editing time for a document. If you bill by the hour based on the amount of time you have worked on a document, you might want to keep track of how much money you've earned so far. If you earn, for instance, $100 per hour, the following formula displays your current billable earnings: { = { EDITTIME } / 60 * 100 } The EditTime result is given in minutes, so you have to divide by 60 to get the number of hours. You then multiply that result by 100 to get the earnings. To ensure accurate billing, you may want to use the ROUND function to round the result to the nearest dollar: { = ROUND( { EDITTIME } / 60 * 100, 0) \#$0.00 } This formula field also uses a numeric picture to format the result with a dollar sign and two decimal places, as shown in Figure 1.25. Figure 1.25. A formatted formula field that calculates the billable charge based on the current EditTime result.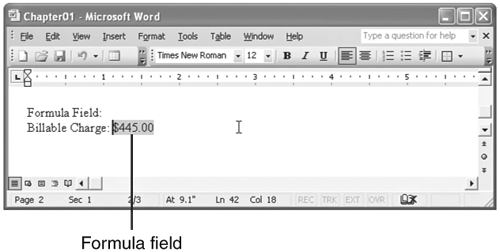 Creating Decision-Making FieldsOne of the most powerful fields is the If field, which compares two expressions and then returns one of two values depending on the result: { IF Expression1 Operator Expression2 TrueResult FalseResult } Expression1 and Expression2 are operands, and Operator is one of the comparison operators listed in Table 1.6. If the result of this comparison operation is true, the field displays the trueResult text; if the result of this comparison operation is false, the field displays the FalseResult text. For example, here's a field that checks the NumWords field to see whether it's greater than 1,000: { IF { NumWords } > 1000 "Over word count!" "Word count okay" } If the NumWords result is greater than 1,000, the field displays Over word count!; if the NumWords result is less than or equal to 1,000, the field displays Word count okay. Prompting the User for InputWith many templates, the user is required to fill in certain document properties, such as the title, subject, author, or keywords. Ensuring that these values are entered can be a crucial part of a document management system. One way to do this is to use a Fill-in field, which displays a dialog box that prompts the user for data. The entered data is then displayed as the field result: { FILLIN Prompt } Prompt is the text that appears as a prompt in the dialog box. Here's an example: { FILLIN "Please enter the document title:" } If you insert this field in a template, Figure 1.26 shows the dialog box that appears when the user creates a new document based on the template. Figure 1.26. When you update a Fill-in field, Word displays a dialog box similar to this one. Although it may occasionally be useful to store user input in the document (see, for example, Chapter 6's "Personalizing Mail Merges with Fill-in Fields"), what if what you really want to do is change the actual document properties? Because each document property has its own field type, you can change many properties by specifying the Fill-in result as the new property value. For example, the following code prompts the user for a document title and then stores the result in the Title property using the Title field: { TITLE { FILLIN "Please enter a document title:" } }
| |||||||||||||||||||||||||||||||||||||||||||||||||||||||||||||||||||||||||||||||||||||||||||||||||||||||||||||||||||||||||||||||||||||||||||||||||||||||||||||||||||||||||||||||||||||||||||||||||||||||||||||||||||||||||||||||||||||||||||||||||||||||||||||||||||||||

EAN: 2147483647
Pages: 129