Section 6.6. Advanced Styles
Tag and class styles are the most common types of styles, but they aren't the only ones available. There are many other style types with various functions and purposes, but Dreamweaver lumps them together under the term advanced styles . To be technically accurate, tag and class styles aren't really styles per se. In CSS lingo, they're known as different types of selectors .
A CSS selector is an instruction that tells a Web browser what it should apply the CSS formatting rules to. For example, a tag selector tells a browser to apply the formatting to any instance of a particular tag on the page. Thus, an h1 tag style applies to all <h1> tags on a page. A class selector, on the other hand, applies only when the browser encounters the class name attached to an element on a page.
Note: For a detailed discussion of selectors, visit http://css. maxdesign .com.au/selectutorial/.
There are a variety of selectors in the CSS arsenal (a few of the most common and useful are mentioned below), but in Dreamweaver, you go about creating them all the same way: start by creating a CSS style, following the instructions on Section 6.2. But when you get to the New CSS Rule window (Figure 6-2), instead of selecting the Tag or Class selector type, choose the Advanced option.
With the exception of four "pseudo-classes"(discussed next ) in the advanced selector drop-down menu, you must type the selector name in the text field at the top of that window. As described in the following sections, each type of advanced selector has a different syntax. (The remainder of the process of creating the style is just like creating a tag or class style, and the process of editing or deleting these styles is also identical.)
6.6.1. Pseudo-Classes
When you select Advanced in the New CSS Rule menu, Dreamweaver lets you select one of four pseudo-classes from the Selector menu, as shown in Figure 6-14. These four options (a:link, a:active, a:visited, and a:hover) correspond to the types of links described in step 14 on Section 1.3.3.
Figure 6-14. Dreamweaver includes four advanced selector types in the Selector menu. These pseudo-classes affect how links appear.
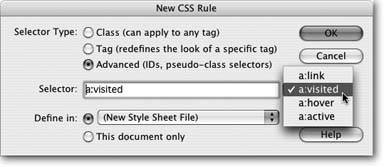
For example, a:link represents the formatting state of an unvisited link on the page; a:active represents the look of the link as the visitor clicks it; a:visited represents the link's look after the visitor has already been to the linked page; and a:hover describes the look of the link as the mouse moves over it. This last option is particularly useful, since it works like a rollover image, but for text.
To use these pseudo-classes, select each in turn from the Selector menu and set its formatting characteristics (font color , size , underscore , and so on). You must, however, create these pseudo-classes in the order that they appear in the menu. (A helpful mnemonic for remembering this rule is LoVe HAtethat is, :link comes before :visited, which comes before :hover, which comes before :active.)
Using these styles, you could make your link text appear red and underscored before it's clicked, twice as large when the mouse moves over it, purple boldface when clicked, and pale pink after it's been visited. (All right, you might never be hired to do Martha Stewart's Web site, but you get the point.)
Note: When you use the Page Properties window to set colors for your links (see Section 1.3.3), behind the scenes, Dreamweaver actually creates these pseudo-class styles in the page's internal style sheet.
These link pseudo-classes have one drawback: setting them affects all links on a page. In that respect, they're like tag styles, except they change the different states of a link (clicked, active, and so on).
If you want to use these styles for only certain links on a page, you could do the following: First, create a class style and apply it to each link you wish to have a special appearance. Then, create another new style, click the Advanced radio button, and type a.className:link (or :active , or :hover , or whichever state you wish to define), where className is the name of the class you applied to the link. (Alternatively, you could use contextual selectors to achieve the same goal, an advanced technique described on Section 6.6.3.)
For example, say you have a set of five links that act as a navigation bar on the left side of a page. You want each of these text links to have a border and a background color, and you want the background color to change when a visitor moves her mouse over the link. Create a new class style named, say, mainNav , and then apply this style to each link (<a> tag). Then create your pseudo-classes for each of the different link states. For example, for the main link state, you could simply name the style a.mainNav:link ; the visited link would be a.mainNav:visited ; and so on.
6.6.2. IDs
An ID is a type of selector that lets you format a unique item on a page. You use an ID style to identify an object (or an area of a page) that appears only oncea banner, copyright notice, or main navigation bar, for example. IDs are frequently used with CSS-based layouts like those presented in Chapter 8.
An ID style is very similar to a class style, in that you supply the style's name and apply the style manually. However, while class styles begin with a period (.company, for example), ID styles must begin with the # symbol (#banner, for example).
Also, while you can apply a class style many times on a page, an ID style can appear only once per page.
Note: IDs are often assigned to a <div> tag. The <div>tag, which indicates a logical division of a page, is discussed on Section 6.6.2.
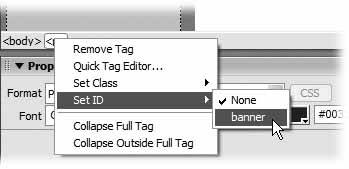
To create an ID style, choose the Advanced option in the New CSS Rule window (see Figure 6-14), type the # symbol and then the style name #banner , for example. Applying IDs can also be a little tricky, but the easiest method is to use the tag selector to apply an ID to a particular tag, as shown in Figure 6-15.
Figure 6-15. You can use the contextual menu on the tag selector to apply an ID to a tag. Simply right-click (Control-click) a tag, choose Set ID, and then select the ID name from the menu. (Since an ID can be applied only once on a page, you won't see an already applied ID name in this list.)
6.6.3. Contextual Selectors (a.k.a. Descendent Selectors)
Tag styles have their drawbacks. While a tag style for the <p> tag makes simple work of formatting every paragraph on a page, it's also indiscriminate. You may not want every paragraph to look the same.
Maybe, for example, you want to divide a Web page into different sectionsa sidebar and a main content area, for instance, using a smaller size text for paragraphs and headings in the sidebar. You could create two class styles sidebarText and mainText , for exampleand then apply them to the appropriate paragraphs in the respective parts of your design (<p class="sidebar Text"> for sidebar paragraphs and < p class="mainText"> for body text). But who has that kind of time?
What you really need is a "smart" tag style, one that can adapt to its surroundings, like a chameleon, using the appropriate formatting depending on where it is in the page. Fortunately, CSS offers just such a type of style contextual selector .
Note: "Contextual selector" is the name given in the original CSS standards. In the most recent incarnations of these rules, the name has been changed to "descendent selector." But because "contextual selector" is more descriptive, you'll see that term in this book.
A contextual selector lets you limit the application of a style to a certain context. For example, you can create a style that formats a <p> tag to be blue and 9 pixels tall, but only when that tag appears in a sidebar. How does a Web browser know the tag is in a sidebar? You tell itusually by using another style.
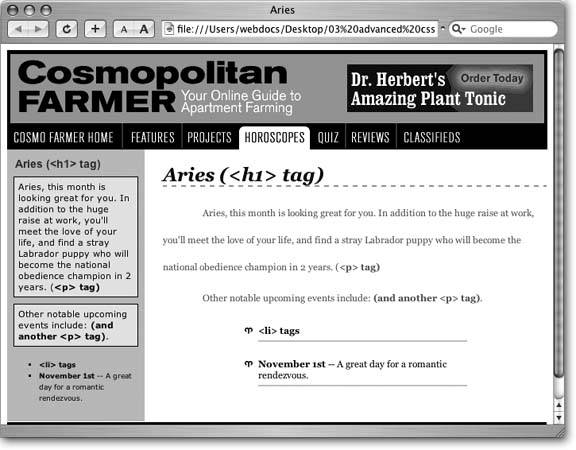
For example, the Web page shown in Figure 6-16 has a common, table-based layout. The gray box on the left side of the page is a single table cell, while the white box to the right is another cell, containing the page's main content. By creating a class called .main and applying it to the <td> tag of the main cell, you set the context for all other HTML placed inside that cell. Now a heading tag (<h1>) that appears inside that cell is within the context of .main. Another way to think of it: Since the <h1> tag is nested inside of the table cell, the heading is a descendent of the cellthus the newer name "descendent selector."
Note: The Cascading Style Sheets tutorial includes an example of the power of contextual selectors. See Section 6.8.6.
Figure 6-16. Contextual selectors can reduce the amount of code used in a Web page. They also speed production by eliminating time-consuming formatting chores. In this example, the HTML code that appears within the left-side table cell is the same as the code in the right-side cell; only their contexts differ . The sidebar content is contained within a cell that's got a class style.sidebarapplied to it. Thus the <h1>, <p>, and <li> tags are within the context of the .sidebar style.
6.6.3.1. Creating the "context"
There are a variety of ways that you can define the context of text, images, or other page content. Some are automatic, and some you'll craft yourself:
-
HTML tags can automatically fall within the context of another tag, merely by being inside that tag. For example, if you want to emphasize a single word inside an <h1> tag, you can select the word and click the Bold button on the Property inspector. That step applies the <strong> tag to the word (see Section 3.3.2). In essence, the context for this instance of the <strong> tag is the <h1> tag, since the <strong> tag is inside the <h1> tag.
Why would you care about this? Since headlines are already bold, the <strong> tag has no visual effect on the word inside the headline. However, you can create a contextual-selector style that could make the <strong> tag appear in italics, or red, or underlined , whenever it appears inside an <h1> tag.
-
As in the example in Figure 6-16, applying a class style to a table cellthe <td> tagmakes everything inside that cell fall within the context of that class.
-
Another common way to define an area of a page is to use an ID selector (described on Section 6.6.2). You could apply an ID style to a table cell, or wrap an entire chunk of content inside a <div> tag and apply the ID to it. (See Section 8.4 for more on the <div> tag.)
6.6.3.2. Creating contextual selectors
Creating contextual selectors is no more difficult than creating any other type of style. You follow the same process as described on Section 6.2 for creating a stylebut in the New CSS Rule window, select the Advanced option. You then type the contextual selector in the selector box. List the context for the style first, followed by a space and then a tag or other selector type. For example:
-
To create a special look for the <strong> tag when it appears inside the <h1> tag, you would type h1 strong in the Selector box. The h1 is the context in which the strong tag must appear for the formatting to apply.
-
You use a similar naming scheme for tags that appear inside classes, too. Following the example in Figure 6-16, you could specify the look of paragraphs that appear inside another element with the class style .sidebar by typing .sidebar p into the Selector box. (Remember, classes begin with a period, so you must include one when creating the selector name.)
-
Likewise, if you wanted to define the look of bulleted lists wherever they appear inside an ID Style named #banner, you'd type #banner ul in the Selector box.
-
You can even create very complex contextual selectors that involve multiple elements. For example, to format anything inside an <li> tag that's inside a <td> tag that's inside a tag with the class style main Story applied to it, you'd create a selector named .mainStory td li .
Tip: When working with contextual selectors, it may help you to read the selector name backward . Take, for example, the selector .mainStory td li . The li means "this style applies to the <li> tag"; the td means "but only when it's inside a <td> tag"; and the final .mainStory means "and only when that <td> tag is inside another tag that has the class .mainStory applied to it."
After you name the contextual selector, click OK in the New CSS Rule window. You're ready to start adding the CSS properties that define the formatting of your contextual-selector style. In other words, proceed as you normally would when creating any type of style.
Note: The type of selector used also affects the cascade (see Section 6.5.2). ID selectors are considered more "specific" than class styles, which are more specific than tag styles. In general, this means that properties from an ID style override properties from a class style. Contextual selectors, which include combinations of tag, class, and ID namesfor example #banner h1 , or .main p , or h1 b have even more force since the specificity adds up. For example, say you create a p tag style with a bright-red text color, and a contextual selector, .sidebar p , with purple text. Any paragraphs inside another elementa table cell, for examplewith the .sidebar style is purple not red.