15.5. Communicating with Design Notes Lots of questions arise when a team works on a Web site: Has this page been proofread? Who is the author of the page? Where did this graphic come from? Usually, you must rely on a flurry of emails to ferret out the answers. But Dreamweaver's Design Notes dialog box (Figure 15-15) eliminates much of that hassle by letting you attach information, such as a Web page's status or author, to a file. Figure 15-15. If you want the Design Notes window to open whenever someone opens the page, turn on "Show when file is opened." This option makes sure no one misses an important note attached to a Web page. When the page is opened in Dreamweaver, the Design Notes window appears automatically. (This option has no effect when adding notes to GIFs, JPEGs, Flash movies, or anything other than a file that Dreamweaver can open and edit, such as a Web page or an external CSS style sheet.) 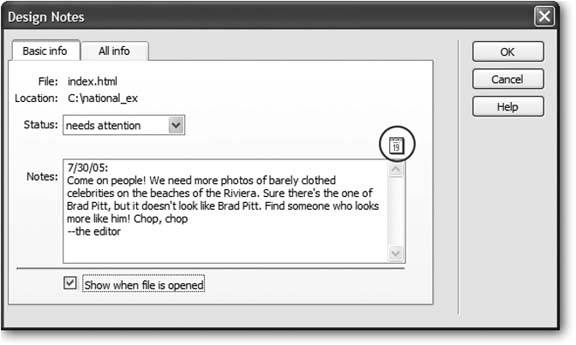
You can open these notes (from the Files panel or from a currently open document), edit them, and even share them with others. In this way, it's easy to leave notes for other peoplesuch as, "Hey Bob, can you make sure that this is the most recent photo of Brad and Angelina?" You can even add notes to files other than Web pages, including folders, images, Flash movies, and external Cascading Style Sheetsanything, in fact, that appears in the Files panel. 15.5.1. Setting Up Design Notes You can't use Design Notes unless the feature itself is turned on. To find out if it is, open the Site Definition dialog box by double-clicking the site's name in the Manage Sites dialog box (choose Manage Sites from the Site menu or the pop-up menu in the Files panel). In the Category list, click Design Notes; as shown in Figure 15-16, two checkboxes pertain to the notes feature: -
Maintain Design Notes . This checkbox lets you create and read notes using Dreamweaver's File  Design Notes command (see the opposite page). Design Notes command (see the opposite page). -
Upload Design Notes for sharing . If you're using Design Notes as part of a team, turn on this checkbox, which makes Dreamweaver upload design notes to the remote site, so that your fellow team members can read them.
Note: Design Notes are especially useful for keeping track of pages that are built and maintained by a team of developers. But if you're a solo operator and still want to use themmaybe you're the type with a hundred Post-it notes taped to the edges of your monitorthen turn off "Upload Design Notes for sharing." You'll save time and server space by preventing Dreamweaver from transferring note files to the Web server.
Click OK to close the Site Definition dialog box. You can double-click another site in the Manage Sites dialog box to turn on its Design Notes feature, or click Done. Figure 15-16. The Clean Up button deletes any notes that were attached to now-deleted files. (To avoid stray notes files in the first place, always delete pages in Dreamweaver's Files panel, instead of on your desktop.) If you turn off the Maintain Design Notes checkbox, clicking Clean Up removes all Design Notes files for the site. 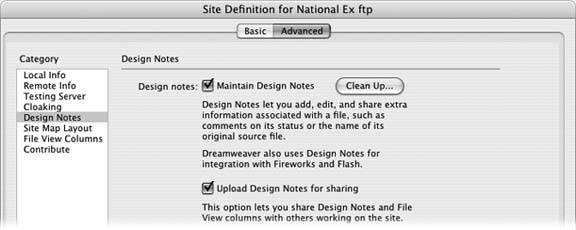
15.5.2. Adding Design Notes to a File To add a Design Note to a document you're working on, choose your favorite method: -
Choose File Design Notes. -
From the File Status menu in the toolbar, choose Design Notes (see Figure 15-9). -
Right-click (Control-click) a file in the Files panel (or an external object, such as a graphic or Flash movie, in the document window), and choose Design Notes from the shortcut menu. In any case, the Design Notes window now opens (Figure 15-15). If you like, you can use the Status pop-up menu to let your team members know where the file stands. For example, is it ready to move to the Web server? Is it just a draft version? Or is there something wrong with it that requires specific attention? Dreamweaver provides eight different options: "draft," "revision1," "revision2," "revision3," "alpha," "beta," "final," and "needs attention." If these categories don't match your workflowfor example, you want a "needs proofing" flagyou can change them; see the box below. The note itself, which you type into the Note box, could be a simple question you have for the author of the page ("Are you sure 'Coldplay: Defining a New Musical Language for the Modern Age' is an appropriate title for this article?") or more information about the status of the page ("Still need studio shot of foil-wrapped cigar hanging from a string"). POWER USERS' CLINIC
Create Your Own Status Menu | | The Status pop-up menu in Design Notes is a great feature. With a flick of the mouse, you can assign a status to a page or file, letting others know if a page is finished or just a rough draft. But the preset status options may not exactly fit your process. Your team may not use the terms "alpha" or "beta." Instead, you may have other stages you'd like to add, such as "copy edit," to signify that a page is ready to be proofread and tested . With a little sly hacking, you can change the status categories to suit your needs. The file Design Notes.htm, in the Dreamweaver 8 Configuration Commands folder, holds the key to this puzzle. Start by making a safety copy of the file; you can always return to it if something goes wrong. Then open this file in a text editor like NotePad or TextEdit, or even within Dreamweaver's Code view (Section 9.2). Find line 28 in the file, which looks like this: STATUS_ITEMS = new Array("","draft","revision1","revision2", "revision3", "alpha","beta","final","needs attention");
The words between the double-quotes are the choices that appear in the Status menu. You can change or delete them as you see fit (if you delete one, be sure to delete the word, both sets of quotation marks, and the following comma). Then, after saving changes to the file, quit and restart Dreamweaver, where you'll see your new, improved Status pop-up menu ready for action. To make sure you and your co-workers see the same choices, give each of them the modified Design Notes.htm file, and advise them to put it in their own Dreamweaver 8 Configuration Commands folders. |
Tip: Click the calendar icon (circled in Figure 15-15) to pop the date into your notea great way to keep a running tally of notes and the dates they were made.
When you click OK, Dreamweaver creates a file with all the note information in it. This file ends with the extension .mno and begins with the name of the file; for the file index.html , for example, the note would be called index.html.mno . Dreamweaver stores notes in a folder called _notes that it keeps in the same folder as the page or file. For example, if you add notes to the home page, Dreamweaver stores the notes file in the _notes folder inside the root folder. 15.5.3. Viewing Design Notes You can view Design Notes in a number of ways. If the note's author turned on "Show when file is opened" (see Figure 15-15), of course, the Design Notes window opens automatically when you open that page. Otherwise , to look at a note, you have any number of options: -
Choose File Design Notes. -
Choose Design Notes from the File Status drop-down menu in the document window's toolbar (see Figure 15-9). -
Double-click the small yellow balloon icon in the Notes column of the Files panel (see Figure 15-17). (This column is visible only when the Files panel is expanded, as described on Section 13.1.5.1.) Figure 15-17. A yellow speech bubble in the Notes column of the Files panel indicates a Design Notes file. You can even add a note to a folder (in this case, the css_images folder).  -
Right-click (Control-click) an embedded object, like a graphic or Flash movie, right in the document window, and choose Design Notes from the shortcut menu. -
Right-click (Control-click) a file in the Files panel and choose Design Notes from the shortcut menu. 15.5.4. Organizing the Columns in the Files Panel When the Files panel is fully expanded (see Section 13.1.5.1), the columns identify a file's name, file size , modification date, type, and so on. This may be more information than you're interested inor it may not be enough. So remember that Dreamweaver lets you show or hide these various columns, change their order, or even create new columns with information retrieved from a file's Design Notes (Section 15.5).
Tip: You can adjust the relative widths of these columns by dragging the dividing line between the column names . You can also sort all the pages listed in this window by clicking the relevant column's name. Clicking Modified, for example, sorts the files so that the newest appear first. Click a second time to reverse the sort , placing oldest files first.
When you're setting up a Web site in the Site Definition window (Section 13.1.1), you can view the column setup by clicking the File View Columns category (Figure 15-18). Figure 15-18. If you're working with others, you'll probably want to share any columns you add. Turn on the "Enable column sharing" checkbox; then, you'll be able to see columns that others on your team have added, and they'll be able to see columns you've added (if you've turned on "Share with all users of this site" for each column, of course). 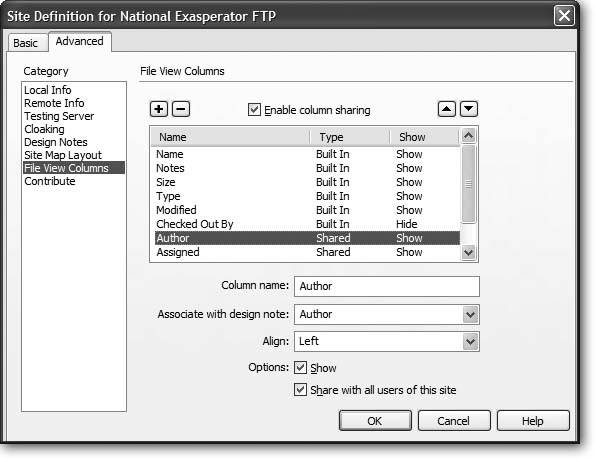
Once you're looking at the display shown in Figure 15-18, you can perform any of these stunts: -
Reorder columns . Click a column name in the Site Definition window to select it. Then click the up and down arrow buttons to move the column one spot to the left or right, respectively, in the Files panel. -
Hide columns . You may not care what date a file was last modified or whether it's a folder or Web page. If that's the case, hide the column by clicking its name in the Site Definition window and then turning off the Show checkbox (see Figure 15-18). (You can always return to the Site Definition window and turn the column back on.) -
Share a column . If you work with a team of designers, you may want to make newly added columns visible to them, too. (See Figure 15-18 for details.) -
Adding Columns . You can add informational columns of your own, as described next . -
Deleting columns . Click the column name, and then click the minus () button to delete the column. (Dreamweaver doesn't let you delete the built-in columns: Name, Notes, Type, Modified, and so on.) 15.5.5. "All Info " Design Notes in Column Views Your Files panel offers columns for all the usual information bits: Name, Checked Out, and so on. But you may someday wish there were a column that showed each page's status, so that your Files panel could show you which files need proofreading, or who wrote each article, or which pages are being held until a certain blackout date. You can indeed add columns of your own design, although the process isn't streamlined by any means. It involves two broad efforts: First, using an offshoot of the Design Notes feature described earlier, you set up the new columns you want displayed. Then, using the column-manipulation dialog box shown in Figure 15-18, you make the new columns visible in the Files panel. 15.5.5.1. Phase 1: Defining the new information types You create new kinds of informational flagsprimarily for use as new columns in the Files panelusing the Design Notes dialog box, described on Section 15.5. Here's the rundown: -
Choose File Design Notes . The Design Notes window appears. (You can summon it in various other ways, too, as described on Section 15.5.1.) -
Click the "All info" tab . This peculiar window shows the programmery underbelly of the Dreamweaver Notes feature (see Figure 15-19). It turns out that it stores every kind of note as a name/value pair. If you used the main Notes screen (Figure 15-15) to choose Beta from the Status pop-up menu, for example, you'll see a notation here that says "status=beta." ( Status is the name of the info nugget; beta is the value.) If you turned on the option called "Show when file is opened," you'll see "showOnOpen=true." And if you typed Badly needs updating as the note itself, you'll see "notes=Badly needs updating" on this screen. But those are just the built-in info types; you're free to create your own. Figure 15-19. Dreamweaver lets you create your own types of notes in the "All info" tab of the Design Notes window. This lets you add more information to a page, such as its author or designer. If you want to delete a note you've added, it's a simple matter of clicking on the note in the Info box and then clicking the minus () button. 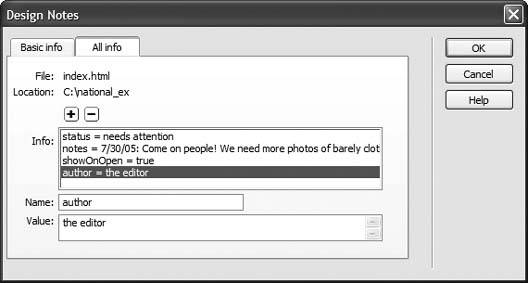 -
Click the + button . You may wonder why you'd do this; after all, you can type a lot of information in the Notes box under the Basic Info tab. The primary benefit of creating new types of notes is that you can display that information in the Files panel. -
Type the name of the new note in the Name field . It may be Author, for example, so that you can note who wrote the text of each page. Or it could be Artist, if you wish to add a note to each image specifying who created it. Maybe you need a column called Hold Until, which lets you know when certain information is OK to publish online. -
Press Tab (to jump to the Value field); type the contents of the note . You can enter the actual name of the author or artistJane Stevens, for exampleor the actual "Hold Until" date. Repeat steps 35 if you want to add more notes to the page or file.
Tip: Keep the value shortone or two words. Otherwise, the narrow Files panel column chops off the latter part of it. If you've got enough screen real estate, you can resize the columns by dragging the divider bars between column names.
-
Click OK . The dialog box closes . 15.5.5.2. Phase 2: Adding the column Just creating a new note type gets you only halfway home; now you have to tell Dreamweaver that you want to see that information in the Files panel. To add a column: -
Open the Site Definition window for the particular site and select the File Views category . See Section 13.1.1.7 for a reminder of how to edit a site definition. The File Views dialog box appears. -
Click the + button (Figure 15-18) . A new, untitled column is added to the list, complete with three fields that need filling in (they now say "untitled"). -
In the Column Name box, type the column-heading name you want to appear in the Files panel . Make it short and descriptive. If possible, it should match the note type (Author, Artist, Hold Until, or whatever). -
Press Tab. Type the name of the Design Note you wish to use for this column . This is the name part of the name/value pair described in step 4 of the previous instructions. For example, if you added a note named Author to a file, you would type Author here. Capitalization matters; so if you named the Design Note Author , type it with a capital A. There's a pop-up menu here, too, but it always lists the same four options: Status, Assigned, Due, and Priority. If you choose Status, you'll get a column that reflects your choice from the Status pop-up menu. The other three options do nothing unless you created a matching note type in step 4 of the previous instructions. (It would be nice if this pop-up menu listed all of the note names you've created, so that you didn't have to remember them.) Before you wrap up the column-adding procedure, you can, if you wish, choose an alignment option for the text in the column (left, right, or center). Check to make sure that the Show checkbox is turned on (otherwise, your new column won't appear, and you've just defeated the purpose of this whole exercise). Finally, turn on "Share with all users of this site," if you like. The Share feature works like this. The next time you connect to the remote site, Dreamweaver uploads a file containing your newly defined column information. The next time another member of the team connects to the remote site, his copy of Dreamweaver downloads this file, so that his Files panel shows the same columns yours does.
Note: The column-sharing feature is very handy; it lets everyone working on a site share the same note information. But it works properly only if everyone on the team has the "Enable column sharing" checkbox turned on (see Figure 15-18).
-
Click OK . You should now see the new information column in your Files panel, as shown in Figure 15-20. (If not, you may need to expand the Files panel view and widen the window to reveal the additional column.) Figure 15-20. The Files panel can show newly created kinds of status information, but only if you've expanded the Files panel view by clicking the Expand/ Collapse button, circled here. Each piece of information (Author, Assigned, and so on) is actually a Design Note you've invented. To sort the list, click the gray column heading. 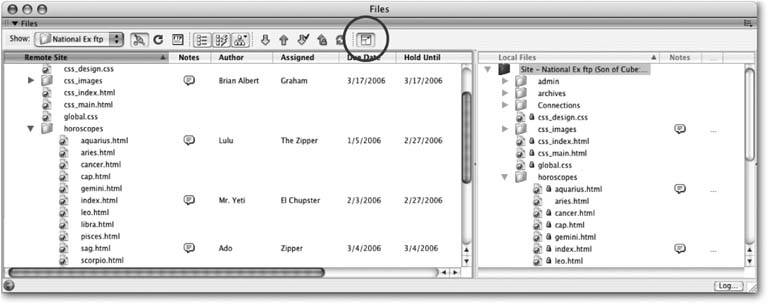
|