Section 15.4. Synchronizing Site Files
As you may suspect, when you keep two sets of filesLocal Folder and Remote Siteit's easy to lose track of which files are the most recent. For example, say you finish your Web site and move all the files to the Web server. The next day, you notice mistakes on a bunch of Web pages, so you make corrections on the copies in your local site. But in your rush to fix the pages, you didn't keep track of which ones you corrected. So although you're ready to move the corrected pages to the Web server, you're not sure which ones you need to transfer.
Note: Dreamweaver 8 introduces an entirely new method for synchronizing files. With some remote server setups, earlier versions of Dreamweaver often failed to synchronize correctly. The new method is much more reliable.
When you use the Check In/Check Out feature described on Section 15.3, you avoid this problem altogether. Using that system, the version on the Web server is always considered the latest and most definitive copy unless you or someone else has checked out that file. In that case, whoever checked out the file has the most recent version.
But if you're operating solo, for example, and don't use the Check In/Check Out feature, you may get good mileage from the Synchronize command, which lets you compare the remote and local sites and transfer only the newer files in either direction. (In fact, since the Synchronize command uses the Get and Put methods of transferring files, you may not get the results you expect if you synchronize your site while also using Check In and Check Out [as described in the box on Section 15.3.2].)
To synchronize your sites:
-
Make sure the "Maintain synchronization information" checkbox is turned on in the Remote Info category of the Site Definition window (you'll make this choice when you're setting up a new site, as described in step 11 on Section 15.1.1) .
This option is turned on automatically when you set up the Remote information for a site (see Figure 15-1).
-
Choose Site
 Synchronize Sitewide .
 Alternatively, you can right-click anywhere inside the Files panel. From the shortcut menu that appears, select Synchronize. In either case, the Synchronize Files dialog box appears (see Figure 15-13).
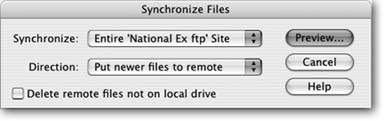
Figure 15-13. Using the Synchronization command, you can copy newer files from your computer to the Web server, or get newer files from the remote site. (The Synchronization command isn't available if you're using Visual SourceSafe.)
-
Using the Synchronize menu, specify the files to update .
You can either synchronize all files in the current Web site, or just files you've selected in the Local Folder list. This last option is good when you have a really big site and you want to limit this operation to just a single section of the siteone folder, for example. For site file-selection techniques, see Section 14.4.2.
-
Using the Direction pop-up menu, choose where you'd like to copy newer files .
You have three choices. Put newer files to remote updates the Web server with any newer files from your local site folder. It also copies any new files on the local site to the remote site. Use this option when you've done heavy editing to the local site and you want to move all new or modified pages to the Web server.
Get newer files from remote does just the reverse: it updates your local site folder with any newer (or new) files from the remote site. Here's one instance where the synchronize feature comes in handy in team-design situations. If you've been out of the office for a while, click this option to download copies of the latest site files. (Note that this doesn't check any files out; it merely makes sure you have the latest files for your own reference. This is one example where synchronization works well with Check In/Check Out, since it refreshes your local copy of the site with the latest files, including graphics and external CSS style sheets that your checked-out pages may depend on.)
Get and put newer files is a two-way synchronization. Any new files on the local site are transferred to the remote site and vice versa. The result is that both "sides" contain the latest files.
-
Turn on the Delete checkbox, if desired .
The wording of this option reflects the option you selected in the previous step. If you're moving newer files to the remote site, it says "Delete remote files not on local drive." It's a useful option when, for example, you've spent the afternoon cleaning up the local copy of your site, deleting old, orphaned graphics files and Web pages, for example, and you want Dreamweaver to update the Web server to match.
If you chose to transfer newer files from the remote site, Dreamweaver lets you "Delete local files not on remote server." Use this feature when your local site is hopelessly out of date with the remote site. Perhaps you're working on the site with a team, but you've been on vacation for two months (this is, of course, a hypothetical example). The site may have changed so significantly that you want to get your local copy in line with the Web site.
Note: Of course, you should proceed with caution when using any command that automatically deletes files. There's no Undo for these delete operations, and you don't want to accidentally delete the only copy of a particular page, graphic, or external Cascading Style Sheet.
If you chose the "Get and put new files" option in step 4, the Delete checkbox is dimmed and unavailable. This option truly synchronizes the two; Dreamweaver copies newer files on the remote site (including files that exist on the Web server but not on your computer) to your local site, and vice versa.
-
Click Preview to begin the synchronization process .
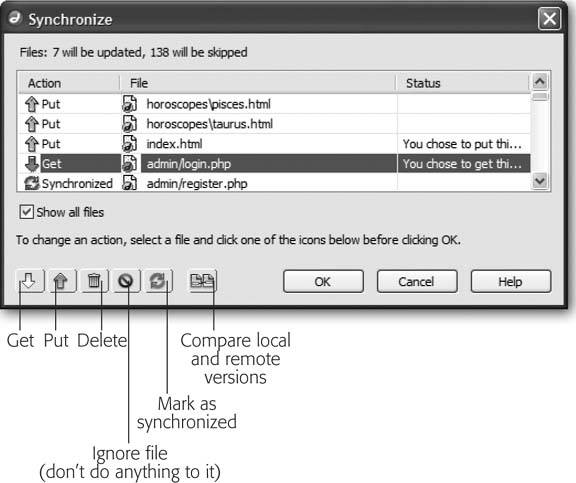
Dreamweaver connects to the remote site and compares the two sets of filesif your site is large, this comparison is a time-consuming process. When it finishes, the Synchronize preview window appears (Figure 15-14), listing which files Dreamweaver will delete and which it will transfer, and providing an additional set of options for working with the listed files.
Figure 15-14. The Synchronize window lets you preview any actions Dreamweaver intends to take to synchronize the files on your local and remote sites. You can change this action on a file-by-file basis. Turning on the "Show all files" checkbox lists all files, including ones Dreamweaver believes are identical on both the remote and local copies of the site: these files are marked Synchronized in the Action column.
-
Change the action Dreamweaver takes on the listed files .
The preview box tells you what Dreamweaver plans to do with a fileget it, put it, or delete it. You can override these actions by selecting a file from the list and clicking one of the action buttons at the bottom of the window. For example, if you realize that Dreamweaver is going to delete a file that you know you need, select the file in the list and click the "Ignore file" button (the red circle with a line through it).
Most of these options are useful only if you know Dreamweaver made a mistake: for example, when the program says you should get a file, but you know your local copy is identical to the server's copy. In that case, you could select the file and click the "Mark as synchronized" button, to tell Dreamweaver that they're identical. However, if you knew exactly which files were identical and which ones needed updating, you wouldn't need to use the synchronize feature in the first place, right?
One option can come in quite handy. The "Compare local and remote versions" button lets you compare the code in the local file to the code in the remote file so you can identify exactly what differs between the two. You can use this, for example, to see exactly what changes someone else may have made to the remote copy of the file. This feature is described in detail on Section 9.5.
-
Click OK to proceed, or Cancel to stop the synchronization .
If you click OK, Dreamweaver commences copying and deleting the chosen files. If you want to stop this process after clicking OK, click the Cancel button in the Background File Activity window (see the box on Section 15.2.1.1).
-
Click Close .
Tip: If you just want to identify newer files on the local site without synchronizing them (to run a report on them, for example), choose Edit
Select Newer Local in the Files panel menu bar (Windows) or choose Site Site Files View Select Newer Local (Mac). Dreamweaver connects to the remote site and compares the files, and then, in the Files panels Local Folder list, highlights files on the Local site that are newer than their remote counterparts.You can also identify newer files on the remote site: Choose Edit Select Newer Remote from the Files panel menu bar (Windows) or choose Site Site Files View Select Newer Remote (Mac). As with the Synchronization command, these options are unavailable if youre using Visual SourceSafe (Section 15.1.5).You can also identify files on your computer that you've either created or modified within a given date range, using the new Select Recently Modified command described on Section 14.4.2.