Work with E-mail
E-mail is one of the essential tools of today’s business and is a great way to keep in touch with your family and friends. Everyone needs an efficient e-mail program, and Apple includes its Mail application with Mac OS X. This program is a full-featured e-mail client, with many advanced features such as a powerful junk mail filter, the possibility to use multiple accounts, customizable rules, and much more.
You don't have to use Apple's Mail for e-mail; you can also use other e-mail programs, such as Entourage (included with Microsoft Office v. X), Eudora, PowerMail, or others.
Some applications will open your e-mail program automatically, or will even open new messages to specific addresses when you click links or buttons. However, Apple's Mail is the default e-mail application, and will open when other programs request your e-mail program, unless you change this default setting. Apple has unfortunately hidden this setting very well; the only way you can change your default e-mail program is from within the preferences of Apple Mail.
To do this, open Mail, and then select Mail | Preferences and click the General tab. The Default Email Reader setting shows the current default program. To change this, click the pop-up menu and select another program; if your e-mail program is not listed, click Select and browse until you find it, and then click Select again.
You can now quit Mail, and be sure that your e-mail program is configured as the default. But even if you don't use Mail, you shouldn't delete it; if you ever need to change this default e-mail program again, there's no other way.
Set Up Mail
Most e-mail programs are easy to use, and Mail is no exception. You set up an e-mail account with your user name, password, and mail servers, and connect to the Internet to check your mail. To open Mail, click its icon in the Dock or double-click its icon in the Applications folder.

If you didn’t enter your e-mail account information in the Internet preference pane, or in the assistant that helped you set up your Mac when you first turned it on, you can configure accounts manually with Mail. When you first open the program, a dialog displays where you can enter account information.
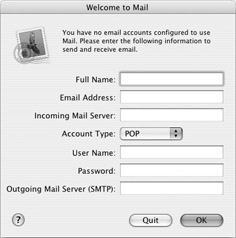
Enter your name, e-mail address, mail server, account type, user name and password, and outgoing mail server in the appropriate fields. If you’re not sure about what to enter here, check with your ISP or network administrator.
If you need to edit your e-mail account information at a later time, or if you want to add another account, you can use the Accounts pane in Mail’s preferences. (See Figure 10-4.) Select Mail | Preferences, and then click Accounts. Click the + button to configure a new account.
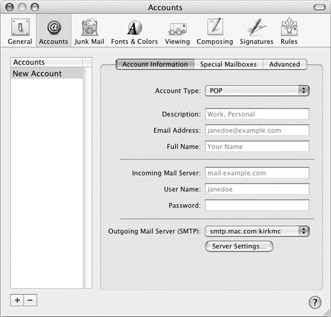
Figure 10-4: The Accounts pane in Mail’s preferences
Fill in all the fields, using the examples shown in this sheet and information from your ISP or network administrator, and then click OK to create the account.
If you have a .Mac account (see Chapter 11 for more on .Mac), there's an easy way to set up your e-mail account. Open the System Preferences application, and then click the .Mac tab. Enter your .Mac member name and password in the appropriate fields, and then quit the System Preferences. When you open Mail, your .Mac e-mail account will be already set up for you, and you won't need to enter any additional information. Also, if you have entered this information in the .Mac preference pane, Mail won't display the account screen shown in the preceding illustration when it starts up.
| Note | If you need to set up an IMAP or Exchange account to use with a corporate network, check with your network administrator to find out what settings to use. For other types of accounts, check with your ISP or other e-mail provider. |
When you first launch Mail and set up your e-mail account, the program displays a dialog asking if you want to import mailboxes from another e-mail client. If you previously used another program, such as Microsoft Entourage, Outlook Express, Claris Emailer, Eudora, and so on, this feature lets you import all your e-mail into Mail.
To do this, click Yes on the Import Mailboxes dialog. (If you don't do it right away, you can do so later by selecting File | Import Mailboxes.) Click the radio button next to the name of your program, and then click the right-arrow button.
Select the items to import on the next screen, and then click the right-arrow button. The next screen tells you that the selected program will open, or it will ask you to find your mailbox files. Follow the remainder of the instructions to import all your mailboxes. You'll now be able to use your saved e-mail in Mail.
If you have an IMAP account, you won't need to worry about importing mail—the principle behind this type of account is that your e-mail resides on a central server, so you don't have to import anything.
Work with Mail
The main things you’ll want to do with Mail are compose mail, send mail, and receive mail. Mail’s interface is simple and easy to understand (see Figure 10-5): the default display uses two panes, with mailboxes and folders in a drawer to the right, and with a toolbar containing icons for the most common actions you use.
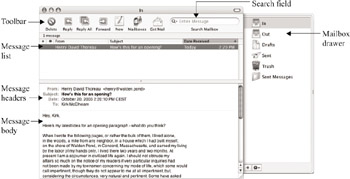
Figure 10-5: Mail’s interface is clear and easy to understand.
In Figure 10-5, you can see the main elements of Mail’s interface:
-
Toolbar At the top of the window, a toolbar holds icons for the most common actions you use with Mail.
-
Message List This is a list of messages in your mailbox. Click one to display its body in the bottom pane.
-
Headers This shows you who a message is from, their address, the date and time they sent it, and the message’s subject.
-
Message Body This is the text of the message.
-
Search Field You can enter text in this field to search among the messages in the selected mailbox.
-
Mailbox Drawer This displays all your mailboxes, folders, and a Trash folder.
The main tasks you perform with Mail are checking your e-mail, reading messages, replying to messages, and sending new messages. Many of the toolbar icons let you do these tasks with just one click:
-
Delete This deletes the selected message.
-
Reply This creates a new message in reply to the selected message.
-
Reply All This replies to the selected message, sending the reply to the sender and all of its recipients.
-
Forward This forwards the selected message; you select the address for the new recipient from the new mail message created after clicking this icon.
-
Compose This opens a new, blank mail message.
-
Mailboxes This hides or shows the mailbox drawer at the side of the window.
-
Get Mail This checks all your accounts for new messages.
-
Junk This sets the selected message as junk mail, and helps Mail’s junk mail filter learn from the message. If Mail thinks the selected message is Junk, this icon says Not Junk. Click it to tell Mail that it is not a junk message.
Check Your Mail
Click the Get Mail icon to check your e-mail. Mail checks your account(s) and downloads any messages waiting for you. These messages go into your In box. Click the In icon in the drawer to see what messages await you.
| Shortcut | You can also press z-SHIFT-N to check for new mail. |
| Note | Mail is set to check your mail automatically every five minutes. You can change this time or turn off automatic checking in Mail’s preferences. Select Mail | Preferences, and click the General icon. Select a time in the Check For New Mail pop-up menu. If you’re not connected to the Internet all the time, set this menu to Manually, so your Mac doesn’t try and open an Internet connection every five minutes. |
All your messages then display in the top pane of Mail’s main window. Click a message to display it; the message body shows in the bottom pane. You can read your message there, and if you want to delete it, just click the Delete button.
Reply to a Message
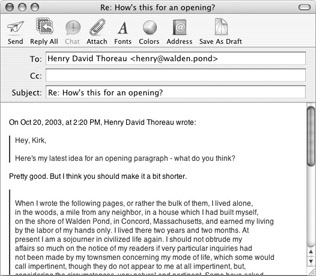
To reply to a message, select it in the top pane, and then click Reply. A new window displays with the To address set to that of the sender of the message you are replying to. The message body contains the entire message you’re replying to, set off as quoted text in a different color. You can type your reply at the top of this message, or you can put your reply in different places throughout the message.
| Shortcut | You can press z-R to reply to a selected or open message. |
If you're not connected to the Internet all the time, you'll find that you need to work a bit differently when composing new messages or replying to messages. When you click Send, Mail tells your Mac to open an Internet connection and send your message. But if you have a dial-up connection, you won't want to connect for each e-mail message you compose.
Select Mailbox | Go Offline to save your messages in the Out box instead of sending them immediately. When you work offline, sending a message puts it in the Out box, and to connect to the Internet and send the waiting messages, you must select Mailbox | Go Online. When you do this, Mail sends all messages in your Out box as soon as you connect to the Internet.
When you’ve finished composing your reply, click the Send button. This sends your message immediately. If you want to wait until later, just close the message and save it as a draft, and then reopen the message from the Drafts folder when you’re ready to send.
When replying to messages, you have several choices: if the message was sent only to you, you can click Reply to send a reply to the sender. If you were one of several recipients, however, and you want all the recipients to read your reply, click Reply All; this sends your reply to both the sender and all the other recipients of the original message. Finally, if you want to forward a message to another recipient, click Forward. This sends the original message to a recipient of your choice, indicating that you forwarded it. You can add your own comments to this message.
Compose a Message
When you want to compose a new e-mail message, click the New button in Mail’s toolbar. This opens a new message window.
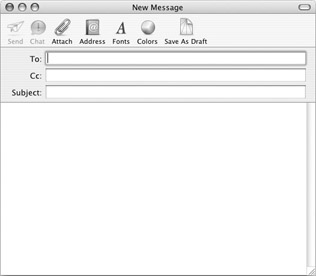
You need to enter an address for the person you’re sending the e-mail message to. Click the To field, and then type the recipient’s address. If you already have that person’s address in your Address Book, or if you’ve recently sent a message to them, you’ll see that Mail automatically completes the address after you type a couple of letters. If the address that Mail proposes is not the one you want, type another letter or two. If you know seven people named Joe, for example, you may need to type this first name plus one or two letters of their last name to find the right one.
You can also select addresses by clicking the Address icon in the New Message window. Just double-click an address, or drag it to the To field. You can send messages to multiple recipients by entering several addresses, or dragging them from the Address window. If you type them, you must separate multiple addresses with commas; if you drag them, just drag one address after another, or select multiple addresses (by pressing the z key and clicking on several addresses) and drag them together.
| Note | You can send messages to recipients by entering their address in the To field, and also send copies of the message to other recipients by entering their addresses in the Cc field. |
After you have entered your recipient’s address, enter a subject for the message in the Subject field.
Work with Attachments
Attachments are files sent with e-mail messages. You can send text files, photos, or even music and video files if you have a fast enough Internet connection, and if both your and your recipient’s mailboxes allow you to send large files. (In many cases, e-mail accounts limit the size of attachments. This can be 5MB or 10MB, or another size. If you need to transfer files larger than this and you have a .Mac account, you can use your iDisk. See Chapter 11.)
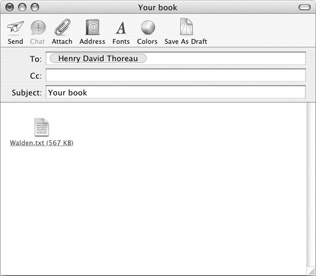
If you want to send files with your message, just drag them from a Finder window or the Desktop into a message window. You can also add attachments by clicking the Attach button in the new message toolbar and browsing to find the file(s) you want to attach. (If you’re sending files to a Windows user, or if you’re not sure whether your recipient uses a Mac or a PC, click the Attach button, find the file you want to send, and check Send Windows Friendly Attachments in the dialog.)
The attachments you add to your message appear in the message body section of the window. In the next illustration, you see a file sent as an attachment; but if you send one or several pictures, they will display in the message.
You can delete any of these attachments by clicking them to select them and pressing the DELETE key.
When you receive messages with attachments, they display at two locations in your incoming message. First, you’ll see the files’ icons in the body of the message. You can save the files by just dragging these icons to the Desktop or to a Finder window. Second, attachments are listed in the headers of your incoming message.
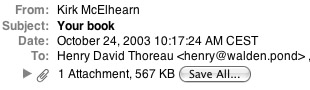
You’ll see the number of attachments and their size, followed by a Save All button. Click this button to open a standard Save dialog where you can choose a folder to save these attachments. You can also click the disclosure triangle at the left of this line; click this triangle to display your attachments. From there, you can drag them from the display to the Desktop or any Finder window.
Sort Spam with Mail’s Junk Mail Filter
Spam is the scourge of the Internet. If you don’t get any, you’re lucky. If you do, you are familiar with the litany of messages offering to help you get rich quick, to increase the size of certain body parts, or to sell you all kinds of medication and more. Some of this is annoying, and some of it is downright offensive.
One of the most powerful features of Apple’s Mail application is its built-in junk mail filter. If you use Mail, you can filter spam, or junk mail, into a special Junk folder, and then check it occasionally to make sure there are no messages that really were intended for you, or set it to delete its contents automatically every day, every week, or at whatever frequency you want.
When you first start up Mail, its junk mail filter is set to Training. (See Figure 10-6.) This means the filter is in a learning mode; it tries to figure out which messages are junk, and you confirm its choices.
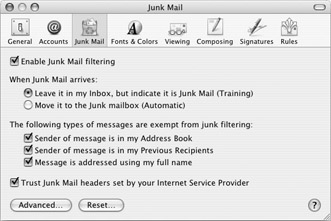
Figure 10-6: The Junk Mail preference pane when you first start up Mail
You can view the Junk Mail preference pane by selecting Mail | Preferences and clicking the Junk Mail icon in the preferences window toolbar.
Junk mail filtering is enabled by default when you first use Mail. This allows you to choose from several settings that tell Mail how to classify messages as junk.
You have two choices as to how Mail reacts when junk mail arrives:
-
Leave It in My Inbox, but Indicate It Is Junk Mail (Training) This tells Mail to stay in training mode. When in this mode, Mail indicates any messages it considers junk by changing their color to brown and showing a Junk header at the top of each message.

-
When you receive messages that are indeed junk mail, just delete them. Mail learns from each message, and keeps a database to filter out junk. If Mail has flagged a message as junk and it’s not junk, click the Not Junk button at the top of the message window.
-
When you receive junk mail that Mail has not spotted as junk, select the message and click the Junk button in the toolbar. This adds information about this message and its contents to Mail’s junk mail database. Remember, Mail is in training mode, and needs your help sometimes to know what is junk.
-
Move It to the Junk Mailbox (Automatic) When you have received enough junk mail for Mail to be accurate in its judgment, you can select this in Mail’s Junk Mail preference pane (see Figure 10-6). This tells Mail to start filing your junk mail into its Junk folder without asking you anymore. You can still set a message to junk by clicking the Junk button in the toolbar, and set a message that gets filtered into the Junk folder to Not Junk by clicking the Not Junk icon in the toolbar. While this junk mail filter is not perfect, it gets better over time as Mail learns from the type of spam you receive. It won’t stop you from receiving junk mail, but it will prevent you from having to read it. It is best to check your Junk folder before deleting its messages, though, in case any real messages get flagged as junk.
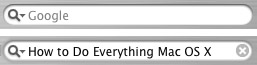
Figure 10-7: The Google search bar; empty (top), and with search words entered (bottom)
The Junk Mail preferences let you choose to exempt three types of messages from junk filtering:
-
Sender of Message Is in My Address Book If this is checked, no messages from people in your address book are flagged as junk.
-
Sender of Message Is in My Previous Recipients Check this to exempt messages from anyone you have recently sent messages to from being considered junk, even if they are not in your Address Book.
-
Message Is Addressed Using My Full Name Since most junk mail is addressed to e-mail addresses only, and sometimes with your first name, this exempts messages that are addressed to your full name. This may allow some messages to get through the junk mail filter, but if you do business over the Internet, and get e-mail from strangers regularly, this helps you spot real messages.
Finally, you can check Trust Junk Mail Headers Set By Your Internet Service Provider if your ISP uses special junk mail headers. It’s best to leave this checked.
Mail has many more features, such as the ability to create rules to filter your mail, threaded views for messages with the same subject, creating as many custom mailboxes as you want, and much more. See Mail’s online help for more on advanced Mail features.
| Note | If you have a .Mac account, you can also manage your e-mail on the .Mac web site. See Chapter 11 for more on using .Mac. |
As a Mac-using translator, I belong to a number of professional mailing lists, which net me between 250 and 300 e-mails a day. Of these, around a hundred are junk mail, which include the usual range of offensive, repulsive, and useless messages.
I needed a way to sort messages from the Inbox with a minimum amount of effort, bearing in mind that some of these messages may be from previously unknown clients asking me to work for them. I set up a Junk mailbox some time ago, and have spent about three months training it message by message.
I also have set up Mail to sort incoming messages by subject: since some mailing lists use introductory characters such as [TW], this makes it easy to set a filter to skip any messages marked in this way. Unfortunately, even the best-set filters cannot catch everything, and sometimes my “clean” mailing lists allow some junk to get through. The opposite also happens, and nonjunk messages get sent to the wrong mailbox.
I've managed to reduce my sorting process to two simple stages:
-
First, I go through the Inbox, deleting unwanted or irrelevant messages, and sending any junk that made it through the filter to the Junk mailbox.
-
I then go through the unsorted Junk mailbox, taking care to mark as Not Junk any wrongly attributed messages I delete, to help with the continuing training process. The rest I trash, leaving an Inbox with only those unread messages I want to answer.
Over time, the junk filter gets better at sorting things out for me, but it is likely I will never be able to let it just work unsupervised, simply because I cannot afford to miss that one e-mail that could mean work for me.
After working for more than 25 years in international commercial real estate consulting, Mark N. di C. Willan now lives semiretired on the French Riviera, where he works as an occasional translator and does voluntary and educational work.
EAN: 2147483647
Pages: 171
- Integration Strategies and Tactics for Information Technology Governance
- An Emerging Strategy for E-Business IT Governance
- Technical Issues Related to IT Governance Tactics: Product Metrics, Measurements and Process Control
- Governing Information Technology Through COBIT
- Governance Structures for IT in the Health Care Industry