Set Up Network Preferences
In most cases, when you first set up your new Mac, you enter the information necessary to connect to the Internet in an assistant that walks you through the setup procedure and records your basic data: your name, address, e-mail address, and your Internet service provider (ISP) information, such as your user name, password, and dial-up phone number. When you do this, your Mac stores the information you enter in the Network preference pane. If you didn’t enter this information when setting up your Mac, or if you didn’t have an Internet connection at the time, I’ll explain how to do so in this section.
| Note | If you’ve upgraded from a previous version of Mac OS X, such as Jaguar, you’ll find that the Network preferences have been reorganized and include many of the settings that were previously in the Internet preference pane. |
Configure Network Preferences
The Network preference pane (Figure 10-1) is where you enter information that your Mac needs when using the Internet and other networks. You can access this preference pane by opening the System Preferences (either click its icon in the Dock or select the Apple Menu | System Preferences) and clicking the Network icon.
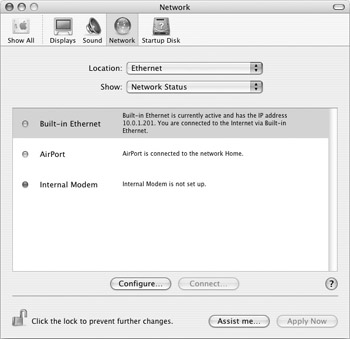
Figure 10-1: The Network preference pane is where you enter information needed by your Mac to connect to the Internet or other networks.
| Note | You may see different entries on the Network preference pane, depending on the type of hardware and network interfaces your Mac has. All new Macs include at least Built-in Ethernet and an Internal Modem, as shown in Figure 10-1; some new Macs also include a wireless AirPort card, and if you don’t have an AirPort card, you can purchase one and install it in most recent Mac models. |
The Network preferences affect your connection both to a local network (if you use one) and the Internet. This preference pane contains a number of different displays, as well as several tabs, depending on the type of hardware your Mac has and the type of connection you want to make. Figure 10-1 shows the Network Status pane; this displays when you open the Network preference pane the first time, or when you select Network Status from the Show pop-up menu. This pane shows the different network interfaces you have, whether they are set up, and whether or not they are connected to a network.
If you select Network Port Configurations from the Show pop-up menu, you’ll see a different display: this pane shows all the network interfaces installed on your Mac. They include your internal modem, Ethernet card, AirPort card, or any other network devices you have.

You can activate or deactivate your network interfaces on this pane by checking or unchecking the boxes next to their names. You can also change the order with which your Mac uses these interfaces to make a connection by dragging them in the list; your Mac uses the topmost network interface first, then the next one, and so on, until it can create a connection.
The easiest way to configure your Mac to use a network is to use the Network Setup Assistant. You can open this assistant by clicking the Assist Me button at the bottom of the Network preference pane. This assistant asks you a series of questions about how you connect to a network or to the Internet and records the settings you need.
| Note | If you use America Online (AOL) for your Internet access, see the instructions included with AOL’s software to find out how to configure your Mac. |
The first screen of the Network Setup Assistant asks you to enter a name for the location it’s going to create. A location is a group of network settings, which includes the network interface you use to connect to a network, and the way this interface goes about connecting. Enter a name for the location in the Location Name field; this could be anything, such as My Connection, or the name of your ISP, home, office, and so on. Enter a location name, and then click Continue.
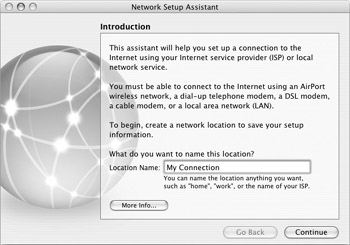
| Tip | You can set up as many locations as you want, and you can switch locations by selecting the Apple Menu | Location, and then the name of the location from the submenu that displays. Locations are practical if you switch network configurations for any reason, such as if you have a PowerBook or iBook and use it both at home and at the office, or if you use your modem sometimes and another network interface at other times. |
The next screen asks you how you connect to the Internet. You have five choices:
-
I use AirPort to connect to the Internet wirelessly. Check this if you have an AirPort card in your Mac and either an AirPort base station or another Mac sharing a connection via AirPort.
-
I use a telephone modem to dial my ISP. Check this if you use your Mac’s internal modem, or an external modem, to connect to your Internet service provider.
-
I use a DSL modem to connect to the Internet. If you have a broadband DSL connection, check this.
-
I use a cable modem to connect to the Internet. Check this if you have cable Internet access.
-
I connect to my local area network (LAN). Check this if your Mac connects to a local network that provides Internet access.
The Network Setup Assistant asks different questions according to the connection method you check here. The following sections cover each of these five connection methods.
| Note | Not sure how you connect to the Internet? Click the More Info button to see the different types of connections and hardware used. If you’re still not sure, contact your Internet service provider or your computer’s administrator. |
Use AirPort to Connect to the Internet Wirelessly
You can connect to the Internet using a wireless Airport connection. If your Mac has an AirPort or AirPort Extreme card (an 802.11b or 802.11g card), you can connect to a wireless network at home, if you have an AirPort base station, or in other locations where wireless network access is available. You can also share a wireless connection among several Macs with Airport cards. (I’ll tell you how to set up an AirPort network in Chapter 12.)
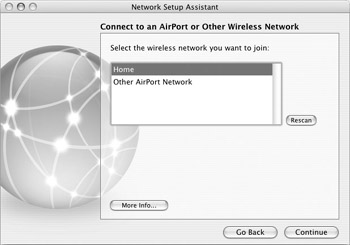
The assistant asks you here to choose the wireless network you want to join. It displays a list of all available networks. Click the one you want to join, and then click Continue. The next screen asks if you’re ready to connect. Click Continue.
The assistant opens the connection—this may take a few seconds—and your location is now saved with the settings you’ve chosen.
| Note | If the wireless network you choose requires authentication, a password field will appear when you select it. Also, some networks don’t broadcast their names. If you know there’s a wireless network available, click Other AirPort Network and you’ll be able to enter the network’s name and password. |
Use a Modem to Connect to the Internet
Every Mac currently sold includes an internal modem (unless you buy a made-to-order model and choose to remove it). This modem operates at a speed of 56 Kbps, which is fine for casual web surfing and e-mail use, but is pretty slow for downloading music, pictures, or movies from the Internet.
The assistant asks you to enter some information such as your account name, password, your ISP’s phone number, and whether you need to dial a prefix to get an outside line. When you’ve done this, click Continue.
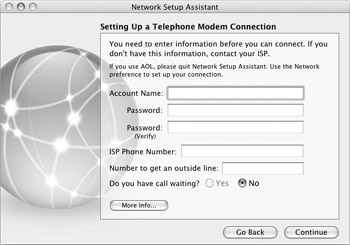
The Modem pop-up menu on the next screen lets you choose from a number of modem scripts, which tell different modems how to connect. If you are not using the standard Apple internal 56K modem, choose your modem from this list. If you are using the Apple modem, you have three choices for modem protocols: v. 34, v. 90, and v. 92. These are different ways for your modem to talk to your ISP’s modems. Try v. 90 first, and if you have connection problems, try the other two or call your ISP and ask them which is the best protocol to use. Select the appropriate modem and click Continue.
The assistant opens the connection—this may take a few seconds—and your location is now saved with the settings you’ve chosen.
Use a DSL or Cable Modem to Connect to the Internet
For people who use the Internet a lot, or who want to be able to send and receive large files, broadband is the way to go. Broadband offers two advantages over modem connections. First, it gives you higher bandwidth. Think of bandwidth as a pipe. If a modem connection is like a water pipe in your home, broadband is like a water main. You get more water through the pipe in a given amount of time. Broadband is the same: you get much more data in or out of your computer in the same amount of time, making downloads and uploads faster. The second advantage is that broadband is generally always on, meaning you don’t need to wait to connect (and listen to the screechy noises of your modem), and that you can use services that require a permanent connection.
There are two main types of broadband connections: cable and DSL (though if you are connected to a local network, that is technically broadband as well). Many cable and DSL connections use the PPPoE protocol (point-to-point protocol over Ethernet), which uses your Mac’s Ethernet jack to connect through a special type of modem, called a cable or DSL modem, to your ISP.
If you plan to connect via broadband, some ISPs offer two types of modems. One connects via Ethernet and the other via USB. Choose the Ethernet model, if you can, since USB models require you to install additional drivers; the Ethernet models connect directly and are easier to set up and troubleshoot.
The Network Setup Assistant can automatically connect to the Internet in many cases; this depends on the type of DSL or cable modem you have, and the way you connect. Try clicking the Continue button to see if you can connect immediately.
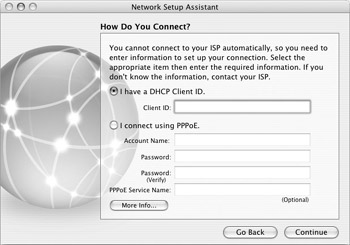
If you can’t connect to your ISP automatically, you’ll need to enter some connection information: you may have a DHCP Client ID; if so, enter that in the first field. If not, you’ll be connecting by PPPoE. Check that option, then enter your account name and password, and then click Continue.
If the Network Setup Assistant can’t connect you to your ISP, contact them to make sure your connection information is correct.
Connect to the Internet via a Local Network
Another way of connecting to the Internet is over a local network. If this is how you access the Internet, the next screen on the assistant attempts to connect to your network. Make sure you are physically connected to the network via an Ethernet cable, and then click Continue.
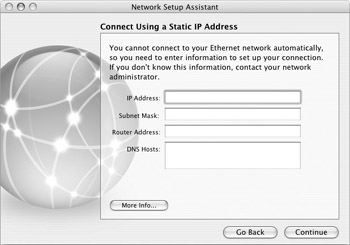
If the assistant can’t connect automatically, the next screen asks you to enter some information such as an IP address, a subnet mask, a router address and one or more DNS hosts. If you don’t know this information, contact your network administrator.
After you’ve entered this information, click Continue, and the Network Setup Assistant connects your Mac to your local network.
| Note | If you have several Macs, either at home or in an office or school, you can configure one of them to connect to the Internet and share its connection to other computers on the network. I’ll tell you how to do this in Chapter 12. |
Open an Internet Connection
If you are using a broadband Internet connection, or connect via a local network, and the Network Setup Assistant was able to connect immediately, then you won’t need to open an Internet connection when you want to surf the Internet. However, if you are using a modem, or certain DSL or cable modem connections (connected via PPPoE), you’ll need to use the Internet Connect application to open and close your Internet connections. (See Figure 10-2.)

Figure 10-2: The Internet Connect application icon
Internet Connect, located in your Applications folder, is a program that manages your Internet connection by dialing your modem (or activating your DSL or Cable modem) and establishing a connection with the ISP you have specified using the Network Setup Assistant or in the Network preferences. Once you are connected, as you can see in Figure 10-3, it shows your connection speed and the amount of time you are connected, and lets you disconnect.
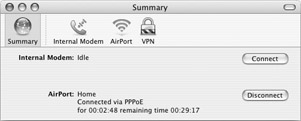
Figure 10-3: This shows a computer connected to the Internet via AirPort.
The Summary pane of Internet Connect, shown in Figure 10-3, shows the different types of connections available. The Internet Connect toolbar gives you access to information and settings for the connections you have available.
To connect to the Internet, click one of the icons in the toolbar, either Internal Modem or AirPort. The Network Setup Assistant will have entered all the necessary information so Internet Connect can function. Click Connect to open a connection. If you connect with a modem, this should take a few seconds, and you’ll probably hear a series of strange noises as your modem negotiates with your ISP’s modem and then finally connects.
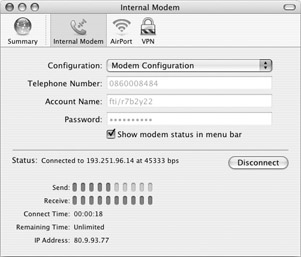
After you’ve connected, the Internet Connect screen shows your connection speed and the IP address you’re connected to, how long you’ve been connected, how much time remaining (if you have a time limit), your IP address, and a set of Send and Receive gauges that show when data is being sent from, and received by, your Mac.
When you want to disconnect, just click the Disconnect button.
You can check Show Modem Status In Menu Bar, from the Internal Modem pane of Internet Connect. If you do this, a Menu Extra displays in the menu bar to help you connect using your modem.
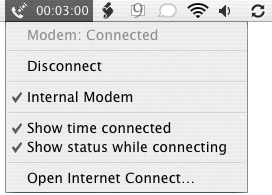
You can use the Menu Extra to open Internet Connect quickly; just click the Modem Menu Extra and select Open Internet Connect... . You can also connect and disconnect directly from the Modem Menu Extra by selecting Connect or Disconnect from its menu.
EAN: 2147483647
Pages: 171