Delete Your Files Securely
When you place files into the Trash, and then empty the Trash, your files are not actually deleted. This may surprise you, but what actually happens is the operating system merely deletes pointers to the files in your hard disk’s directory, a catalog file that records the locations of individual files.
For this reason, disk recovery software (see Chapter 21) can sometimes recover files that you have accidentally deleted or that have been lost to hard disk corruption. The files remain on the disk, but Mac OS X can’t find them.
Sometimes, however, you want to really delete your files, erasing them in such a way that no one can get them back. This may be the case for sensitive files, but you may also want to securely delete files on a hard disk you are going to remove, or on a Mac you are going to sell or give away.
To securely delete files in the Trash, select Finder | Secure Empty Trash. An alert displays asking if you’re sure you want to do this; after all, you won’t be able to recover these files in any way. If you’re sure, click OK. This writes zeros over the files’ locations on your hard disk, instead of just deleting their directory records. However, since most applications rewrite files each time they save them, this only really deletes the latest versions of the files; it’s entirely possible that there are dozens of older versions of the files on your disk.
| Tip | There are a few programs that can permanently delete the free space on your hard disk. SafeShred Xtreme from CodeTek (www.codetek.com) is one such program, and commercial versions of PGP also offer this feature. |
Reformat Your Hard Disk Securely
The only way to fully delete the files on your hard disk, especially if you are changing your disk, or selling or giving away your Mac, is to reformat your hard disk. Yet, again, simple formatting is not enough; you must totally erase the disk when you reformat it.
To do this, you’ll need to restart from a Mac OS X Install CD or from a different hard disk (such as a second internal hard disk or an external disk). In the first case, insert the CD, and then double-click the Install Mac OS X icon; you can also insert the CD and restart your Mac while holding down the C key on your keyboard. Then select Installer | Open Disk Utility to access Disk Utility. (If you are working from a second hard disk, just launch Disk Utility from this disk.)
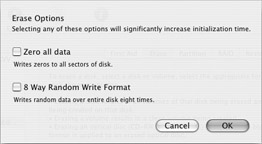
Select your hard disk in the disk list at the left of the window, and then click the Erase tab. Click the Options button to display Erase Options:

You can choose from two options. If you choose Zero All Data, Disk Utility writes zeros to all the disk’s sectors. If you choose 8 Way Random Write Format, Disk Utility reformats the disk writing random data eight times. Either of these choices greatly increases the time it takes to reformat your disk, but they are the only way to truly delete all the remnants of your files.
EAN: 2147483647
Pages: 171