Choosing a Data Source
 |
| |||||||||
The next step in building a report is to select the data that will be used to populate your report. The Standard Report Creation Wizard dialog, shown in Figure 1.4, allows you to choose your data source.
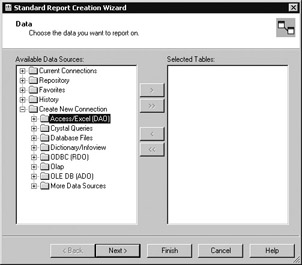
Figure 1.4. Available data sources
Available Data Sources
The Data dialog contains a list of available data sources on the left side of the window. Crystal Reports 9 supports a long list of data sources. There’s a good chance the type of data you’re using will be listed directly; if not, you can use the Create New Connection option to access the database. Table 1.2 describes the five general categories of data sources.
| Note | Think of “available data sources” as being any database or data file located on your machine or accessible through a network connection from your computer. |
| Source | Description |
|---|---|
| Current connections | Displays the databases to which Crystal Reports is currently connected. |
| Repository | Lists data stored in Crystal’s common object repository. |
| Favorites | Displays a list of databases that you have manually added to your Favorites. |
| History | Shows data sources you have recently used; during the current Crystal session, all databases you access will appear; once closed and reopened, Crystal displays the most recent five data sources. |
| Create new connections | Allows a connection to any data source that you can access. |
The process of specifying data for your report is to select a data source from the window on the left (Available Data Sources) and use the arrow in the middle to move your selected data source to the window on the right (Selected Tables).
| Note | The + (plus sign) to the left of a word or phrase indicates that this is an expandable category that contains subcategories, as shown previously in Figure 1.4. |
The VistaNations organization uses a Microsoft Access database. In the collapsed format, the Standard Report Creation Wizard does not list the VistaNations database, so we need to go and find it. This will often be the case in your organization…finding the data can be an adventure!
Making a New Connection
Since we know the data source is a Microsoft Access database and we haven’t worked with it before, the option to create a new connection sounds promising. In fact, whenever you start working with a database you haven’t used previously in Crystal Reports, this is your starting point. Once you make a connection to a database, it appears directly in the list. Double-clicking the Make New Connection option opens the Connection dialog shown in Figure 1.5.

Figure 1.5. Connection dialog
The Connection dialog provides an area to specify the database name, the type of database you’re accessing, and whether you need to access the database with a user ID and password, in another words, a secure logon.
The options to add a database password, a session user ID, a session password, and a system database path become active and available only when the Secure Logon check box is marked.
Minimally, you can provide just the database name and its type to make the connection. You can enter this information directly, browse to it, or use a drop-down list to help you.
Let’s find a database using the browse button (the button with three ellipsis points on it). The browse button brings up a dialog window to let you find and open any data file. In our example, the VistaNations database is located directly on the Local Disk (C:), as shown in Figure 1.6.
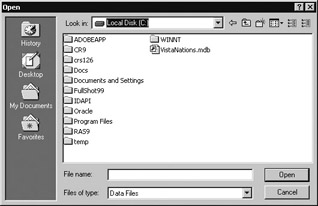
Figure 1.6. Open dialog
The VistaNations database is read-only and does not require any userID or password, so we’ll leave the Secure Logon check box unmarked. Figure 1.7 shows the database name and database type properly filled in, so you’re ready to click the Finish button to make the connection.
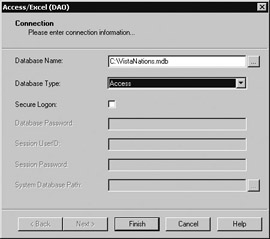
Figure 1.7. Connection settings
This completes the task of choosing a data source. The VistaNations data source now appears in your list of Available Data Sources, as shown in Figure 1.8, and you’re ready to choose tables and fields.

Figure 1.8. An available data source
Choosing a Table
Database software (such as Microsoft Access) stores data in files that can contain any number of database tables. Within each table, any number of fields can be stored. The typical database components are depicted in Figure 1.9. Microsoft Access stores its data in a file that has an .MDB extension.
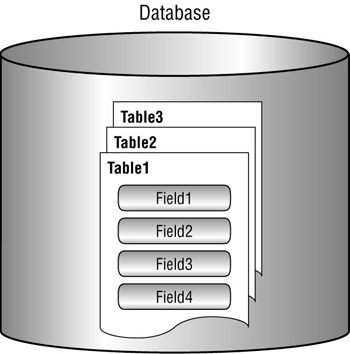
Figure 1.9. Database components
The Data dialog shown in Figure 1.10 shows a list of Available Data Sources on the left and a list of Selected Tables on the right: the tables you have selected to use in this particular report. When you begin a new report, this list is empty.
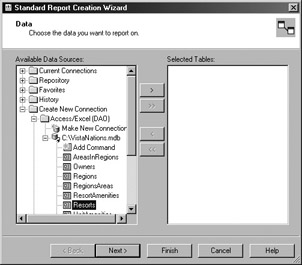
Figure 1.10. Data dialog
The VistaNations organization has several tables in its database; we’ll build a report with one of them. By clicking a table, for instance, Resorts, you select that table from the list of Available Data Sources. With a table selected, the buttons in the middle become active. A single click on the first button copies the table to your Selected Tables list, as shown in Figure 1.11.
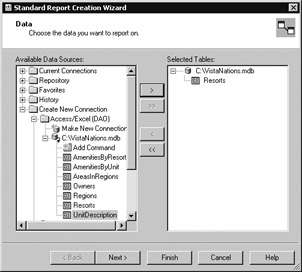
Figure 1.11. Selected table
Let’s spend a moment discussing the Crystal-specific behavior of the five button options at the middle of the Data dialog. The first button, Back, is grayed out (disabled), signaling that moving to the previous dialog is not an option at this point. This is common practice in applications written for Microsoft Windows.
The Next button is available, and it is the button you use to move step-by-step through the Report Creation Wizard. So, the Back and Next buttons move you in either direction through the Report Creation Wizard. The nice thing about this is if you want to change one of the choices you’ve made during the creation process, simply use the Back button to go back and correct the option and the Next button to return to where you were and keep going.
The Finish button is also active and available. The behavior of the Finish button in Crystal is to stop the wizard at any point you choose, take the information collected up to that point, and use it to create and display the report. That means you don’t have to use all the screens in the wizard in order to create a report! As a point of reference for when to do this, though, take note that if you were to click Finish at this point, you’d have a pretty dull report since you haven’t chosen any field data.
The Cancel button also stops the wizard, halting the report-building activity completely and closing all open dialogs. The behavior of the Cancel button should be familiar to you Windows users out there!
The Help button opens a context-sensitive help window. An appropriate help window for the task you are doing will appear. Crystal Reports 9 has a very complete help file and provides a wealth of information. This feature has been vastly improved in Crystal Reports 9, so enjoy!
| Note | After the wizard completes and you are in the Crystal Reports design environment, you can add additional tables or change your data source altogether using the toolbar. Notice the icon in the top-right corner of the Data dialog, shown in Figure 1.11. This icon will appear on the Crystal Reports toolbar later. |
| Use of content on this site is expressly subject to the restrictions set forth in the Membership Agreement | |
| Conello © 2000-2003 Feedback | |
EAN: 2147483647
Pages: 217