Adding Fields
 |
| |||||||||
With a data source’s table identified, the Report Creation Wizard next guides you to choose fields from the table to add to the report using the Fields dialog shown in Figure 1.12.
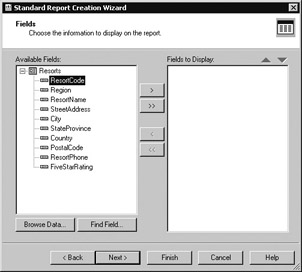
Figure 1.12. Choosing fields
Choosing Fields
The Fields window should feel familiar since it is similar in design to the previous dialog we examined. Your job is to select fields in the list of Available Fields on the left side of the dialog and copy them to the right side of the dialog, Fields To Display, using the buttons between the two lists. Referencing the business question, we’ll choose appropriate fields from the 10 available in the Resorts table.
Business Question: How many resorts does VistaNations have in each country and what are their names?
To satisfy this business question, we’ll need the following fields:
-
ResortName
-
Country
You can click each field individually to select it and then use the first button between the two lists to copy the field to the list of Fields To Display. When you’ve finished adding fields to the list of Fields To Display, you can click Next to move to the next step.
| Note | The first two buttons shown in Figure 1.12 move fields to the list of Fields To Display; the second two buttons in Figure 1.12 (shown disabled here) remove fields from the display list. |
| Tip | You can use the Microsoft keyboard shortcuts Ctrl or Shift while selecting fields to highlight individual or adjacent fields as a group. |
Browsing Data and Finding Fields
There are two buttons on the Fields dialog: Browse Data and Find Field. The Browse Data field is used to take a peek at the type of data that is stored in the field before adding it to your report. For instance, with the Country field selected in the Available Fields list, clicking the Browse Data button displays sample data and tells you what type of data is stored. Figure 1.13 shows the Browse Data window for the Country field. You can scroll through the list box to view the data that is stored in the field. Along the top, you can see that the field data type is String and its length is 50.
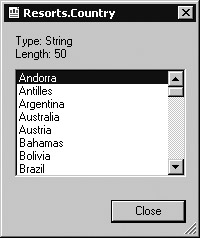
Figure 1.13. Browse Data window
The Find Field button is useful when a long list of fields is displayed and you want to avoid scrolling to find a particular field. You can type in the exact name of the field you’re looking for or as much of the name, starting at the beginning, as you know, as shown in Figure 1.14.
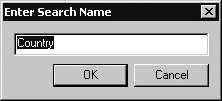
Figure 1.14. Find Field window
Sequencing Fields
With a set of fields to display shown in the Fields dialog, you can determine the order in which the fields are added to the report. Click the upward- or downward-pointing triangle, visible here in Figure 1.15, to move the selected field higher or lower in the list of fields.
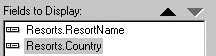
Figure 1.15. Sequencing fields
| Note | After the wizard completes and you are in the Crystal Reports design environment, you can still add fields using the toolbar. Notice the icon in the top-right corner of the Fields dialog, shown previously in Figure 1.12. This icon will appear on the Crystal Reports toolbar later. |
| Use of content on this site is expressly subject to the restrictions set forth in the Membership Agreement | |
| Conello © 2000-2003 Feedback | |
EAN: 2147483647
Pages: 217