Opening Images
Opening an image in one of Photoshop’s accepted file types is a snap (take a look at the sidebar “What you need to know about file types” for a list of file types). If you want to open an image from a peripheral device such as a camera or scanner, the process is a little trickier, but not much. For details about opening images from a peripheral device, check out the section “Importing Images into Photoshop,” a little later in this chapter.
Opening an image using the File menu
To open an image:
-
Choose File→Open or Ctrl+O (z+O on a Mac).
Tip The Open dialog box appears. The two images in Figure 3-3 show the dialog box for both Windows and Mac machines as shown in Figure 3-3, ready for you to move to the folder where the image is stored and select it.
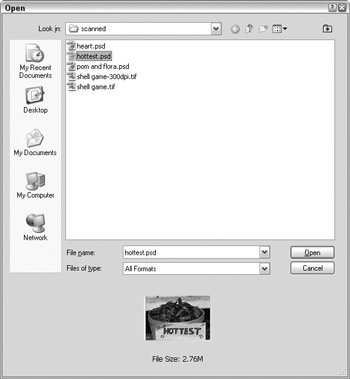
Figure 3-3 (Windows): This dialog box lets you locate and open images on your hard drive or some other disk.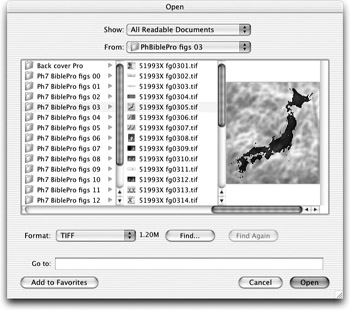
Figure 3-3 (Mac): The Open dialog box in Mac OS X sports a browser type display, allowing you to easily locate and open your image. -
If you’re a PC user, locate the folder that contains the image you want to open using the Look In drop-down list box.
After selecting folder, the folder’s contents will appear in the file list box.
-
If you’re a Mac user, find the folder containing the image using the Browser pane or the Favorites pop-up menu.
The scrolling browser list shows folders and images on the disk. Double-click a folder name to open a folder to see a list of all its contents (subfolders and images).
-
Click the image you want to open.
A preview of the image appears in the dialog box so you can see what it looks like.
-
Click Open.
Tip You can just double-click the image file name to open it, skipping the preview mentioned in Step 3 and skipping Step 4.
Using the File Browser
| Photoshop CS | Introduced in Photoshop 7, the File Browser is a special window that lets you search for images using thumbnails, as well as moving, renaming, rotating, and, yes, even opening images (several at a time, if you want!). New Photoshop cs features allow you to flag, sort, group, and rank images, drag images around the File Browser just like it’s a light box, and perform batch actions. For instance, you can convert a group of images from color to grayscale, instead of performing the task one image at a time. You also can use automated plug-ins from inside the File Browser. |
To open images using the File Browser is easy, here’s how:
-
Open the File Browser by choosing File→Browse or Ctrl+Shift+O (z+Shift +O on a Mac) or by clicking the File Browser button on the Options bar.
Photoshop CS Located on the right side of the Options bar is a File Browser button (see Figure 3-4). This button toggles on and off, meaning that you can both open and close the File Browser by clicking this button.

Figure 3-4: The new File Browser button on the Options bar makes opening and closing the File Browser easy.The File Browser, shown in Figure 3-5, consists of several palettes that vertically line up along the left side of the File Browser window, menus and buttons along the top that help you perform tasks, drop-down list boxes to help locate folders and sort images, and a large pane that lets you quickly look at thumbnails of the images.
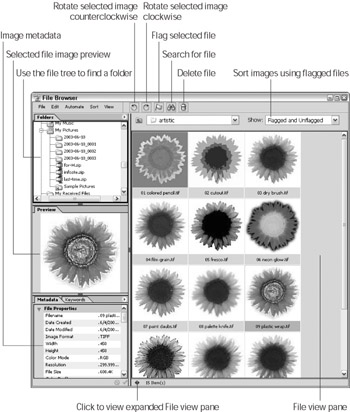
Figure 3-5: The File Browser window offers many options for managing image files. -
Use the Folders palette to locate the folder where the image you want to open is stored.
Thumbnails of the images contained in that folder appear in the view pane.
-
Click a thumbnail to select an image.
The image you selected appears in the Preview palette. If any metadata is associated with the file, that information appears in the Metadata palette. Metadata is information, such as the filename, file creator, image format, date the file was last modified, resolution, and so on, that is associated with the image.
-
Choose File→Open from the top of the File Browser window (not the Photoshop window).
The image opens, ready for editing. Photoshop keeps the File Browser open and close at hand in case you want to select another image to open or perform other File Browser tasks.
-
To close the File Browser either click the Close button in the File Browser window or click the File Browser button on the Options bar.
Tip You also can select multiple images to open by Ctrl+clicking (z+clicking on a Mac) the thumbnails at the right of the File Browser window.
Other ways to open images using the file browser include dragging a thumbnail out of the File Browser onto the Photoshop desktop, and double-clicking a thumbnail in the File Browser dialog box.
Other File Browser features
The File Browser makes many important tasks just a mouse click away. With the File Browser open, give these features a try:
-
Rename files: Click the filename below a thumbnail, and then type in the new name.
-
Delete files: Drag the file to the trash can button at the top of the File Browser or choose File→Delete.
-
Rotate images: Select the image thumbnail, and then click either the Rotate Counter-Clockwise or Rotate Clockwise button at the top of the File Browser. You also can select a rotation method from the Edit menu.
-
Sort files: Click the Sort button at the top of the File Browser window, and then select a sorting method from the menu that appears. Some sorting methods include sorting by filename, width, file size, resolution, and color profile.
-
View specific images in a particular folder: Select the thumbnail of the first image you want to view, and then click the Flag File button at the top of the File Browser window. Select the second thumbnail and then click the Flag File button, and repeat this process until you have flagged all the files you want to view. Then, select Flagged Files from the Show drop-down list box. All the unflagged thumbnails disappear, leaving only the flagged image thumbnails for viewing.
-
Drag sorted and ranked images: Drag the thumbnails to your heart’s content. To expand the view pane and hide the palettes at the left of the File Browser, click the Toggle Expanded View button at the bottom of the File Browser dialog box.
-
Perform batch processes: To perform the same task on several images at a time, select the image thumbnails in the view pane, and then choose Automate→Batch from the top of the File Browser window. The Batch dialog box opens. Select a task from the Action drop-down list; for instance you can convert the images from RGB to grayscale, and then click OK. Photoshop opens the images and performs the task. You can then save the changes that Photoshop performed.
-
Open files in ImageReady: ImageReady is Photoshop’s sister program for creating Web graphics. Select the thumbnail of the image you want to open, and then choose File→Edit in ImageReady. For a detailed description of ImageReady and what it can do, turn to Chapter 18.
What you need to know about file types
Photoshop can open and save 35 different file types. This list of file types includes many that you have heard of, such as PDF, TIF, BMP, and GIF, and a few that you probably have never heard of and will never use. You can identify an image’s file type by looking at the three or four characters that appear after the period at the end of the filename (for instance, Flower.eps is an Encapsulated PostScript, or EPS, file). Check out Table 3-1 to see a list of the most common file types and what they are used for. To learn how to save images in other file formats, take a look at the section “Saving an image in another file format,” later in this chapter.
| File Type | Uses |
|---|---|
| PSD | Photoshop’s native file format. This is the default file format and the only one that supports all Photoshop features. Save images that you edit in Photoshop in this format, but if you want to send the files electronically to others, you may want to choose a specialized format such as TIF, EPS, JPG, or GIF that can be viewed by people who don’t have Photoshop (you can save a copy of the image in any of these file types). |
| BMP | Windows Bitmap format. BMP is a standard Windows-only image format. This format supports RGB, Indexed Color, Grayscale, and Bitmap color modes, but it does not preserve layers, editable type, grids, or guides. This is the file format used to save graphics on a Windows computer that become part of the computer’s resources, such as desktop wallpaper. |
| EPS | Encapsulated PostScript format. Postscript is a page description language used by printers. It is typically used for high-end image reproduction; for instance, you might choose the EPS format if you’re creating expert color separations for print. (For details on saving an image in EPS file format, turn to Chapter 6). |
| GIF | Graphics Interchange Format. Used for Web images and animations (see Chapter 18). |
| JPG, JPEG | Joint Photographic Experts Group format. Typically used for fullcolor Web images and photographs (see Chapter 18) because it compresses image file size. |
| | Portable Document Format. Adobe Acrobat’s native file format. This format was developed by Adobe to be a file viewing option that is operating system independent. Saving an image in Photoshop PDF format preserves layers, editable type, grids, and guidelines. |
| TIF, TIFF | Tagged Image File Format. This format was developed to serve as a cross-platform image format. TIFF is an excellent file format to use for printed images. It can be imported in to almost all page layout and drawing programs. Saving an image in Photoshop TIF format preserves layers, editable type, grids, and guidelines. |
EAN: 2147483647
Pages: 221