Erasing and Restoring History
You can select any state or snapshot in the History palette and use it as a “painting” source for the History Brush tool, the Art History Brush tool, and the Eraser tool. When working with one of these tools and with an earlier state selected, you can paint away (or erase) any subsequent states in an area of an image, creating interesting effects.
Erasing history
The Eraser tool is pretty straightforward. To use it to erase a portion of a layer to a previous history state, follow these steps:
-
 Select the Eraser tool from the Toolbox.
 -
Select the layer in the Layers palette that you want to erase from.
This layer must be an image layer, not an editable type layer or shape layer. (To find out more about type layers, turn to Chapter 17; for more about shape layers, turn to Chapter 16.)
-
Set Eraser tool options.
As shown in Figure 14-8, use the Options bar to choose Eraser settings. Use the Brush Preset picker to select the eraser tip diameter and hardness, choose an eraser mode — Brush, Pencil, or Block, select an opacity setting, and choose the amount of flow.
-
On the Options bar, select Erase to History.
-
In the History palette, click in the column to the left of the history state or snapshot that you want to erase to.
A tiny History Brush icon appears in the column, as shown in Figure 14-9.
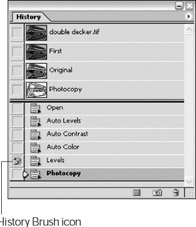
Figure 14-9: A tiny History Brush icon indicates the selected state or snapshot that the Eraser tool will erase to. -
Drag the Eraser tool to restore portions of the image to the selected history state or snapshot.
Figure 14-10 shows the Eraser tool in action. A snapshot of the double-decker bus image on the left was taken to save its original state. Then, the Photocopy filter was applied as shown in the middle image. Next, the tiny History Brush icon was positioned next to the snapshot in the
History Palette. Finally, using the Eraser tool with its Erase to History option checked and the original source state selected, the upper deck of the bus was restored with a few swipes of the Eraser tool.
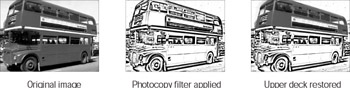
Figure 14-10: A double-decker bus gets its upper deck restored using the Eraser tool.
Filling a layer or selection with a history state
Using the Edit→Fill command, you can erase a portion of a layer or selected area to a previous history state or snapshot. Here’s how:
-
In the Layers palette, choose the layer that you want to fill with a history state or a snapshot.
If you want to only fill a portion of the layer, use any of the selection tools to select those areas. (To find out how to use the selection tools, turn to Chapter 7.)
-
Click in the left column next to the history state or snapshot that you want to use as the fill.
A tiny History Brush icon appears in the column as shown in Figure 14-9.
-
Choose Edit→Fill to open the Fill dialog box.
-
In the Contents area, select History from the Use drop-down list box.
Figure 14-11 shows the History option being selected. You can also choose a blending mode and opacity for the fill in this dialog box. If the layer you selected has transparent pixels, put a check in the Preserve Transparency check box to replace only colored pixels.
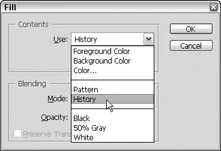
Figure 14-11: In the Fill dialog box, select History from the Use drop-down list box in the Contents area. -
Click OK.
The Fill dialog box closes and the layer (or selections) are filled with the previous history state or snapshot. In Figure 14-12, the windows of the double-decker bus shown in Figure 14-10 with the Photocopy filter applied, were selected then filled with the original history state.

Figure 14-12: You can select a layer or image and fill it with a previous history state.
The History Brush tool
The History Brush tool works like Eraser tool and Fill command, but with more painterly results because a previous history state or snapshot is stroked onto the image. And, the History Brush tool has all the power and flexibility of the Brush tool — you can select brush tips using the Brushes palette, including the incredible brush options such as Shape Dynamics,
Scattering, Dual Brush settings (as discussed in Chapter 12), set blending modes, opacity, flow, and airbrush capabilities.
To use the History Brush tool, follow these steps:
-
 Select the History Brush tool from the Toolbox.
 -
Use the Options bar to select History Brush tool options.
As shown in Figure 14-13, you can select a brush tip size and hardness from the Brush Preset picker, select a blending mode, set the opacity, select flow percentage, and airbrush capabilities.
Tip If you want to create a custom brush shape, you can use the Brushes palette as discussed in Chapter 12.

Figure 14-13: When the History Brush tool is selected, the Options bar offers the same settings as the Brush tool. -
In the History palette, click in the left column next to the history state or snapshot that you want to use as the pixel source for the History Brush tool.
A tiny History Brush icon appears in the column as shown in Figure 14-10.
-
In the Layers palette, select the layer you want to restore.
-
Use the History Brush tool to paint strokes on the layer.
The pixel data from the state or snapshot you selected in Step 3 is used to restore the stroked areas to that earlier state.
Figure 14-14 shows three versions of the same image. On the left is the original photograph of a ballet dancer. Using the History palette, I took a snapshot of this history state. Next, I applied the Watercolor filter to the photograph (middle image). Then, I positioned the tiny History Brush icon next to the snapshot in the History Palette. Finally, I stroked the head, arms, and upper torso of the ballet dancer with the History Brush tool, restoring the dancer’s original skin tones and facial features (right image).

Figure 14-14: These three images show the History Brush tool at work.
The Art History Brush tool
The Art History Brush tool is great for adding painterly watercolor-like effects to an image by blending adjacent colors with special brush tips only available to tool.
| Tip | The Art History Brush tool spreads paint like a watercolor brush. As you stroke with the brush, paint flows more into darker areas and less into lighter areas. Painting on a high-contrast image works best. |
- Select the Art History Brush tool from the Toolbox.
-
Use the Options bar to select Art History Brush tool options.
As shown in Figure 14-15, you can select a brush tip size and hardness from the Brush Preset picker, select a blending mode, and set the opacity. In addition, you can select a brush style, the area the painting will spread to, and the tolerance setting. A higher tolerance will restore more of the image at one time.
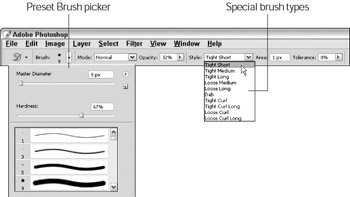
Figure 14-15: When the Art History Brush tool is selected, the Options bar offers blending mode and opacity settings, and special brush styles.Tip This tool works best with a small, hard tip selected. Also, area and tolerance settings should be set quite low; otherwise the brush covers a lot of area very fast. If you have a stylus, by all means use it. The Art History Brush tool works well when stroked with a stylus.
-
In the History palette, click the left column next to the history state or snapshot that you want to use as the pixel source for the History Brush tool.
A tiny History Brush icon will appear in the column as shown in Figure 14-10.
-
In the Layers palette, select the layer you want to restore.
-
Use the Art History Brush tool to paint strokes on the layer.
Figure 14-16 shows three versions of the same image. On the left is the original photograph of flowers and leaves. Using the History palette, I took a snapshot of this history state. Next, I applied the Find Edges filter to the photograph (middle image). Then, I positioned the tiny History
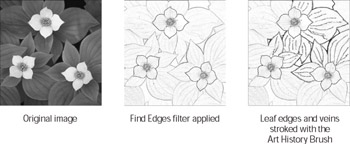
Figure 14-16: Using the Art History Brush tool set to a 3 pixel Tight Short Style brush, 32% Opacity, an Area of 1 pixel, and 0% Tolerance, the leaf edges and veins were restored to the original history state with a dappled watercolor appearance.Brush icon next to the snapshot in the History Palette. Finally, I stroked the leaf edges and veins with the Art History Brush tool, restoring the original state with a watercolor touch as shown in the right image.
EAN: 2147483647
Pages: 221