Creating Components
| In the traditional terminology of object and component development, a component is referred to as a reusable set of one or more objects that expose events, interfaces, and properties. In .NET terms this notion of a component has been extended to a set of reusable functionality that may be hosted in a design environment. Previous sections of this chapter described user controls, which are visual components. The discussion in this section will concentrate on nonvisual components, which will be referred to as just components. Referring to a nonvisual component as just a component is consistent with Microsoft .NET Framework documentation. The purpose of components is to provide a visual design experience, with nonvisual runtime behavior. The example in this section is a component for calculating mathematical operations. There is no need for it to have a visual interface and therefore it can be derived from System.Windows.Forms. Component, which doesn't have the overhead of other base types that support visual controls. To create a component with C#Builder, first create a Class Library project and then add a Component file, which you can find by selecting File, New, Other and then selecting the C# Files folder under the C# Projects folder. This creates a class derived from System.ComponentModel.Component. It will initially appear in the C#Builder IDE as a designer surface with a white background and some information on adding other components. This designer surface is for adding other nonvisual components for the same reasons that this component is being used for. A component can host other components. You can add visual components to this designer surface, but they will not be displayed anywhere, which makes sense because a component is supposed to be nonvisual. If you need visual controls, it's better to create a user control. Write an Add and Subtract method in the class, change its name to MathComponent, and compile. The code should look like Listing 10.4. Listing 10.4 Code for a Nonvisual Component (MathComponent.cs) using System; using System.ComponentModel; using System.Collections; using System.Diagnostics; namespace MathLibrary { /// <summary> /// Summary description for Component. /// </summary> public class MathComponent : System.ComponentModel.Component { /// <summary> /// Required designer variable. /// </summary> private System.ComponentModel.Container components = null; public MathComponent(System.ComponentModel.IContainer container) { /// /// Required for Windows.Forms Class Composition Designer support /// container.Add(this); InitializeComponent(); // // TODO: Add any constructor code after InitializeComponent call // } public MathComponent() { /// /// This call is required by the Windows.Forms Designer. /// InitializeComponent(); // // TODO: Add any constructor code after InitializeComponent call // } /// <summary> /// Clean up any resources being used. /// </summary> protected override void Dispose(bool disposing) { if (disposing) { if (components != null) { components.Dispose(); } } base.Dispose(disposing); } #region Component Designer generated code /// <summary> /// Required method for Designer support - do not modify /// the contents of this method with the code editor. /// </summary> private void InitializeComponent() { } #endregion public int Add(int n1, int n2) { return n1 + n2; } public int Subtract(int n1, int n2) { return n1 - n2; } } } As you scan through Listing 10.4, you should pay attention to a couple of points. First, the InitializeComponent method is part of the class. Had any other components been dropped upon the designer surface of this one, their state would have been serialized into InitializeComponent. Another important point about this listing is the fact that the constructor is overloaded. The first overload with a parameter is shown following: public MathComponent(System.ComponentModel.IContainer container) { /// /// Required for Windows.Forms Class Composition Designer support /// container.Add(this); InitializeComponent(); // // TODO: Add any constructor code after InitializeComponent call // } Visual designer surfaces in C#Builder implement the IContainer interface. When this component is dropped upon the designer surface, the designer calls this constructor, passing a reference to its container. With that reference, the component adds itself to the container. Then the constructor calls InitializeComponent as it normally would. This component exposes Add and Subtract methods that can be called through an instance of the MathComponent class.
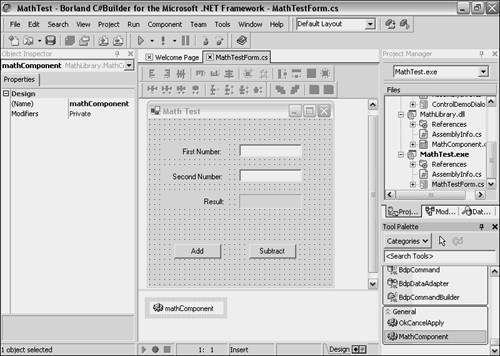
Adding the Component to a FormComponents can be dragged and dropped from the Tool Palette onto a designer surface the same as controls. However, instead of residing on the form, they appear on the section of the visual designer called the Component Tray, which appears below a form. Adding a component to the Tool Palette is the same procedure as for user controls, where the component is located through the Installed .NET Components dialog. When added, the component will appear in the General section of the Tool Palette and can be added to the form via drag-and-drop (see Figure 10.5). Figure 10.5. A component in the visual form designer.
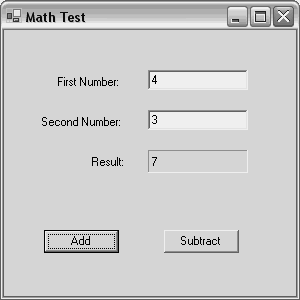
When the component is added to the form, the C#Builder IDE generates code for the component in the editor. Listing 10.5 shows the code generated by C#Builder when the MathComponent is added to the form. Labels and text boxes have been added so that the user can type in numbers and click a button to perform a math calculation. When the button is clicked, the program uses the Math component to perform the math and return the results. Listing 10.5 A Form Hosting a Component (MathTest.cs) using System; using System.Drawing; using System.Collections; using System.ComponentModel; using System.Windows.Forms; using System.Data; namespace MathTest { /// <summary> /// Summary description for WinForm. /// </summary> public class WinForm : System.Windows.Forms.Form { /// <summary> /// Required designer variable. /// </summary> private System.ComponentModel.IContainer components; private MathLibrary.MathComponent mathComponent; private System.Windows.Forms.Label lblFirstNumber; private System.Windows.Forms.Label lblSecondNumber; private System.Windows.Forms.Label lblResult; private System.Windows.Forms.TextBox txtFirstNumber; private System.Windows.Forms.TextBox txtSecondNumber; private System.Windows.Forms.Label lblResultOutput; private System.Windows.Forms.Button btnAdd; private System.Windows.Forms.Button btnSubtract; public WinForm() { // // Required for Windows Form Designer support // InitializeComponent(); // // TODO: Add any constructor code after InitializeComponent call // } /// <summary> /// Clean up any resources being used. /// </summary> protected override void Dispose (bool disposing) { if (disposing) { if (components != null) { components.Dispose(); } } base.Dispose(disposing); } #region Windows Form Designer generated code /// <summary> /// Required method for Designer support - do not modify /// the contents of this method with the code editor. /// </summary> private void InitializeComponent() { this.components = new System.ComponentModel.Container(); this.mathComponent = new MathLibrary.MathComponent(this.components); this.lblFirstNumber = new System.Windows.Forms.Label(); this.lblSecondNumber = new System.Windows.Forms.Label(); this.lblResult = new System.Windows.Forms.Label(); this.txtFirstNumber = new System.Windows.Forms.TextBox(); this.txtSecondNumber = new System.Windows.Forms.TextBox(); this.lblResultOutput = new System.Windows.Forms.Label(); this.btnAdd = new System.Windows.Forms.Button(); this.btnSubtract = new System.Windows.Forms.Button(); this.SuspendLayout(); // // lblFirstNumber // this.lblFirstNumber.Location = new System.Drawing.Point(24, 40); this.lblFirstNumber.Name = "lblFirstNumber"; this.lblFirstNumber.TabIndex = 0; this.lblFirstNumber.Text = "First Number:"; this.lblFirstNumber.TextAlign = System.Drawing.ContentAlignment.MiddleRight; // // lblSecondNumber // this.lblSecondNumber.Location = new System.Drawing.Point(24, 80); this.lblSecondNumber.Name = "lblSecondNumber"; this.lblSecondNumber.TabIndex = 1; this.lblSecondNumber.Text = "Second Number:"; this.lblSecondNumber.TextAlign = System.Drawing.ContentAlignment.MiddleRight; // // lblResult // this.lblResult.Location = new System.Drawing.Point(24, 120); this.lblResult.Name = "lblResult"; this.lblResult.TabIndex = 2; this.lblResult.Text = "Result:"; this.lblResult.TextAlign = System.Drawing.ContentAlignment.MiddleRight; // // txtFirstNumber // this.txtFirstNumber.Location = new System.Drawing.Point(144, 40); this.txtFirstNumber.Name = "txtFirstNumber"; this.txtFirstNumber.TabIndex = 3; this.txtFirstNumber.Text = ""; // // txtSecondNumber // this.txtSecondNumber.Location = new System.Drawing.Point(144, 80); this.txtSecondNumber.Name = "txtSecondNumber"; this.txtSecondNumber.TabIndex = 4; this.txtSecondNumber.Text = ""; // // lblResultOutput // this.lblResultOutput.BorderStyle = System.Windows.Forms.BorderStyle.Fixed3D; this.lblResultOutput.Location = new System.Drawing.Point(144, 120); this.lblResultOutput.Name = "lblResultOutput"; this.lblResultOutput.TabIndex = 5; this.lblResultOutput.TextAlign = System.Drawing.ContentAlignment.MiddleLeft; // // btnAdd // this.btnAdd.Location = new System.Drawing.Point(40, 200); this.btnAdd.Name = "btnAdd"; this.btnAdd.TabIndex = 6; this.btnAdd.Text = "Add"; this.btnAdd.Click += new System.EventHandler(this.btnAdd_Click); // // btnSubtract // this.btnSubtract.Location = new System.Drawing.Point(160, 200); this.btnSubtract.Name = "btnSubtract"; this.btnSubtract.TabIndex = 7; this.btnSubtract.Text = "Subtract"; this.btnSubtract.Click += new System.EventHandler(this.btnSubtract_Click); // // WinForm // this.AutoScaleBaseSize = new System.Drawing.Size(5, 13); this.ClientSize = new System.Drawing.Size(292, 266); this.Controls.Add(this.btnSubtract); this.Controls.Add(this.btnAdd); this.Controls.Add(this.lblResultOutput); this.Controls.Add(this.txtSecondNumber); this.Controls.Add(this.txtFirstNumber); this.Controls.Add(this.lblResult); this.Controls.Add(this.lblSecondNumber); this.Controls.Add(this.lblFirstNumber); this.Name = "WinForm"; this.Text = "Math Test"; this.ResumeLayout(false); } #endregion /// <summary> /// The main entry point for the application. /// </summary> [STAThread] static void Main() { Application.Run(new WinForm()); } private void btnAdd_Click(object sender, System.EventArgs e) { int n1 = Int32.Parse(txtFirstNumber.Text); int n2 = Int32.Parse(txtSecondNumber.Text); lblResultOutput.Text = mathComponent.Add(n1, n2).ToString(); } private void btnSubtract_Click(object sender, System.EventArgs e) { int n1 = Int32.Parse(txtFirstNumber.Text); int n2 = Int32.Parse(txtSecondNumber.Text); lblResultOutput.Text = mathComponent.Subtract(n1, n2).ToString(); } } } The application in Listing 10.5 accepts two numbers and lets the user select an Add or Subtract button. In the Click events of these buttons, it extracts the values and uses the MathComponent component to perform the requested operation (see Figure 10.6). Figure 10.6. Form hosting the MathComponent component.
|