User Controls
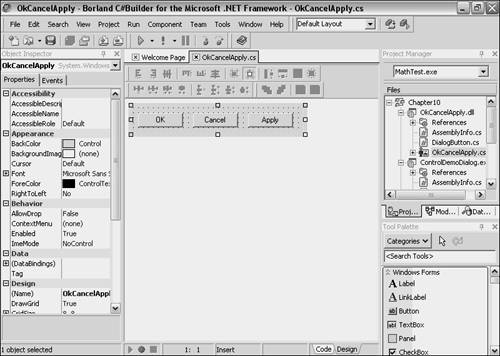
| Quite often developers build different forms that contain the same controls with the same functionality. This clearly creates duplication and a waste of resources and productivity. It begs the question of how to do it better, how to eliminate the duplication, and how to promote reuse. This is the primary purpose of user controls, enabling developers to consolidate the repeated use of multiple other controls into one. A user control is also referred to as a composite control because it is a composite or combination of other controls. It contains other controls and lets the developer work with those controls as a single unit. A custom user control inherits from the System.Windows.Forms.UserControl class. The documentation shows that the UserControl class inherits the ContainerControl class, which is also the base class for the Form class. What this means is that much of the functionality that is available to Form via its inheritance relationship with its base classes is also available to the UserControl class. Some of the primary differences between UserControl and Form are that UserControl does not have a title bar, minimize/maximize/close buttons, system menu, and border. Because of this inheritance relationship, a UserControl derived class has a lot of functionality itself. Building a User ControlThe easiest way to begin creating a user control is to go to the main menu and select File, New, User Control, or right-click on an existing solution in the Project Manager and select Add New Project. If you're launching the wizard from the Project Manager, a New Items dialog will appear, so select the C# Projects folder and then start the Control Library wizard. After you fill in project information and click the OK button, the wizard will create a designer surface with the user control. As mentioned earlier, a user control doesn't have all the decorations that a Form does. The designer surface will be a blank panel with no borders. The particular example in this section creates a user control for the OK, Cancel, and Apply buttons something that could be reused in many dialogs. Each was dragged from the Tool Palette and dropped onto the control. They are named btnOK, btnCancel, and btnApply, and their Text properties should be set to OK, Cancel, and Apply, respectively. The buttons can be aligned, centered, and spaced by using the toolbar buttons just above the designer surface. To make these toolbar buttons live, select all the buttons by pressing either the Control or Shift key, holding it down, and selecting each button with the mouse. After the buttons are created and named, add Click events so that the form they reside on can be notified when a button is clicked. After all the steps have been taken in the visual designer to create the user control, it should look similar to Figure 10.1. I sized the control to about 272x40 and set the Anchor property of the buttons to the bottom right for default behavior when residing in a parent form later. This was an arbitrary choice, meaning that user control properties may be set as necessary to represent individual requirements and anticipated usage scenarios. Figure 10.1. A user control on the designer surface.
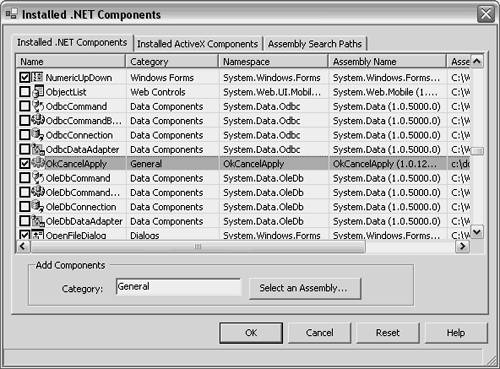
The code generated by C#Builder for this user control is shown in Listings 10.1 and 10.2. I've added an additional type and members to the generated code to customize the behavior of the user control and make it easier for enclosing forms to work with. Listing 10.1 The DialogButton Enum (DialogButton.cs) using System; namespace OkCancelApply { public enum DialogButton { OK, Cancel, Apply } } Listing 10.2 The OkCancelApply User Control (OkCancelApply.cs) using System; using System.Collections; using System.ComponentModel; using System.Drawing; using System.Data; using System.Windows.Forms; namespace OkCancelApply { /// <summary> /// Summary description for UserControl. /// </summary> public class OkCancelApply : System.Windows.Forms.UserControl { /// <summary> /// Required designer variable. /// </summary> private System.ComponentModel.Container components = null; private System.Windows.Forms.Button btnOK; private System.Windows.Forms.Button btnCancel; private System.Windows.Forms.Button btnApply; public OkCancelApply() { // This call is required by the Windows.Forms Designer. InitializeComponent(); // TODO: Add any initialization after the InitForm call } /// <summary> /// Clean up any resources being used. /// </summary> protected override void Dispose(bool disposing) { if (disposing) { if (components != null) components.Dispose(); } base.Dispose(disposing); } #region Component Designer generated code /// <summary> /// Required method for Designer support - do not modify /// the contents of this method with the code editor. /// </summary> private void InitializeComponent() { this.btnOK = new System.Windows.Forms.Button(); this.btnCancel = new System.Windows.Forms.Button(); this.btnApply = new System.Windows.Forms.Button(); this.SuspendLayout(); // // btnOK // this.btnOK.Anchor = ((System.Windows.Forms.AnchorStyles) ((System.Windows.Forms.AnchorStyles.Bottom | System.Windows.Forms.AnchorStyles.Right))); this.btnOK.Location = new System.Drawing.Point(8, 9); this.btnOK.Name = "btnOK"; this.btnOK.Size = new System.Drawing.Size(72, 23); this.btnOK.TabIndex = 0; this.btnOK.Text = "OK"; this.btnOK.Click += new System.EventHandler(this.btnOK_Click); // // btnCancel // this.btnCancel.Anchor = ((System.Windows.Forms.AnchorStyles) ((System.Windows.Forms.AnchorStyles.Bottom | System.Windows.Forms.AnchorStyles.Right))); this.btnCancel.Location = new System.Drawing.Point(96, 9); this.btnCancel.Name = "btnCancel"; this.btnCancel.Size = new System.Drawing.Size(72, 23); this.btnCancel.TabIndex = 1; this.btnCancel.Text = "Cancel"; this.btnCancel.Click += new System.EventHandler(this.btnCancel_Click); // // btnApply // this.btnApply.Anchor = ((System.Windows.Forms.AnchorStyles) ((System.Windows.Forms.AnchorStyles.Bottom | System.Windows.Forms.AnchorStyles.Right))); this.btnApply.Location = new System.Drawing.Point(184, 9); this.btnApply.Name = "btnApply"; this.btnApply.RightToLeft = System.Windows.Forms.RightToLeft.No; this.btnApply.Size = new System.Drawing.Size(72, 23); this.btnApply.TabIndex = 2; this.btnApply.Text = "Apply"; this.btnApply.Click += new System.EventHandler(this.btnApply_Click); // // UserControl // this.Controls.Add(this.btnApply); this.Controls.Add(this.btnCancel); this.Controls.Add(this.btnOK); this.Name = "UserControl"; this.Size = new System.Drawing.Size(272, 40); this.ResumeLayout(false); } #endregion public new event EventHandler Click; public DialogButton m_buttonClicked = DialogButton.Cancel; public DialogButton ClickedButton { get { return m_buttonClicked; } set { switch (value) { case DialogButton.OK: case DialogButton.Cancel: case DialogButton.Apply: m_buttonClicked = value; break; default: m_buttonClicked = DialogButton.Cancel; break; } } } public void InvokeClickEvent() { if (Click != null) { Click(this, EventArgs.Empty); } } private void btnOK_Click(object sender, System.EventArgs e) { ClickedButton = DialogButton.OK; InvokeClickEvent(); } private void btnApply_Click(object sender, System.EventArgs e) { ClickedButton = DialogButton.Apply; InvokeClickEvent(); } private void btnCancel_Click(object sender, System.EventArgs e) { ClickedButton = DialogButton.Cancel; InvokeClickEvent(); } } } As you look over the code in Listing 10.2, it should be reminiscent of a Form derived class. The constructor calls InitializeComponent, all controls added to the user control in the visual designer were added to InitializeComponent, and there is a Dispose method. Following the #endregion directive, which encloses the InitializeComponent method, is the additional code that customizes the control. As mentioned in the overview, a custom user control inherits the UserControl class and thus all of its members, including the Click event. This user control is designed to be added to a form, the same as any other control. The next section will show how to prepare this user control so that it can be dragged and dropped from the Tool Palette onto a form, just like the controls in the Windows Forms library. In the user control in Listing 10.2, the Click event is particularly interesting. If the enclosing form hooks up a handler to this control's Click event, its Click event handler will be called every time the user control is clicked. That would be fine if the entire surface of the user control needed to react to mouse clicks. However, the user control in Listing 10.2 has buttons that must react to mouse clicks, which is the entire purpose of the control. This means that events generated by mouse clicks on the surface of the control and not on a button are illogical. To keep callers from using the control improperly, this condition must be fixed. How do we correct the problem? The answer lies in the reason the problem was created in the first place. The UserControl class Click event was inherited and can't be overridden. Therefore, we need to hide it. Observe the Click event in the following line, and how it is decorated with the new modifier. public new event EventHandler Click; If you recall from the discussion in Chapter 3, the new modifier hides the base class member with the same signature, so the preceding declaration hides the UserControl class Click event. Any caller that hooks up to the Click event of the control from Listing 10.2 will receive Click events defined in the OkCancelApply class and not its base class, UserControl. The three buttons from Listing 10.2 have Click event handlers that perform similar functions. The handler in the following lines is for the OK button. private void btnOK_Click(object sender, System.EventArgs e) { ClickedButton = DialogButton.OK; InvokeClickEvent(); } Each of the button event handlers sets the ClickedButton property to a value of the DialogButton enum (see Listing 10.1) that corresponds to that button. Then each handler invokes the Click event through the InvokeClickEvent method, shown in the following lines: public void InvokeClickEvent() { if (Click != null) { Click(this, EventArgs.Empty); } } Because we're managing our own Click event, the InvokeClickEvent method must check to see if any callers have hooked up to the event. If not, the Click event will equal null. Trying to invoke the Click event without this check would generate a NullReferenceException with the message "Object Reference not set to an instance of an object." Using the User ControlThe purpose of a user control is to be added within another control or form, eliminating repetitive code and promoting reuse. Like other controls, a user control may be added to the Tool Palette, where it may be dragged and dropped on the designer surface of a form. Getting the user control to the Tool Palette takes a few easy and straightforward steps. First, make sure the user control is compiled. Also, make sure the class name is something meaningful because that is the name that will show up in the Tool Palette. The default class name created by the wizard is UserControl, which is pretty meaningless in the Tool Palette. Next go to the Tool Palette, right-click anywhere on the Tool Palette, and select Installed .NET Components. The Installed .NET Components dialog will appear as shown in Figure 10.2, and its list will be filled in after a few seconds of searching for available components. If this is the first time that you're adding the user control, it won't appear in the list and must be added. Click the Select an Assembly button and go find the DLL file the user control was compiled to. It will be located in the /bin/debug folder under the project directory where the user control files are located. This assumes that this is a debug release and the user control is still under development. Chapter 18, "Assemblies, Versioning, and Deployment," has a section that covers more on deployment and how to manage files for release builds. Figure 10.2. The Installed .NET Components dialog with a new user control.
When the user control is added to the Installed .NET Components list, it will have a check mark by it (see Figure 10.2). Clicking the OK button closes the dialog and places the OkCancelApply control in a new section of the Tool Palette labeled General (see Figure 10.3). After the user control has been added to the Tool Palette, a new category can be created, as discussed in Chapter 1, and the control can be dragged to the new category. Otherwise, there is no problem leaving it in the General section, which is purely user preference. Figure 10.3. A new user control in the General section of the Tool Palette.
When the user control is on the Tool Palette, it can be dragged and dropped to the designer surface. The example in this section (see Listing 10.3) shows a form that uses the user control. It also has a label and text box, suggesting the beginnings of a generic input dialog. Listing 10.3 A Windows Form Hosting a User Control (ControlDemoDialog.cs) using System; using System.Drawing; using System.Collections; using System.ComponentModel; using System.Windows.Forms; using System.Data; using OkCancelApply; namespace ControlDemoDialog { /// <summary> /// Summary description for WinForm. /// </summary> public class ControlDemoDialog : System.Windows.Forms.Form { /// <summary> /// Required designer variable. /// </summary> private System.ComponentModel.Container components = null; private OkCancelApply.OkCancelApply okCancelApply; private System.Windows.Forms.TextBox txtInput; private System.Windows.Forms.Label lblInput; public ControlDemoDialog() { // // Required for Windows Form Designer support // InitializeComponent(); okCancelApply.Click += new EventHandler(ControlClicked); } public void ControlClicked(object sender, System.EventArgs e) { DialogButton selectedButton = okCancelApply.ClickedButton; string format = "You selected the {0} button and \n" + "your input was '{1}'."; string message = String.Format( format, selectedButton, txtInput.Text); MessageBox.Show(message, "Control Clicked"); } /// <summary> /// Clean up any resources being used. /// </summary> protected override void Dispose (bool disposing) { if (disposing) { if (components != null) { components.Dispose(); } } base.Dispose(disposing); } #region Windows Form Designer generated code /// <summary> /// Required method for Designer support - do not modify /// the contents of this method with the code editor. /// </summary> private void InitializeComponent() { this.okCancelApply = new OkCancelApply.OkCancelApply(); this.txtInput = new System.Windows.Forms.TextBox(); this.lblInput = new System.Windows.Forms.Label(); this.SuspendLayout(); // // okCancelApply // this.okCancelApply.ClickedButton = OkCancelApply.DialogButton.Cancel; this.okCancelApply.Dock = System.Windows.Forms.DockStyle.Bottom; this.okCancelApply.Location = new System.Drawing.Point(0, 102); this.okCancelApply.Name = "okCancelApply"; this.okCancelApply.Size = new System.Drawing.Size(280, 40); this.okCancelApply.TabIndex = 0; // // txtInput // this.txtInput.Location = new System.Drawing.Point(32, 56); this.txtInput.Name = "txtInput"; this.txtInput.Size = new System.Drawing.Size(208, 20); this.txtInput.TabIndex = 1; this.txtInput.Text = ""; // // lblInput // this.lblInput.Location = new System.Drawing.Point(32, 24); this.lblInput.Name = "lblInput"; this.lblInput.TabIndex = 2; this.lblInput.Text = "Input:"; this.lblInput.TextAlign = System.Drawing.ContentAlignment.BottomLeft; // // WinForm // this.AutoScaleBaseSize = new System.Drawing.Size(5, 13); this.ClientSize = new System.Drawing.Size(280, 142); this.Controls.Add(this.lblInput); this.Controls.Add(this.txtInput); this.Controls.Add(this.okCancelApply); this.Name = "WinForm"; this.Text = "Control Demo Dialog"; this.ResumeLayout(false); } #endregion /// <summary> /// The main entry point for the application. /// </summary> [STAThread] static void Main() { Application.Run(new ControlDemoDialog()); } } } There are a couple of code snippets from Listing 10.3 that demonstrate what has happened with this user control and points that would be helpful to know. One piece of code, shown following, relates to the previous discussion on the Click event. public ControlDemoDialog() { // // Required for Windows Form Designer support // InitializeComponent(); okCancelApply.Click += new EventHandler(ControlClicked); } This code works regardless of whether the Click event belonged to the OkCancelApply or UserControl class. The behavior was different, but that is transparent to this code. This signifies another benefit of controls, where they are also classes that encapsulate behavior. Another interesting part of Listing 10.3 is the way the user control is serialized into the InitializeComponent method. When dropped onto the form, the user control properties became available for modification in the Object Inspector (see Figure 10.4). The following code was serialized from the user control: // // okCancelApply // this.okCancelApply.ClickedButton = OkCancelApply.DialogButton.Cancel; this.okCancelApply.Dock = System.Windows.Forms.DockStyle.Bottom; this.okCancelApply.Location = new System.Drawing.Point(0, 102); this.okCancelApply.Name = "okCancelApply"; this.okCancelApply.Size = new System.Drawing.Size(280, 40); this.okCancelApply.TabIndex = 0; Figure 10.4. Object Inspector properties for a user control.
The term "serialized" means that the state of the user control is persisted to a data store. In this case, the data store is the InitializeComponent method of the ControlDemoDialog.cs file. This serialization facilitates both design-time and runtime state management for the control. At design time, the serialization represents state that differs from the default values of a control's properties, which can be changed manually through the Object Inspector. At runtime, the serialization sets the startup values of each specified property, which can be modified programmatically in code. The properties that appeared in the Object Inspector were all the properties in the entire inheritance hierarchy for the user control. All public properties of the UserControl derived type appear in the Object Inspector also. In the case of the OkCancelApply user control, the ClickedButton control appears in the Object Inspector (see Figure 10.4). |