16.3. Creating Templates Ready-to-use templates are a fantastic innovation because they provide fine- tuned worksheets without forcing you to write a single formula. Of course, these templates also have a major drawback: No matter how clever Microsoft programmers are, they can't predict your every need. For example, the Travel Services Invoice provides a generic worksheet that a travel agency may use to bill its customers. But what if you need to group different types of expenses separately, apply different discount rates to various groups, include a late fee, and tack on a few miscellaneous charges to pad your company's bottom line? If that's the case, you'd need to add your own formulas, restrictions, and formatting to the template. In that case, starting over from scratch and creating a template with the exact features you need is probably easier. Fortunately, creating custom templates isn't difficult at all.
Note: You can use one of Excel's templates as a starting point for your own templates. Just follow the process described earlier, edit the template (by adding information, changing formatting, and so on), and then save it as a new template. However, you'll generally find it easier (at least at first) to create your own templates from scratch.
16.3.1. Understanding Custom Templates Earlier in this chapter, you learned how to create a new workbook by choosing a template from the New Workbook dialog box. In order to understand how to create your own templates, you need to know how the New Workbook dialog box worksnamely, how does Excel find the templates that are installed on your computer? UNDER THE HOOD
Tracking Down Templates | | It's a good idea to take note of where your Templates folder is. This information helps when you want to share your templates with other people (or take their templates and copy them to your computer). Even if you aren't planning on sharing templates, it still makes sense to pay attention to their location, so you can back them up for safekeeping. The Templates folder location varies depending on the current user name (the account under which you've logged into Windows). For example, if you've logged yourself in under the user account billjones, then you'll probably find the templates in C:\Documents and Settings\billjones\Application Data\Microsoft\Templates . You may already be familiar with this location, because it's closely related to the special My Documents folder where Windows programs encourage you to store files (like Excel worksheets and Word documents). In this example, the My Documents for Bill Jones is probably C:\Documents and Settings\ billjones\My Documents . Essentially, C:\Documents and Settings\billjones is a user-specific folder where Windows stores temporary data, documents, desktop settings, your list of favorite Internet shortcuts, and even custom templates. (Incidentally, this folder includes user-defined templates for all installed Office programs, including Word.) If you're having trouble tracking down your templates folder, there's a handy trick that can help you locate it. In Excel, choose Office Button  Save As, and select the "Excel Template (*.xltx)" file type to move to the Templates folder. To find out exactly where this folder is, click the arrow in the "Save in drop-down list box at the top of the Save As dialog box. The folder tree you're looking at shows you exactly where your Templates folder's located. Save As, and select the "Excel Template (*.xltx)" file type to move to the Templates folder. To find out exactly where this folder is, click the arrow in the "Save in drop-down list box at the top of the Save As dialog box. The folder tree you're looking at shows you exactly where your Templates folder's located. |
The answer is a little tricky because Excel actually has three types of templates, all of which can appear in the New Workbook dialog box. The different types of templates include: -
Installed templates . These templates are part of the Office package and are included automatically when you install Excel. You can find them (depending on where you installed Office) in a folder like C:\Program Files\Microsoft Office\Templates\1033 . (1033 is the language ID for U.S. English.)
Note: This list includes only the templates on your computer. It doesn't include the templates from Office Online because those are stored on Microsoft's Web servers.
-
Local templates . These templates are the custom ones you create. (They're also known as "My templates.") Excel stores them in a special folder on your computer (more on that later). When you first install Excel, this category is empty because you haven't made any custom templates yet. -
Workgroup templates . These templates are also custom templates. The only difference is that they're stored in a shared location where more than one person can access them. This way, other people using the same computer (or connected via a network) can make use of your hard work. When you first install Excel, the workgroup template folder doesn't exist yet. If you want to use this feature, you need to set it up yourself; see Section 16.3.3 for details. You can't change the list of installed templates. Even if you save your own custom files to the folder where the installed templates are stored, Excel steadfastly ignores them. For that reason, you should never try to add or remove an installed template. On the other hand, you can freely add custom templates to the local and workgroup folders. Best of all, Excel always checks these folders before it displays the New Workbook dialog box. If Excel finds two custom templates in the local template folder, and three more in the workgroup template folder, then it shows all five in the "My templates" category. You can use these templates to create new spreadsheets in exactly the same way you use a built-in template. So, all you need to know to integrate your custom templates with Excel's is where to save your files. As it turns out, Excel can take you there automatically, as you'll see in the next section. WORD TO THE WISE
Creating Bulletproof Templates | | By now, you probably realize that templates aren't just a way to eliminate repetitive work when you need to create similar spreadsheets. They're also a way to let ordinary people those, like you, who aren't familiar with Excel's dark artsto record information, fill out forms, and analyze data. These people need a little guidance, and templates are there to help them. Unfortunately, Excel isn't always particularly forgiving . Even if you craft the perfect template, an Excel novice can accidentally delete or overwrite a formula just by pressing the wrong key. And it's almost as easy to put the wrong information in a cell (for example, by entering a date incorrectly so that it's interpreted as text). Furthermore, a template is no help at all when the person using it doesn't know where to start typing or what the different headings really mean. All these problems can occur (and regularly do occur) even if you think your template is a small miracle of straightforward design and organization. When you want to create a truly bulletproof template, you can use two more Excel features: -
Data validation prevents people from entering the wrong type of data in a cell (or warns them when they do). It also lets you set up a handy drop-down list of values that the person editing the worksheet can choose from. -
Worksheet protection prevents people from changing certain cells , and ( optionally ) stops them from viewing the formulas inside. Microsoft designed both these features for ordinary workbooks, but they make good sense in templates too. If you'd like to learn more about how they work, skip straight to Chapter 22 to get the full story. |
16.3.2. Building a Custom Template To create a custom template, you simply need to build a new workbook, add any headings, formatting, and formulas you desire , and then save it as a template. You can start this process from scratch by opening a new, blank workbook, or you can refine an existing built-in template. Either way, you should follow the same process of perfecting your workbook until it's ready for template status. Here are some tips: -
Clear out the junk . Your template should be a blank form politely waiting for input. Clear away all the data on your template, unless it's generic content. For example, you can leave your company name or the worksheet title, but it probably doesn't make sense to have sample numbers . -
Assume formulas won't change . The ideal template is one anyone can use, even Excel novices who are too timid to edit a formula. If you have a formula that contains some data that might change (for example, the sales commission, interest rate, late fee, and so on), don't type it directly into your formulas. Instead, put it in a separate cell, and use a cell reference within the formula. That way, the person using the template can easily modify the calculation just by editing the cell. -
Don't be afraid to use lists and outlining . These features are too complicated for many mere mortals (those who haven't read this book, for example), but they make spreadsheets easier to use and more powerful. By putting these advanced frills into the template, you ensure that people can use them in their spreadsheets without having to learn how to apply them on their own. Charts and pictures, which you'll learn more about in Part Four, are also good template additions. -
Turn off worksheet gridlines . Many templates don't use Excel's gridlines. That way, it's easier to see custom borders and shading, which you can use to draw attention to the important cells. To turn off gridlines, select View Show/Hide Gridlines. -
Add the finishing touches . Once you have the basicstitles, captions, formulas, and so onit's time to create a distinct look. You can add borders, change fonts, and inject color . (Just remember not to go overboard with cell shading, or the output may be impossible to read on a black-and-white printer.) You may also want to tweak the paper size and orientation to ensure a good printout. -
Delete extra worksheets and assign good names to the remaining worksheets . Every workbook starts with three worksheets, named Sheet1, Sheet2, and Sheet3. The typical template has only one worksheet, and it's named appropriately (such as Expense Form). For information about deleting and renaming worksheets, flip back to Chapter 4. -
Consider adding custom macros to make a really slick spreadsheet . For a real treat, you can build a toolbar with custom macros (and even attach them to custom buttons ) that perform related tasks . For more information about how to build macros, see Chapter 27. Once you've perfected your template, you're ready to save it. Follow these steps: -
Select File Save As . The Save As dialog box appears. -
In the "Save as type" drop-down list box at the bottom of the window, choose "Template (*.xltx)" . Excel automatically browses to the Templates folder, which is where the templates you create are stored on your computer. Typically, this folder is one like C:\Documents and Settings\UserName\Application Data\Microsoft\Templates (where UserName is the name of the Windows account you used to log in). -
Type the template name, and then click Save . The saved template file automatically appears in the "My templates" category. You can use it to build new spreadsheets. Just select Office button New, and then choose "My templates. A dialog box appears with all the custom templates you've created, as shown in Figure 16-7. 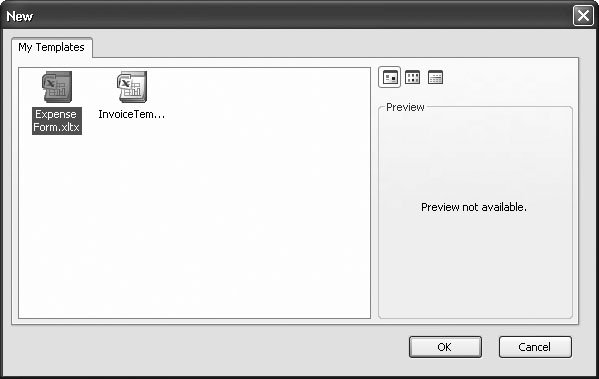 | Figure 16-7. This dialog box displays all your home-made templates. If you want to get rid of a template, right-click it in this window, and then choose Delete. | |
Note: Of course, your templates don't need to appear in the "My templates" list. You can save a template file anywhere on your computer, and open it later by browsing to the right folder, and then choosing the template file. However, this approach has a couple of drawbacks. When you open a template file directly, Excel doesn't automatically create a new workbook. It's easy to overwrite the template by accident . Also, if your templates aren't in the "My templates" list, you may have trouble remembering where you put them.
16.3.3. Sharing Templates with Others As you've already seen, once you place a template in the Templates folder, it appears in the New Workbook dialog box where you can use it to create new workbooks. However, you may be disappointed to find out that you're the only one who can benefit from all your hard work. Co-workers using other computers won't be able to access your templates. In fact, your template won't even be available to other people who use the same computer if they log in with a different user name and password. That's because the Templates folder is a user-specific setting. You may use the folder C:\Documents and Settings\billjones\Application Data\Microsoft\Templates , but if Sarah Cheng logs onto the same computer, then Excel bothers to check only C:\Documents and Settings\sarahcheng\Application Data\Microsoft\Templates . You can use several strategies to get around this problem. -
You can give a copy of your template to everyone who wants to use it. Choose any way you like to transfer the template (by email, on a floppy disk or CD, over a network drive, and so on), but make sure you tell folks to put it in their own local Templates folder, as explained earlier. -
You can create a workgroup templates folder. In this case, multiple people will use the same workgroup template folder, so Excel automatically shows any template files you put there in everybody's New Workbook dialog box. You can use the second option to share files between more than one user account on the same computer or, for even better results, on a network drive that a whole team of people can use. Unfortunately, Excel nearly throws a wrench into the whole process because it doesn't let you specify which folder to use for workgroup templates. However, Microsoft Word gives you a back door to the answer. Because Excel and Word both use the same template system, if you configure the workgroup templates folder in Word, it also takes effect in Excel. (Don't bother asking why Word provides this service and Excel doesn'tit's just one of those enduring Microsoft mysteries.)
Tip: If you're unlucky enough to not have Word installed, you still have one more painful option. You can write a custom Excel macro that sets the location of the workgroup templates folder. The line of code you need is Application.NetworkTemplatesPath = "[ path goes here ]", but you'll have to learn a fair bit about the intricacies of VBA (Visual Basic for Applications) programming before you can actually use it. For more information, see Chapter 28.
Once you accept the fact that you need to rely on Word, the process actually becomes quite easy. Here's what you need to do: -
Decide which folder you want to use as a shared folder . You may want to create a new folder now. If you do, the easiest approach is to use a tool like Windows Explorer. -
Start Word . You'll find Word in the Start menu. Choose Programs Microsoft Office Microsoft Word 2007. -
Word Options. The Word Options dialog box appears. The Word Options dialog box looks fairly similar to the Excel Options dialog box. -
From the list on the left, choose the Advanced section . -
Scroll down to the General heading (on the right), and click the File Locations button . This action opens the File Locations dialog box (Figure 16-8), which is the place where you tell Office applications where they should look for certain types of files. You can actually make three interesting changes here: -
If you modify the Documents folder, Excel and Word start off in that folder the first time you choose to save or load a file after launching the application. -
If you change the "User templates" folder, you can specify where Excel and Office look for user-created templates stored on your computer. -
Finally, if you set the "Workgroup templates" folder, you can tell Word and Excel where to look for shared templates. This option is the one that interests you. 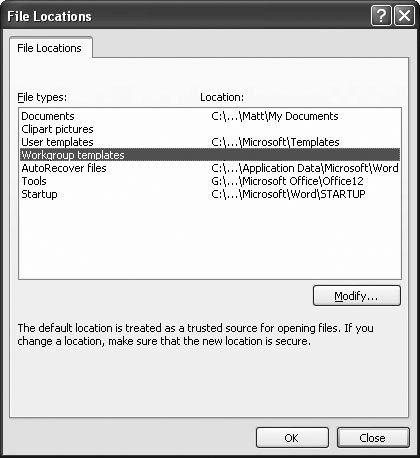 | Figure 16-8. If you haven't configured the workgroup templates folder before, you'll notice that it starts off blank. That's because Office has no idea where to put shared templates until you give it the right instructions. | |
Note: Remember, when Excel looks for templates, it searches both the user templates and the workgroup templates folders. Then it shows all the templates it found in the "My templates" list.
-
Select the "Workgroup templates" entry in the list, and then click Modify . A Modify Location dialog box appears. This dialog box looks more or less the same as the standard dialog boxes you use to open and save files. -
Browse to the folder you want to use, and click OK . Remember, you aren't limited to your local computer. Feel free to jump to a network drive, or even browse your network places to find a specific server. -
Click OK again to close the Word Options dialog box . Now, the change has been made. Remember, in order for template sharing to work, everyone needs to perform this same set of steps to configure their copies of Excel to look in the same shared folder. Template sharing is a simple idea that can become incredibly useful in a company environment. Instead of sending template files whizzing back and forth in emails, trying to keep a group of overworked employees in synch each time the template changes, you simply need to modify the templates in the shared location. That way, everybody always has the latest versions available, and there are no distribution headaches . |