Lesson 5: Configuring IPSec
The Microsoft Management Console (MMC) can be used to create and configure IPSec policies. It can be configured to centrally manage policy (for Active Directory services), manage policy locally, or manage policy remotely for a computer. In this lesson you explore various screens used to configure IPSec. You also create a test IP Security policy.
After this lesson, you will be able to
- Describe how to implement IPSec
- Configure IPSec policies
- Describe the various property sheets of an IPSec policy, Authentication Method, IP Packet Filtering, Filter Actions, and additional IPSec tasks
Estimated lesson time: 30 minutes
Prerequisites for Implementing IPSec
The computers in your network need to have an IPSec policy defined that is appropriate for your network security strategy. Computers in the same domain might be organized into groups with IPSec policy applied to the groups. Computers in different domains might have complementary IPSec policies to support secure network communications.
How to Implement IPSec
You can view the default IP Security policies in the Group Policy MMC snap-in. The policies are listed under IP Security Policies on Active Directory: Group Policy Object\Computer Configuration\Windows Settings\Security Settings\IP Security Policies.
You can also view IPSec policies by using the IP Security Policy Management snap-in of the MMC. Each IPSec policy is governed by rules that determine when and how the policy is applied. Right-click a policy and select Properties. The Rules tab lists the policy rules. Rules can be further subdivided into filter lists, filter actions, and additional properties. The default snap-in is started from the Administrative Tools menu; this allows configuration of the local computer only. To centrally manage policy for multiple computers, add the IP Security Management snap-in to an MMC.
Configuring IPSec Policies
The initial window displays three predefined policy entries: Client (Respond Only), Secure Server (Require Security), and Server (Request Security). By default, none of these policies is enabled. These policies are shown in Figure 9.17.
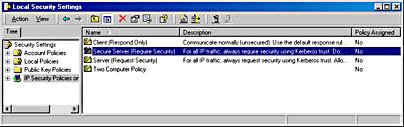
Figure 9.17 MMC of a Windows 2000 member server
These defaults are the same whether the IPSec policy is local or stored in Active Directory directory services as part of a group policy. In the example shown in Figure 9.17, the policy is local to a member server.
- The Client (Respond Only) policy allows communications in plaintext but will respond to IPSec requests and attempts to negotiate security. This policy effectively allows clear-text communication but attempts to negotiate security if a security request is made. Uses Kerberos v5 for authentication.
- The Server (Request Security) policy causes the server to attempt to initiate secure communications for every session. If a client who is not IPSec-aware initiates a session, the session is allowed.
- The Secure Server (Require Security) policy requires Kerberos trust for all IP packets sent from this computer, with the exception of broadcast, multicast, Resource Reservation Setup Protocol (RSVP), and IKE packets. This policy does not allow unsecured communications with clients. Therefore, any clients who connect to a server with this policy must be IPSec-aware.
To edit policies, right-click on the policy and select Properties.
NOTE
Only one policy can be assigned at a time. If an IPSec policy is configured in several overlapping group policies, the normal group policy hierarchy applies.
Connection Types
The Connection Type tab can be chosen from the Edit Rule Properties dialog box (see Figure 9.18). It is also displayed as part of the Rule Creation wizard.
NOTE
All policy settings can be configured through wizards. Use of the wizards is turned on by default, but can be turned off by deselecting the Use Add Wizard check box.
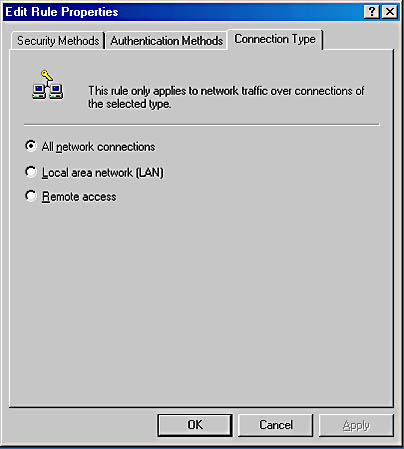
Figure 9.18 Edit Rule Properties dialog box
Designating a connection type for each rule determines which computer connections (network adapters or modems) will be affected by an IPSec policy. Each rule has a connection property that designates whether the rule applies to LAN connections, remote access connections, or all network connections.
Authentication Method
The authentication method defines how each user is going to be assured that the other computers or users really are who they say they are. As illustrated in Figure 9.19, each authentication method provides the necessary pieces to assure identity. Windows 2000 supports three authentication methods: the Kerberos protocol, using certificates, and using a preshared key.
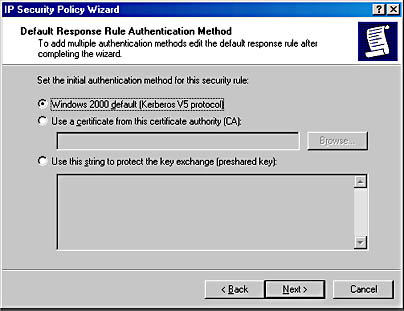
Figure 9.19 Default Response Rule Authentication Method dialog box
- Kerberos protocol. The Kerberos v5 security protocol is the default authentication technology. The Kerberos protocol issues tickets, or virtual proof-of-identity cards, when a computer logs on to a trusted domain. This method can be used for any clients running the Kerberos v5 protocol (whether or not they are Windows-based clients) who are members of a trusted domain.
- Certificates. Using certificates requires that at least one trusted certificate authority (CA) has been configured. Windows 2000 supports X.509 version 3 certificates, including CA certificates generated by commercial certifying authorities. A rule may specify multiple authentication methods. This ensures that a common method can be found when negotiating with a peer.
- Preshared Key. Users can also used a shared key that is secret and has been previously agreed upon. Using a preshared key is efficient and does not require the client to run the Kerberos protocol or have a public-key certificate. Both parties must manually configure IPSec to use this preshared key. This is a simple method for authenticating non-Windows-based hosts and standalone hosts.
NOTE
The key derived from the authentication is for authentication only; it is not the key used to encrypt or authenticate the data.
Each rule may be configured with one or more authentication methods. Each configured authentication method appears in a list in the order of preference. If the first authentication method cannot be used, then the next will be attempted.
IP Packet Filtering
IP Security is applied to packets as they are sent and received. Packets are matched against filters when being sent (outbound) to see if they should be secured, blocked, or passed through as clear text. Packets are also matched when received (inbound) to see if security should be negotiated, or if the packets should be blocked or passed through and permitted into the system.
Individual filter specifications are grouped into a filter list to enable complex patterns of traffic to be grouped and managed as one named filter list, such as Building 7 File Servers, or All Blocked Traffic. Filter lists can be shared as necessary between different IPSec rules in the same policy or in different IPSec policies. Filter specifications should be set for incoming and outgoing traffic. Two types of filters may be specified. They are input filters and output filters, which correspond to incoming and outgoing traffic respectively.
- Input filters, which apply to traffic received, allow the receiving computer to match the traffic with the IP filter list, respond to requests for secure communication, or match the traffic with an existing SA and decrypt the secured packets.
- Output filters, which apply to traffic leaving a computer toward a destination, trigger a security negotiation that must take place before traffic is sent.
IMPORTANT
Although input and output filters are defined and used in the filter list, it is unclear in the user interface as to which filter is being created. The source and destination addresses determine whether the filter is inbound or outbound.
There must be a filter to cover any traffic scenarios to which the associated rule applies. A filter contains the following parameters: the source and destination address of the IP packet; the protocol over which the packet is being transferred; and the source and destination port of the protocol for TCP and UDP.
- Source and destination address of the IP packet. As illustrated in Figure 9.20, the following address options can be chosen when creating or editing the filter:
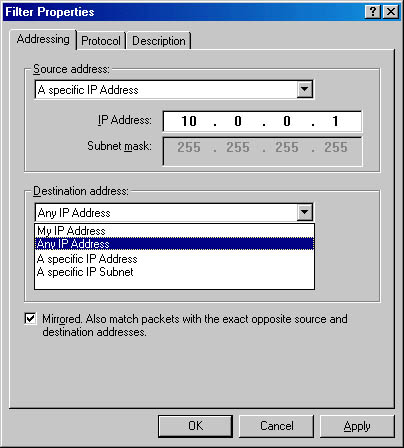
Figure 9.20 IP packet Filter Properties dialog box
- My IP Address - the IP address of the local machine
- Any IP Address - unicast addresses only (IPSec does not support multicast or broadcast addresses.)
- A Specific IP Address - refers to a specific IP address on the local network or on the Internet
- A Specific IP Subnet - includes any IP address on a specified IP subnet
NOTE
IPSec populates My IP Address with the first bound IP address only. If the computer is multihomed, IPSec uses only one of the IP addresses, not both. Routing and Remote Access clients are considered to be multi-homed, and therefore IPSec may not populate the IP address properly.
- Protocol over which the packet is being transferred. This automatically defaults to cover all IP client protocols in the TCP/IP suite.
Table 9.3 provides a list of the protocol types available in the Protocol tab in the Filter Properties dialog box, which is illustrated in Figure 9.21.
Table 9.3 Protocol Filtering
Protocol type Description ANY Any Protocol EGP Exterior Gateway Protocol HMP Host Monitoring Protocol ICMP Internet Control Message Protocol Other Unspecified protocol based on IP protocol number RAW Raw data on top of IP RDP Reliable Datagram Protocol RVD MIT Remote Virtual Disk TCP Transmission Control Protocol UDP User Datagram Protocol XNS-IDP Xerox NS IDP 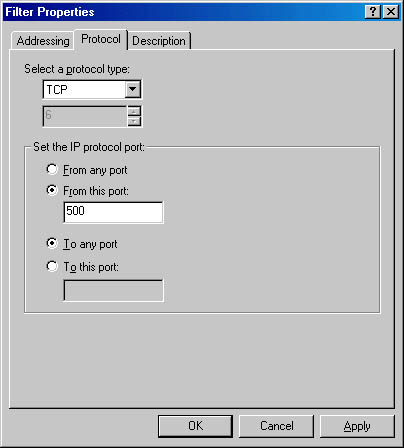
Figure 9.21 Protocol settings in the Filter Properties dialog box
- Source and destination port of the protocol for TCP and UDP. This also defaults to cover all ports, but can be configured to apply only to packets sent or received on a specific port.
Select the filter properties when editing or creating a filter. Filters can be managed globally by right-clicking on the managed computer in the left pane. They can also be managed within each of the policies' Rule Properties pages. The Filter Creation wizard allows these properties to be configured.
Mirroring
Mirroring allows a filter to match packets with the exact opposite source and destination addresses. An outbound filter specifying the IP address as the source address and the second computer as the destination address, for example, will automatically create an inbound filter specifying the second computer as the source address and the initiating computer's IP address as the destination.
NOTE
The mirrored filter does not actually show in the filter list. Instead, the Mirrored check box will be checked in the Filter Properties dialog box.
Host A must do the following in order to always exchange data securely with Host B:
- To send secured data to Host B, Host A's IPSec policy must have a filter specification for any outbound packets going to Host B.
- To receive secured data from Host A, Host B's IPSec policy must have a filter specification for any inbound packets from Host A, or must have a policy with the default-response rule set to active.
- Mirroring would allow each host to send or receive from the other host without creating another filter to do so.
Filter Actions
The filter action specifies what security action to take once a filter has been triggered. The action specifies whether to block the traffic, permit the traffic, or negotiate the security for the given connection. The negotiation consists of support for only authenticity and integrity using the authentication header (AH) protocol, or for integrity and confidentiality using the Encapsulating Security Payload (ESP) protocol. Each filter action can be customized, allowing the administrator to choose which protocols require authenticity and which protocols require confidentiality.
One or more negotiated filter actions may be specified. As illustrated in Figure 9.22, the filter actions appear as a list with the first method listed taking precedence over the actions lower in the list. If that filter action cannot be negotiated, the next filter action is attempted.
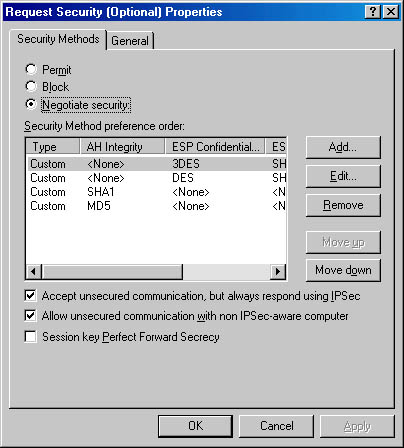
Figure 9.22 Secure Initiator Negotiation policy properties
It is also possible to choose either high or medium security rather than specifying a custom method. High security both encrypts and provides data integrity. Medium security only provides data integrity.
Additional IPSec Tasks
The administrator can perform several other tasks that are accessed by right-clicking on the IP Security Policy icon in the left window. These tasks include:
- Managing IP Filter Lists and Filter Actions. This allows the administrator to configure filters and filter actions separate from individual rules. Once a rule is created, the filters or filter actions may be activated, as illustrated in Figure 9.23.

Figure 9.23 The Rules tab of the Secure Server Properties dialog box
- Checking Policy Integrity. Because Active Directory services takes the last information saved as current, if multiple administrators are editing a policy, the links between policy components could be broken. For example:
Policy A uses Filter A.
Policy B uses Filter B.
This means that Filter A has a link to Policy A, and Filter B links to Policy B.
Suppose Bob edits Policy A and adds a rule that uses Filter C.
At the same time, Alice edits Policy B from a different location, and adds a rule that also uses Filter C.
If both save the changes simultaneously, Filter C could link to both Policy A and Policy B. However, it is unlikely that they will save changes simultaneously. It is more likely that, for example, Policy A is saved last. If this it the case, it will overwrite the link from Filter C to Policy B. Filter C will link only to Policy A. This will cause problems in the future when Filter C is modified, because Policy A users will pick up the new changes, but Policy B users will not.
The policy integrity check eliminates this problem by verifying the links in all IPSec policies. It is a good idea to run the integrity check after modifications to a policy. The administrator can perform several other tasks that are accessed by right-clicking on the IP Security Policy icon in the left window. These tasks are :
- Restoring Default Policies. A predefined policy may be restored to its original configuration.
- Importing Policies. Policies are imported from another host on the network.
- Exporting Policies. A policy may be exported to another host on the network.

Practice: Testing IPSec
In this practice, you activate a built-in IPSec policy to see that it blocks communications if traffic cannot be secured. If both computers are running Windows 2000 Server and are members of the same or trusted Windows 2000 Server secure domains, the built-in IPSec policies can be used to establish secure communications easily. Otherwise, you will need to configure your own IPSec policy for testing on each computer with the steps provided in later sections.

NOTE
Before you continue with the lesson, run the Ch09B.exe demonstration file located in the Media folder on the Supplemental Course Materials CD-ROM that accompanies this book. The file provides an overview of testing IPSec.
Exercise 1: Adding IPSec to the MMC
- Verify that you can communicate with the other computer by pinging the other computer's IP address.
You should receive four replies to the ping.
- Using the Administrative Tools on the Start menu, run the Local Security Policy MMC plug-in.
- Select IP Security Policies On Local Machine in the left pane.
- In the right pane, right-click on Secure Server (Require Security), and then click Properties.
- In the Secure Server (Require Security) Properties dialog box, click Add. The Security Rule wizard appears.
- At the Welcome screen, click Next.
- At the Tunnel Endpoint screen, click Next.
- At the Network Type screen, click Next.
- At the Authentication Method screen, click the Use This String To Protect The Key Exchange (Preshared Key) radio button. Type MSPRESS in the scroll box, then click Next.
- Click All IP Traffic, and then click Next at the IP Filter List screen.
- Click Require Security, and then click Next at the Filter Action screen.
- Click Finish to close the wizard.
- Now that you have added a restrictive filter list, deselect all default filter lists.
- Close the Secure Server (Require Security) Properties dialog box.
- Right-click on Secure Server (Require Security), and click Assign from the pop-up menu.
- Ping your partner host.
Notice that the ping was unsuccessful.
- To let yourself communicate on the network again, unassign the Secure Server (Require Security) policy using the pop-up menu.
Lesson Summary
Before you can implement IPSec, you need to have an appropriate security policy defined. Three predefined policy entries—Client (Respond Only), Secure Server (Require Security), and Server (Request Security)—come with Windows 2000. These can be modified or removed at any time. Additionally, MMC can be used to add customized policies. The custom policies may address connections types, authentication methods, IP Filtering and other security issues.
Using IPSec, Windows 2000 can support various host authentication methods and provide IP packet filtering, thus allowing computers to communicate or denying communication based on a wide variety of rules and filters.
EAN: N/A
Pages: 244