Lesson 6: Customizing IPSec Policies and Rules
IPSec is easily customizable with policies and rules. In this lesson you will explore how to secure a network using these various methods, taking into consideration such things as proxies, network address translation (NAT), Simple Network Management Protocol (SNMP), Dynamic Host Configuration Protocol (DHCP), Domain Name System (DNS), Windows Internet Name Service (WINS), and domain controllers.
After this lesson, you will be able to
- Explain IPSec policies and rules
- Describe how to configure IPSec for use with firewalls, NAT, and proxies
- Describe how to use IPSec to secure a network with SNMP, DHCP, DNS, WINS, or domain controllers
Estimated lesson time: 40 minutes
Policy-Based Security
Strong, cryptographic security methods have become necessary to protect communications, but they can also increase administrative overhead. IPSec reduces this by providing policy-based administration. Your network security administrator can configure IPSec policies to meet the security requirements of a user, group, application, domain, site, or global enterprise. Windows 2000 provides an administrative interface, called IPSec Policy Management, to define IPSec policies for individual computers or groups of computers within Active Directory.
IPSec Policies
An IPSec policy is a named collection of rules and key exchange settings. The policy may be assigned as a domain security policy or an individual computer's security policy. A domain computer automatically inherits the IPSec policy assigned to the domain security policy when it logs on to the domain. If a computer is not connected to a domain (for example, a roving portable computer or a standalone server), IPSec policies are stored in and retrieved from the computer registry.
This allows great flexibility in configuring security policies for groups of similar computers or individual computers with special requirements. For example, one security policy can be created for all users on the same network or all users in a particular department. IPSec policies are created with the IPSec Management snap-in for a Windows 2000 member server, as illustrated in Figure 9.24.
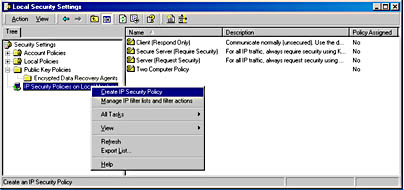
Figure 9.24 MMC of a Windows 2000 member server
Rules
Rules govern how and when IPSec is used. A rule contains a list of IP filters and specifies the security actions that take place upon a filter match. A rule is a collection of
- IP filters
- Negotiation policies
- Authentication methods
- IP tunneling attributes
- Adapter types
Each security policy may contain multiple rules. This provides the flexibility of assigning one IPSec policy to multiple computers with different communication scenarios. For example, one policy may cover all users in a department or network, but multiple rules may be required: one for intranet communications and another for Internet communications.
IP Filters and Filter Specifications
All rules are based on packets matching an IP filter. Each rule may only have a single IP filter active. The IPSec driver watches each IP datagram for a match with the active IP filter. If a match occurs, the action specified in the associated rule is implemented for that communication.
Filter Specifications
IP datagrams are checked for a match against each filter specification. Filter specifications contain the following properties:
- The source and destination address of an IP datagram, based on IP address, DNS name, or by a specific subnet or network
- The protocol, TCP, or UDP
- The specific source and destination protocol port numbers for either TCP or UDP
Security Methods and Negotiation Policies
The level of security used for a communication is determined by the security methods and the negotiation policy.
Security Methods
Each security method specifies a unique level of security to be used for the communication. Multiple security methods can be part of a single negotiation policy to increase the ability of two computers finding a common security method. The IKE service on each computer traverses the list of security methods in descending order until a common method is found. You can choose between preconfigured security methods of High or Medium or configure your own custom method.
- High. The IP ESP provides confidentiality, integrity, authentication, and antireplay protection services.
- Medium. The IP AH security protocol provides integrity, authentication, and antireplay protection services. Confidentiality is not a part of AH.
- Custom. In addition to choosing between ESP and AH, expert users can specify the algorithms for authentication, integrity, and confidentiality.
Negotiation Policies
A negotiation policy is a named collection of security methods. Each rule can have a single negotiation policy specified as currently active. If a common security method cannot be established between two computers, the negotiation policy can be configured to refuse communication with that computer or to send the data in clear text (without encryption).
Because IPSec does not disturb the original IP header, it is considered normal IP traffic and is routed as such.
ESP and Routers
The Encapsulating Security Payload (ESP) neither encrypts nor authenticates the IP header, leaving it undisturbed. Even in Tunnel mode, where the original IP header is encrypted, routing does not pose a problem. The new tunnel IP header (left undisturbed) is used to route between the tunnel endpoints. Once the packet reaches the tunnel destination endpoint, it is authenticated and decrypted. The original IP packet is forwarded without IPSec authentication or encryption to the final destination.
AH and Routers
The authentication header (AH) protocol uses all fields in the IP header to create the Integrity Check Value (ICV). Because routers modify fields in the IP header as they forward packets, this could cause problems; however, the fields that may be modified are set to zero for ICV calculation. Therefore, routers can change the mutable fields (Time to Live [TTL], checksum, and so on) without affecting the ICV calculation. At the receiving end, IPSec once again sets the mutable fields to zero for ICV calculation.
The same is true for Tunnel mode, where the new tunnel IP header would be used to calculate the ICV, but the mutable fields would be set to zero. At the tunnel destination endpoint, the hash is verified and the original IP packet forwarded without further authentication.
IPSec through Firewalls
Any routers or switches in the data path between the communicating hosts simply forwards the encrypted and/or authenticated IP packets to their destination. However, if there is a firewall or filtering router, IP forwarding must be enabled for the following IP protocols and UDP port:
- IP Protocol ID of 51. Both inbound and outbound filters should be set to pass AH traffic.
- IP Protocol ID of 50. Both inbound and outbound filters should be set to pass ESP traffic.
- UDP Port 500. Both inbound and outbound filters should be set to pass IKE traffic.
Be aware that these settings are used to allow IPSec traffic to pass through the firewall only when using Transport mode, or if the firewall is on the public side of the tunnel server. IPSec cannot be used in such a way that the firewall would implement IPSec on all incoming or outgoing packets. The router would have to create and maintain all the SAs associated with each connection.
NOTE
Traditional firewall filtering (filtering on TCP or UDP ports) cannot be done to ESP traffic, as the port numbers are encrypted.
IPSec Not Possible through NAT and Proxies
It is not possible to use IPSec through a NAT or application proxy. Even though the IP header is left intact, the encryption and authentication do not allow for other fields in the packet to be changed.
This is a problem for NAT because it would require the security parameters index to change, which cannot be allowed as this would invalidate the ICV field. Also, NAT cannot update the UDP and TCP headers because they are within the encrypted portion of the ESP or have been used in the ICV calculation.
Application proxies pose another problem for IPSec. Because application proxies operate at the application layer they would need to be IPSec-aware and have a security association for each IPSec client. This is obviously unreasonable and not provided by application proxies.
Securing SNMP
All SNMP-enabled systems must be configured to use IPSec, or at a minimum, the IPSec policies must be configured to allow unsecured communications if all the SNMP-enabled hosts cannot also be IPSec-enabled. Otherwise, secured communication will fail and SNMP messages will not be exchanged.
IPSec does not automatically encrypt the SNMP protocol. The only exceptions are the predefined polices Secure Initiator and Lockdown, which have been configured to secure SNMP traffic as well. To secure SNMP, add two pairs of filter specifications to a new or existing policy on the SNMP-enabled host.
The first pair of filter specifications would be for typical SNMP traffic (SNMP messages) and would consist of one inbound and one outbound filter specification. The following steps explain how to set filter specifications for the first pair.
- In the Addressing page of the IP Filter dialog box, set the Source address to the IP address of the SNMP management system.
- Set the Destination address to My IP Address, which will translate to the IP address of the host to which the policy is assigned (an SNMP agent).
- Enable Mirrored to automatically create the outbound filter specification.
- In the Protocol page of the IP Filter List dialog box, set the Protocol Type to TCP or UDP (if both are required, create an additional filter specification).
- Set From This Port and To This Port to 161.
The second set of filter specifications would be for SNMP trap messages and would also consist of one inbound and one outbound filter specification. The following steps explain how to set filter specifications for the second pair.
- In the Addressing page of the IP Filter List dialog box set the Source address to the IP address of the SNMP management system.
- Set the Destination address to My IP Address, which will translate to the IP address of the host to which the policy is assigned (an SNMP agent).
- Enable Mirrored to automatically create the outbound filter specification.
- In the Protocol page of the IP Filter List dialog box, set the Protocol Type to TCP or UDP (if both are required, create an additional filter specification).
- Set From This Port and To This Port to 162.
The SNMP management system or console must also be IPSec-enabled. The SNMP service in Windows 2000 supports SNMP management software, but does not include SNMP management software. To secure SNMP traffic with IPSec, the third-party management software must be IPSec-capable.
DHCP, DNS, WINS Servers, or Domain Controllers
If enabling IPSec for any servers running these services, consider whether or not all their clients are IPSec-capable. Ensure that the policies, especially the authentication and negotiation settings, are compatible. Otherwise, secure negotiation might erroneously fail, and clients will not be able to access network resources.
When DNS Is Not IPSec-Enabled
To specify a host's DNS name in an IP Filter List specification (rather than the IP address) if DNS servers are not IPSec-enabled, a special policy setting is required. Otherwise, IPSec will not be able to successfully resolve the DNS host name to a valid IP address. The setting consists of a filter specification to exempt traffic between the host and the DNS server from requiring IPSec.
Follow these steps to add a filter specification to the applicable policy and rule:
- From the Addressing page of the IP Filter List dialog box, set the Source address to My IP Address. Set the Destination address to the IP address of the DNS server.
- Enable Mirrored to automatically create the outbound filter specification.
- In the Protocol page of the IP Filter List dialog box, set From This Port and To This Port to 53.
This is the common port used by most DNS servers for communication; set this to whatever port the DNS service has been configured for traffic use.
Additionally, the negotiation policy for this rule must be set to Do Not Allow Secure Communication: No security methods should be configured. This will ensure that DNS traffic is never secured with IPSec.
TCP/IP Properties
If a computer that is a member of a domain is disconnected from its domain, a copy of the domain IPSec properties will be retrieved from the computer's registry. If the computer is not a member of a domain, a local IPSec policy will be stored in the registry. The TCP/IP properties allow the nondomain computer to always use IPSec, use IPSec only if possible, or never use IPSec.
NOTE
If the computer is connected to a domain, TCP/IP properties will not be configurable.

Practice: Building a Custom IPSec Policy
Several built-in policies have been defined to permit you to examine and investigate their behavior and configuration. However, most installations of IPSec require custom policies to be built. In this practice, you will build and test your own IPSec policy. You should perform this practice on both computers.
Exercise 1: Building your own IPSec policy
In this exercise, you will use the MMC and the Add Wizard to create a custom IPSec security policy.
- Using the Administrative Tools on the Start menu, run the Local Security Policy MMC plug-in.
- In the left pane, right-click IP Security Policy On Local Machine.
- From the pop-up menu, choose Create IP Security Policy.
- When the wizard appears, click Next to continue.
- Type the policy name Two Computer Policy, and then click Next.
- Accept the default for the Requests For Secure Connection screen by leaving the Default Response Rule check box checked, and then click Next.
- Accept the default response rule for Kerberos Authentication, and then click Next.
- Be sure to leave the Edit Properties check box checked.
- Click Finish to complete the initial setup.
- The Properties box appears. Do not close it.
At this point, you still have not configured your custom rule. Only the default response rule properties have been configured.
What is the purpose of the default response rule?
Answer
Exercise 2: Adding a New Rule
In this exercise, you will add a new rule to the IPSec policy you just created without using the Add Wizard. The rule will be configured manually using the appropriate dialog boxes and property tabs.
- At the bottom of the Properties dialog box, deactivate the Use Add Wizard check box.
- In the Rules tab of the Property screen, click Add.
- The New Rule Properties screen appears.
Exercise 3: Adding a New Filter
In this exercise, you will be configuring filters between your computer (Server01) and your second computer (Pro1). You will need to configure an outbound filter specifying your IP address as the source address and your second computer's IP as the destination address. The mirror processing then automatically configures an inbound filter specifying your second computer as the source address and your computer as the destination address.
- Click the Add button.
The IP Filter List appears.
- In the Name box, type the filter name Host A—Host B Filter.
- Deactivate the Use Add Wizard check box.
- Click the Add button in the IP Filter List tab.
- The Filter Properties box appears.
- Change Source Address to a specific IP address.
- Add your IP (w.x.y.z) address.
- Change the Destination Address to a specific IP address.
- Add your second computer's IP (w.x.y.z) address.
- Click OK and verify that your filter has been added in the Filters box of the IP Filter List dialog box.
- Click Close.
- From the IP Filter List tab, activate your filter by clicking the radio button next to the filter list you just added.
Exercise 4: Specifying a Filter Action
In the preceding exercise, you configured input and output filters for matching communication packets. In this exercise you configure the actions to take on the filtered packets.
- Click the Filter Action tab and deactivate the Use Add Wizard check box.
- Click the Add button to create a filter action.
- In the Security Methods tab, ensure Negotiate Security is selected.
- Verify that Allow Unsecured Communication With Non IPSEC Aware Computer is not selected.
- Click Add to choose a security method.
- Select Medium (AH) and click OK.
- Click OK to close the New Filter Action Properties dialog box.
- Click the radio button next to the filter you just created to activate it.
Exercise 5: Setting an Authentication Method
In this exercise, you specify how the two computers will trust each other by specifying the authentication method to use when attempting to establish an SA. You use a preshared key, which is a word or phrase that both computers must know to be trusted by one another. Both sides of the IPSec communication must know this value. It is not used to encrypt application data. Rather, it is used during negotiation to establish whether or not the two computers will trust one another.
- Click the Authentication Methods tab.
- Click Add.
- Click the Pre-Shared Key radio button.
- Type a preshared key or password in the text box and click OK.
- Choose Pre-Shared Key in the list and click Move Up so it appears first in the list.
Exercise 6: Verifying Settings and Complete Rule Creation
All of the changes to your IPSec configuration are now complete, however they have not been implemented. In this exercise, you take the final steps to verify that the settings are correct and complete creating the rule.
- Click the Tunnel Setting tab.
Verify that This Rule Does Not Specify An IPSEC Tunnel is selected.
- Click the Connection Type tab.
Verify that All Network Connections is selected.
- Click Close to return to Policy Properties and complete the creation of this rule.
Verify that This New Rule is selected in the list box.
- Close Policy Properties.
Your new IPSec policy is now ready to be activated.
Exercise 7: Activating the New Policy
Now that you have configured your new IPSec policy, in this exercise, you activate the new policy and then test the IPSec configuration.
- In the right pane of the MMC, right-click the Two Computer Policy you just created.
- Click Assign.
The Policy Assigned column value should now be Yes.
- Enable the policy on your computer and your second computer.
- Ping your second computer.
The first ping after enabling the policy will usually fail due to the time it takes to negotiate policy.
With matching policies active on both computers, future pings will work.
- Alternatively, enable and disable the policy on your computer and your second computer to see the effects of nonmatching policy settings.
Lesson Summary
IPSec allows you to use policies, rules, filters, and other methods to create a secure network. Policy-based administration helps reduce the administrative overhead of implementing security. Using rules and filters you can create custom policies to meet specific needs. In this lesson, you learned how to secure a network using these various methods and taking into consideration such things as proxies, NAT, SNMP, DHCP, DNS, WINS, and domain controllers.
EAN: N/A
Pages: 244