Lesson 2: Upgrading a Primary Domain Controller
In this lesson, you'll consider the issues that must be addressed prior to starting the actual upgrade. You will also perform the upgrade of the MIGKIT PDC, MIGKIT1, to Windows 2000 Advanced Server and then verify the installation.
After this lesson, you will be able to
- Perform an in-place upgrade of a Windows NT Server PDC.
Estimated lesson time: 90 minutes
This lesson takes you through the process of performing an upgrade of the PDC in a Windows NT domain.
IMPORTANT
In the practice, the actual Windows 2000 upgrade and copy process and the Active Directory installation and configuration might take one to three hours, depending on the speed of your hardware and the complexity of your upgrade. Also have Windows 2000 network card drivers available before proceeding with the upgrade.
Prior to an upgrade of the primary domain controller, you should always ensure that
- The correct Windows 2000 drivers are available and on hand for the server upgrade.
- The entire domain has been fully synchronized with a disaster recovery BDC that contains copies of all scripts, policies, and essential information from the PDC.
- The disaster recovery BDC is taken off-line.
- You know the correct configuration information for the TCP/IP protocol stack if TCP/IP isn't already installed on the PDC.
The domain arrangement you have configured in earlier chapters involves the MIGKIT1 server operating as the PDC of the MIGKIT domain and MIGKIT2 operating as the BDC.
Practice 1: Upgrading the MIGKIT Primary Domain Controller

In this practice, you'll perform an upgrade of the MIGKIT primary domain controller from Windows NT Server to Windows 2000 Advanced Server and verify whether DHCP is still working.
Exercise 1: Completing the Configuration of MIGKIT1
First you must complete these short procedures on MIGKIT1 to finalize its configuration prior to the actual upgrade.
To add user accounts to the MIGKIT domain
- Log on to MIGKIT1 as Administrator with a password of secret.
- Run the setup script provided in the Tools folder on MIGKIT1 by first opening a command prompt.
- Change to the C:\Tools folder and type setmigkt.bat.
This script creates several user and group accounts and other network settings that you'll use later in this chapter and in Chapter 7, "Transitioning an Upgrade to Native Mode." It also creates a home folder and a profiles folder and the associated shares for some of the practices in these chapters. Finally, it places the Market.bat and Finance.bat logon scripts in both the export and import folders of MIGKIT1 and creates the MIGKIT user and group accounts.
To check that the script has created the user accounts
- If you're not already logged on, log on to MIGKIT1 as Administrator using a password of secret.
- From the Start menu, select Programs, Administrative Tools, and then click User Manager For Domains.
You should see four users, Migkitfin1, Migkitfin2, Migkitmarket1, and migkitmarket2, and the groups to which they belong: marketing, finance, and printers.
- Examine the properties of each user by double-clicking each user name, and clear the User Must Change Password At Next Logon setting if it is set.
- Change the user rights policy to allow any user to log on by first selecting User Rights from the Policies menu. Then select the option Log On Locally in the Right list box.
- Add the Everyone group to this user right if it is not already listed.
- Click OK to accept the changes and then log off from MIGKIT1.
- Now test that users can log on by logging on as each of the users, Migkitfin1, Migkitfin2, Migkitmarket1, and Migkitmarket2, using a password of secret2 in each case.
To record the settings of your TCP/IP configuration
IMPORTANT
Unless your network card is running in plug and play mode, it is imperative that you write down the I/O base port address range, IRQ address, and memory range being used by your network card before continuing with the upgrade.
- Log on to MIGKIT1 as Administrator with a password of secret.
- To find the network card parameters, open Windows NT Diagnostics from the Start menu by selecting Programs, Administrative Tools, and then clicking Windows NT Diagnostics.
- Click the Resources tab as shown in Figure 6.4.
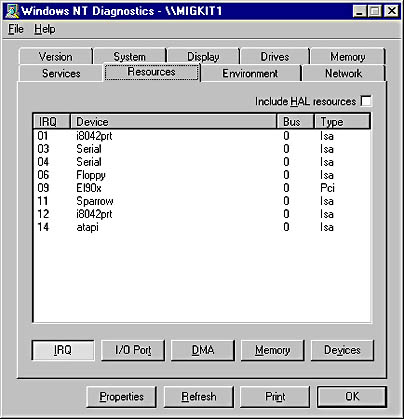
Figure 6.4 Windows NT Diagnostics Resources settings
- Using the buttons at the bottom of the dialog box, record the network card settings for IRQ, I/O Port, and Memory. (In Figure 6.4, the device EI90x is the network card and is shown using IRQ 9.)
If no settings are shown, you might have a plug and play card, in which case you should be okay.
- Close Windows NT Diagnostics.
Exercise 2: Upgrading the Windows NT PDC to Windows 2000
Now you're prepared to upgrade MIGKIT1 to Windows 2000 Advanced Server. An evaluation edition of Windows 2000 Advanced Server is included with this book, and it is the basis for the instructions that follow. If you want to use your own copy of one of the server versions of Windows 2000, follow these steps and adapt them if necessary for your version.
- Log on to MIGKIT1 as Administrator.
- Insert the Windows 2000 Advanced Server disk into the CD-ROM drive. If you have Autorun enabled, you'll see the dialog box shown in Figure 6.5.
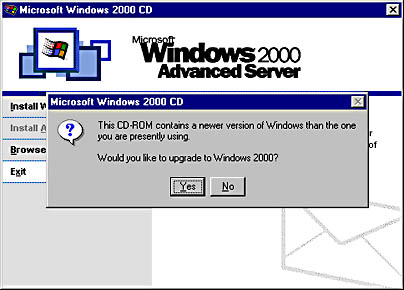
Figure 6.5 Windows 2000 upgrade message box
If you don't have Autorun configured, right-click the CD-ROM drive icon in My Computer and select AutoPlay from the shortcut menu that appears.
- Click Yes to start the Windows 2000 Setup Wizard. The page shown in Figure 6.6 will now be displayed.
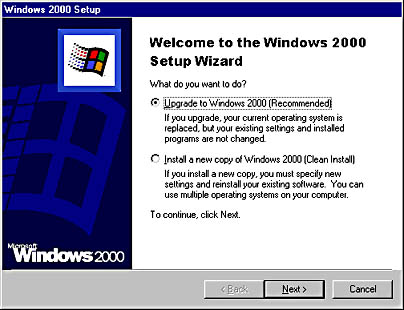
Figure 6.6 Windows 2000 Setup Wizard opening page
If you install a clean version of Windows 2000, a new set of users, groups, or trust relationships will be created. Previous settings won't be retained and you'll have to recreate everything.
NOTE
Installing a clean version will leave the original Windows NT system untouched and produce a dual or multiple-boot system. During a real upgrade, this might be the best choice if you don't have a spare server system and you want to verify that Windows 2000 can run on the server platform before performing an upgrade of the production domain. To install a clean version, you'll need at least 2 GB of free disk space, preferably on a separate partition or drive. - Because you're performing an upgrade in this procedure, select Upgrade To Windows 2000 (Recommended) and click Next.
The dialog box shown in Figure 6.7 will be displayed.
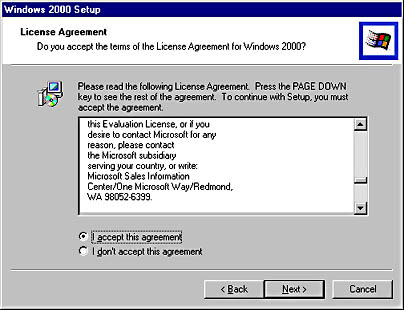
Figure 6.7 Windows 2000 License Agreement
- Read the license terms, select I Accept This Agreement, and then click Next.
The Product Key page as shown in Figure 6.8 will now appear.
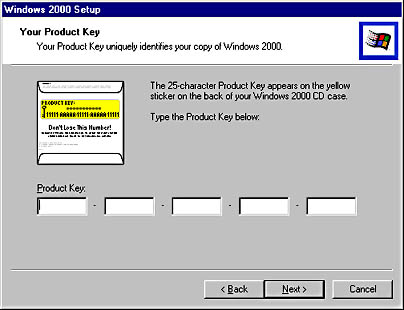
Figure 6.8 Windows 2000 Product Key page
- Enter the product key supplied with your copy of Windows 2000 and click Next.
- Click Next on the next screens until the setup program begins copying files.
If enough disk space is available and your hardware is supported, the setup program will copy the installation files to a temporary folder called $Win_nt$.~bt and will update the Boot.ini file to use this folder when the system is restarted. Once the copy process has finished, you'll see the Restarting The Computer page shown in Figure 6.9.
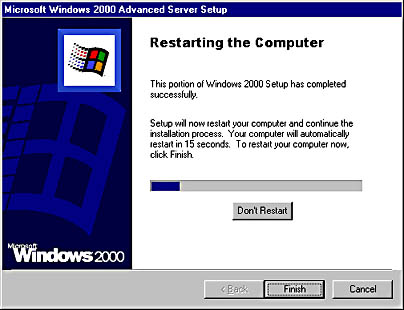
Figure 6.9 Restarting The Computer page
NOTE
If your CD-ROM drive is configured to boot up when your machine starts, remember to remove the Windows 2000 installation CD before rebooting; otherwise the Setup program will attempt to start over from the beginning each time you reboot during the updrade process. You will be prompted to re-insert the installation CD after you reboot. - Click Finish to reboot.
NOTE
During the upgrade, MIGKIT1 will take no part in Windows NT domain operations. It will perform no authentication. Any changes in the properties of a user (such as a password change) or, indeed, any changes involving the user management tool that require a PDC will not be possible until the Windows 2000 domain controller is performing as the PDC emulator. This operation can take up to an hour and is best performed when not many users require password changes because there will be no PDC to support these changes.When the system reboots, the upgrade will continue. The system will reboot twice during the installation while the system's hardware is detected and drivers are loaded. This process will take at least 30 minutes, so you might like to take a break here or review Chapters 3 and 4, which cover many of the upgrade issues you might encounter.
After the second reboot, the Active Directory installation wizard will start and the title page shown in Figure 6.10 will appear.
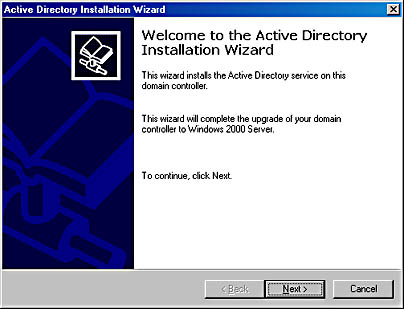
Figure 6.10 Active Directory installation wizard
IMPORTANT
Before you continue, ensure that the network connection is performing correctly and that TCP/IP has been configured for the system. One of the challenges with a Windows 2000 upgrade is that in many cases, it will not detect your network card.Before proceeding any further with this practice, wait until Windows has finished starting and type ipconfig /all on MIGKIT1 at a command prompt. If your IP address is shown, carry on. Otherwise, if the network card drivers were not upgraded automatically, you will have to install new ones. Install the Windows 2000 network card drivers and then reset the TCP/IP configuration information for MIGKIT1 to have a fixed IP address of 192.168.0.100 with a subnet mask of 255.255.255.0. To do this, right-click My Computer and select Properties. Click the Hardware tab and use the Hardware Wizard to manually add your network card drivers.
- Click the Next button on the Active Directory Installation Wizard introductory page to move to the Create Tree Or Child Domain page shown in Figure 6.11.
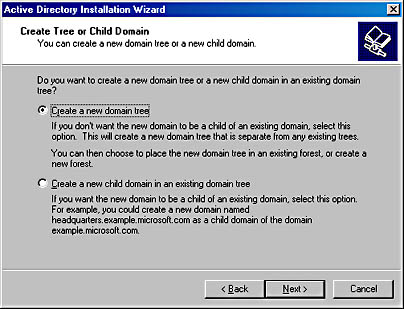
Figure 6.11 Create Tree Or Child Domain page
This is the first Windows 2000 domain, so it must be the root of the forest. Further domains to be upgraded will be installed as children of this root domain.
- Select Create A New Domain Tree and click Next.
The Active Directory installation wizard asks whether you are creating a new forest, as shown in Figure 6.12.
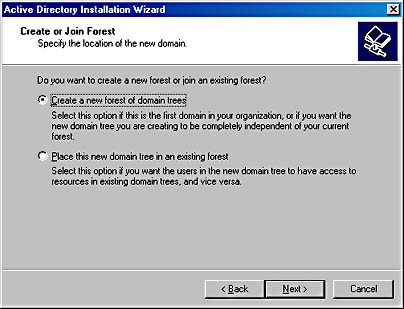
Figure 6.12 Create Or Join Forest page
- Because no other forests are in use, select Create A New Forest Of Domain Trees and then click Next.
NOTE
The pages shown in Figure 6.11 and 6.12 closely resemble each other, but they are asking quite different questions. Be sure that you understand the difference between trees and forests when answering these questions because an error will create a different Windows 2000 configuration than you intended. - The New Domain Name page now appears, as shown in Figure 6.13.
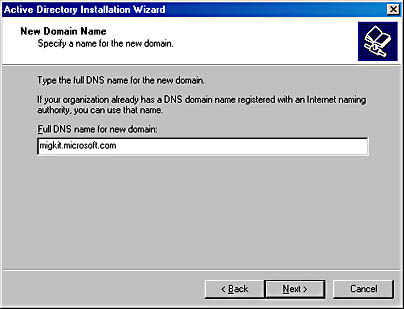
Figure 6.13 New Domain Name page
The domain name you enter must be managed by a DNS server that is active on the network to which the Windows 2000 system is connected. If a server isn't found, the Active Directory wizard will run the DNS installation wizard to configure DNS to run on the server being upgraded, MIGKIT1, in this case. For a more detailed description of the issues surrounding DNS names, review Lesson 3, "Assessing DNS," in Chapter 4.
- Type the sample domain name used in this practice, migkit.microsoft.com, in the text box. Then click Next.
The Database And Log Locations page of the Active Directory installation wizard now appears, as shown in Figure 6.14.
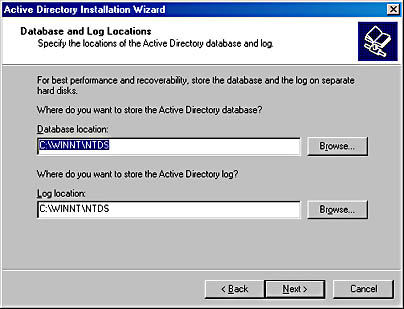
Figure 6.14 Determining the location of the Active Directory log and database
On this page, you enter the path to the Active Directory log and database directories. Note that these aren't required to be on the same drives, and performance might be enhanced by placing them on separate drives.
- For this practice, accept the default locations, which are folders beneath the Windows 2000 installation system folder, and click Next.
The Shared System Volume page appears, as shown in Figure 6.15.
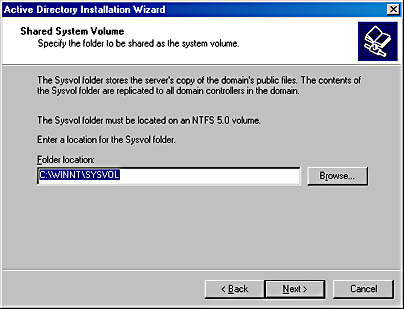
Figure 6.15 Shared System Volume page
This page requests the path to the Sysvol folder. This folder is used by the Windows 2000 File Replication service (FRS) and replaces the Windows NT LAN Manager Replication Service. It uses multimaster replication to exchange information among servers in a Windows 2000 domain, as discussed in the next lesson.
- Accept the default location for the Sysvol folder by clicking the Next button.
If the upgrade doesn't locate a DNS server for the Active Directory domain you're creating, the message in Figure 6.16 appears. Because there is no DNS for migkit.microsoft.com, the dialog box should appear.

Figure 6.16 DNS message box
- Click OK to move to the next page of the Installation Wizard, shown in Figure 6.17.
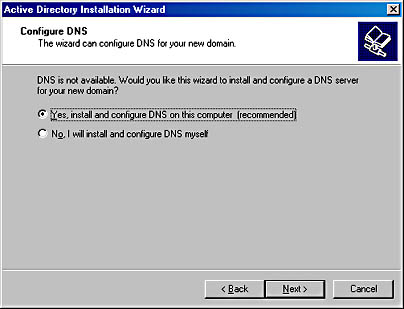
Figure 6.17 Configure DNS page
- For this practice, select the first option because you want the Active Directory installation wizard to install the DNS service for you. Click Next to continue.
NOTE
When you upgrade a server that doesn't have TCP/IP installed, the protocol will be installed as part of the upgrade process. Computers that are clients of the servers in the network and that want to use Active Directory will also need to have the TCP/IP protocol installed on them. You must address this issue as part of your migration plan.Now the Permissions page appears, as shown in Figure 6.18.

Figure 6.18 Permissions page of the Active Directory installation wizard
The Active Directory installation wizard needs to determine whether to allow programs to be run on this domain by anonymous users, which is required for programs such as the Routing and Remote Access Service (RRAS) on Windows NT. The security concern is that allowing anonymous users access will also provide a means for unauthorized entry by unknown (as in anonymous) users not registered in the Windows 2000 Active Directory. Anonymous users can then incorporate a variety of hacking programs to view data or locate proper user logon information such as a user name and password.
As discussed in Lesson 4 of Chapter 4, you can choose to relax this security setting and select Permissions Compatible With Pre–Windows 2000 Servers if you're using RRAS on Windows NT servers in the domain. Higher levels of security can be restored once the RRAS server system has been upgraded to Windows 2000. Issues with RRAS servers and pre–Windows 2000 applications should be investigated in the test lab and resolved as part of the migration planning process.
- Leave the Permissions setting at Permissions Compatible With Pre–Windows 2000 Servers and click Next.
The Directory Services Restore Mode Administrator Password page appears, as shown in Figure 6.19. This password is used to validate entry to the Directory Services Restore mode option when you press the F8 key at startup. You would use this feature if there were problems with Active Directory.
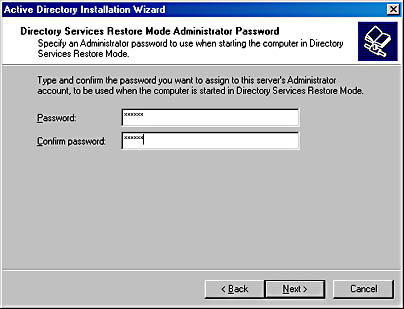
Figure 6.19 Directory Services Restore Mode Administrator Password page
- Type the following password: secret. Confirm the password by typing it again in the Confirm Password box, and then click Next.
The Summary page displayed in Figure 6.20 appears, which presents the settings you've selected.
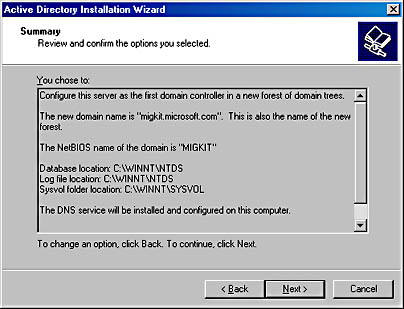
Figure 6.20 Summary page
- If any of the settings are incorrect, you can use the Back button to navigate to the appropriate page and make changes; otherwise, click Next to continue.
The Configuring Active Directory dialog box appears, as shown in Figure 6.21. The page will be updated as the installation proceeds, and it might take some time to complete.
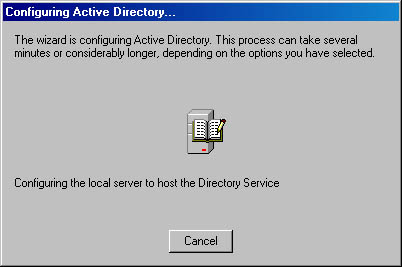
Figure 6.21 Configuring Active Directory page
When the Active Directory installation is complete, the page shown in Figure 6.22 will appear.
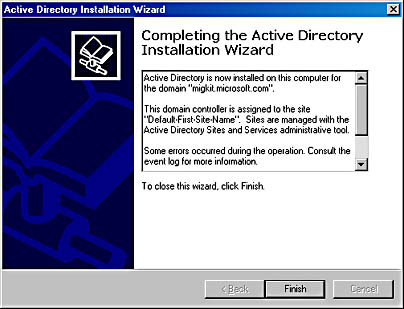
Figure 6.22 Completing The Active Directory Installation Wizard page
- Click Finish to close the Installation Wizard.
- Restart the machine when prompted.
Practice 2: Verifying the Upgrade
To verify that the upgrade has completed correctly, perform the following tests on MIGKIT2.
- Log on to MIGKIT2 as Administrator with the password secret.
- Verify that the client is still able to receive an IP address by opening a command prompt and typing the following lines:
ipconfig /release ipconfig /renew ipconfig /all
You should see an IP address from the Windows 2000 DHCP service.
- Reset the IP address on MIGKIT2 to a fixed IP address of 192.168.0.101, and set the primary DNS server to 192.168.0.100.
Now you're going to verify that MIGKIT2 can't become a primary domain controller.
- From the Start menu, select Programs, Administrative Tools, and then click Server Manager.
- Verify that the primary domain controller is still visible.
- Select MIGKIT2 and try to promote it to a PDC by selecting Promote To Primary Domain Controller from the Computer menu. Explain what happens.
- Add a comment to the Market.bat logon script held in C:\Winnt\System32\Repl\Export\Scripts on the former MIGKIT1 (now migkit.microsoft.com). Then log on to MIGKIT2 and see whether the Market.bat file has been updated in the C:\Winnt\System32\Repl\Import\ Scripts folder. Explain what you see. As a hint, open Server Manager on MIGKIT2 and try to configure replication on MIGKIT1. Suggest an answer to the problem.
Now you must verify that your users can still log on locally.
- On MIGKIT2, open User Manager For Domains from the Administrative Tools folder.
- Verify that the user rights policy still allows any user to log on locally by selecting User Rights from the Policies menu.
- Select the Log On Locally option in the Right list box.
- Check that the Everyone group is in the list of groups and users. If it isn't, add the Everyone group to this right.
- Click OK and exit User Manager For Domains.
This change will be made on the Windows 2000 system so you must now replicate the change back to MIGKIT2 from Server Manager.
- On MIGKIT2, from the Start menu, select Programs, Administrative Tools, and then click Server Manager.
- Select MIGKIT2 and from the Computer menu select Synchronize With Primary Domain Controller.
- Log on to MIGKIT1 using the name Migkitfin1 and the password secret2.
- Were there any problems obtaining your normal Windows NT profile?
Answers
Lesson Summary
In this lesson, you saw that you should fully synchronize the entire domain prior to an upgrade of the PDC and that all Windows 2000 drivers should be at hand. In the practice, you upgraded a primary domain controller and you verified that the upgrade had completed properly. You noted security issues with RRAS and that the Windows NT Directory Replicator Service is no longer available from the upgraded Windows 2000 PDC.
EAN: 2147483647
Pages: 126