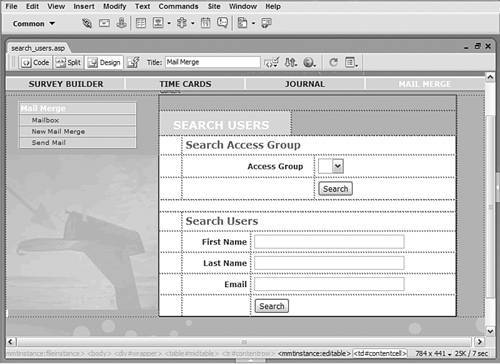
End User Recipe: Search Users
| Perhaps the most time-consumingand error-susceptibleaspect of sending email to a group of people is entering the email addresses. The Search Users page of the Mail Merge application provides an easy way to collect and apply the required addresses. Typically in a workgroup, email is sent either to individuals whose email address is known or to a specific set of people tasked with a particular job, such as managers, whose email address might not be known to the sender. The Search Users page is structured to accommodate either scenario. You'll find that this search page differs from others in this book in several ways. First, the pages uses two different search forms: one that looks for individuals and another that concentrates on groups. Both forms have their own form buttons, but each button activates the same codeand that's the second major difference. Instead of the form just passing parameters to another page to handle the actual search, the Search Users page first places all the selected search criteria into session variables, which can be referenced throughout the application. This process has the added benefit of ensuring that the currently selected criteria will be present if the user returns to this page by way of either the Back button or a link. After the variables are stored, the user is redirected to the results page. A simple recordset is used to gather the available groups for a drop-down list in one of the search forms. By attaching the list dynamically, new groups can be included as a search item as they become available, without additional coding. Step 1: Implement Search Users DesignThe obvious difference between this Web application page and most others is that this page includes more than one form. When designing the layout for this page, make sure to completely separate the two forms by putting them in two separate table rows. You'll also want to make sure that each form is named differently; the forms contained in our snippet are called SearchUsers and SearchAccessGroups, reflecting their functionality. However, for our purposes, it's important that the submit buttons in both forms use the same name, such as Search; having identically named buttons will ensure that the same custom code is called regardless of which form is submitted.
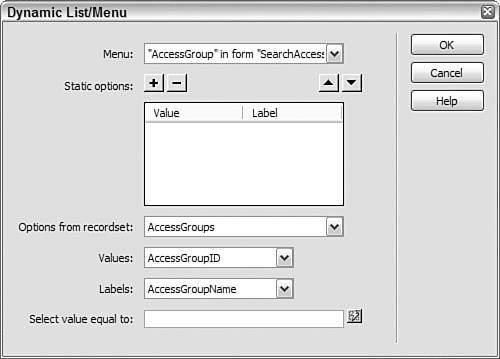
Step 2: Add Database ComponentsAs the introduction to this application page mentioned, only one recordset is required. To allow the user to select any of the groups set up for access to the workgroup, we'll create a recordset that includes the names of all the groups. If access groups are not used in your workplace, you can substitute any other group that is suitable. Note For more details on access groups, see the user log-in application in Recipe 1, "User Login."
Step 3: Data Binding ProcessWe'll put our recordset right to use and apply it to the list element found in the Access Groups form. In addition to making the list dynamic, we'll need to add a hidden form element next to the list. The hidden form element is required for our custom code (added later in this recipe) to work properly. Let's start by attaching the proper recordset values to the list element.
Now we'll add the hidden form element with the needed name and value.
We put this hidden form element in the Access Groups form so that our custom SQL statement (inserted later in the Mailing List page) will not find a match in the Email field when the AccessGroups list is used. Step 4: Set Form ActionIn many other search pagesincluding those used in recipes elsewhere in this bookthe form action is set to another dynamic page, which handles the actual search depending on values passed from the initial search page. In this recipe, we're going to demonstrate an alternative approach that sets the action to the calling pagethis search pageand uses custom code to redirect the user to the results page after certain session variables have been set. This "same page" method is effective when the search criteria are needed in various other pages in the application. Because we have two search forms, we'll need to set the actions for both of them, starting with the Search Users form:
Now let's repeat the same procedure for the second form:
Step 5: Insert Custom CodeWe're now ready for the final step in this recipe: inserting the custom code. As noted throughout the recipe, the custom code serves two purposes: to set the search criteria to easily accessible session variables and to send the user to the results page. The custom code is inserted at the top of the page. What keeps it from being called immediately? An if-then statement surrounds the code and ensures that it will be executed only when the Request string is equal to Search, which happens to be the name assigned to the submit buttons in both forms. By giving the buttons the same name (as we did at the start of this recipe), we ensure that the custom code is run when either one is pressed.
Your page is now ready for initial testing, but until we complete the next page in the applicationMailing Listyou won't be able to see the results of your search. |
EAN: 2147483647
Pages: 121