| The View Journal page displays all the entries in a particular journal as well as basic information about the journal itself. The page, in essence, combines information from the Journal and JournalEntries data tables by using two corresponding recordsets. From here, the user can also look at the journal through an archive view or choose to edit any individual entry. Step 1: Implement Journal Design The Journal layout includes two distinct areas: one that contains basic information on the journal and one that displays all the associated entries. The former is a standard label and dynamic data arrangement, whereas the latter uses a repeating region to display the entries by date. 1. | Create a page for the View Journal recipe, either from a template or from the File > New dialog.
 In the Journal folder, locate the folder for your server model and open the journal page there. In the Journal folder, locate the folder for your server model and open the journal page there.
| 2. | In the content area of your page, create a header for the page and an area to hold both the general journal information and the specific entries.
From the Snippets panel, drag the Recipes > Journal > Wireframes > Journal - Wireframe snippet into the Content editable region.
| 3. | Add labels and table cells to hold the journal information (name, owner, and description) and, below that, a two-row, two-column table for the journal entries.
| Place your cursor in the first row below the words VIEW JOURNAL and insert the Recipes > Journal > ContentTables > Journal Info - Content Table snippet. | | | Place your cursor in the bottom row of the wireframe and insert the Recipes > Journal > ContentTables > View Journal - Content Table snippet [r6-7]. |
| 4. | Save the page.
|
r6-7. 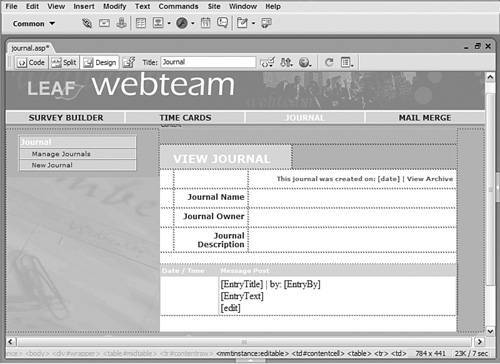
Step 2: Add Database Components For the two layout areas, two separate data sources are needed. As noted earlier, the Journals and JournalEntries data tables are used to create the recordsets. The Journals table is filtered to include information about the currently selected journal, while the JournalEntries table is filteredusing the same valueto show all the journal's entries. 1. | From the Bindings panel, choose Add (+) and select Recordset.
| 2. | In the dialog's simple view, enter an appropriate name for the recordset.
Enter Journal in the Name field.
| 3. | Choose a connection (data source) to use.
Select Recipes from the Connection list.
| 4. | Choose the table in the data source to work with.
Select Journals (journals for PHP) from the Table list.
| 5. | Leave the Columns option set to All.
| 6. | In the Filter area of the Recordset dialog, set the four Filter list elements like this:
JournalID | = (Equals) | URL Parameter | ID |
| 7. | Leave the Sort option set to None and click OK to close the dialog.
|
Although similar to the Journal recordset, the Entries recordset is filtered differently. Rather than look for a specific entry, this recordset gathers all the entries for the current journal, as represented by the ID parameter in the URL. 1. | From the Bindings panel, choose Add (+) and select Recordset.
| 2. | In the dialog's simple view, enter an appropriate name for the recordset.
Enter Entries in the Name field.
| 3. | Choose a connection (data source) to use.
Select Recipes from the Connection list.
| 4. | Choose the table in the data source to work with.
Select JournalEntries (journalentries for PHP) from the Table list.
| 5. | Leave the Columns option set to All.
| 6. | In the Filter area of the Recordset dialog, set the four Filter list elements like this:
EnTRyJournal | = (Equals) | URL Parameter | ID |
| 7. | Leave the Sort option set to None and click OK to close the dialog.
| 8. | Save your page.
|
Without sorting the Entries recordset, the journal entries will be presented in the order they were storedoldest to newest. You could sort by EntryDate Descending if you wanted to put the newest journal entry first. Step 3: Data Binding Process Data fields from the two recordsets must be placed in their separate content areas. In all cases for this page, the data fields can be dropped into position from the Bindings panel. Let's start by binding data fields from the Journal recordset. 1. | From the Bindings panel, expand the Journal recordset.
| 2. | Place the data source fields onto the page in their respective areas:
| Drag JournalTitle into the cell next to the Journal Name label. | | | Drag JournalOwner into the cell next to the Journal Owner label. | | | Drag JournalDescription into the cell next to the Journal Description label. | | | Select the term [date] in the placeholder text at the top of the content area, and drag JournalDate from the Bindings panel onto the selection. |
| 3. | Save the page.
|
Now, let's add the data fields from the Entries recordset. 1. | From the Bindings panel, expand the Entries recordset.
| 2. | Place the data source fields onto the page in their respective areas:
| Drag EntryDate into the cell below the Date/Time label. | | | Select the term [EntryTitle] in the placeholder text at the top of the content area, and drag EntryTitle from the Bindings panel onto the selection. | | | Select the term [EntryBy] in the placeholder text at the top of the content area, and drag EntryBy from the Bindings panel onto the selection. | | | Select the term [EntryText] in the placeholder text at the top of the content area and drag EntryText from the Bindings panel onto the selection [r6-8]. |
| 3. | Save the page.
|
r6-8. 
Step 4: Assigning Dynamic Links The Journal page is connected to two other pages in the application: Archive and Journal Editor. The Archive page lets you see all the journal entries organized by their archiving option, whether daily, weekly, or monthly. The Journal Editor, as the name implies, allows an entry to be modified. 1. | Select the text or image you want to link to the archive page.
Choose the phrase View Archive in the upper-right section of the content area.
| 2. | Click the folder icon next to the Link field in the Property inspector.
The Select File dialog opens.
| 3. | Make sure the dialog is set to Select File Name From File System.
| 4. | Choose Parameters at the bottom of the dialog.
| 5. | In the Name column of the Parameters dialog, enter the variable name.
Enter ID in the Name column.
| 6. | In the Value column, enter the dynamic value of the current survey's ID.
Click the lightning bolt icon next to the Value column and, from the Dynamic Data dialog, choose JournalID from the Journal recordset. When you're done, click OK once to close the Dynamic Data dialog, and again to close the Parameters dialog.
| 7. | In the Select File dialog, select the file that will be used to edit the survey information.
Choose archive in the Journal folder for your server model.
| 8. | When you're done, click OK to insert the link.
|
To make the link to the edit page functional, we'll need to pass two parameters: one identifying the current journal and another for the selected entry. 1. | Select the text or image you want to link to the journal application.
Choose the word [edit] below the Journal label.
| 2. | Click the folder icon next to the Link field in the Property inspector.
The Select File dialog opens.
| 3. | Make sure the dialog is set to Select File Name From File System.
| 4. | Choose Parameters at the bottom of the dialog.
| 5. | In the Name column of the Parameters dialog, enter the variable name.
Enter ID in the Name column.
| 6. | In the Value column, enter the dynamic value of the current survey's ID.
Click the lightning bolt icon next to the Value column and, from the Dynamic Data dialog, choose JournalID from the Journal recordset. When you're done, click OK to close the Dynamic Data dialog.
| 7. | Choose Add (+) to insert another parameter.
| 8. | Enter a name for the entry ID variable in the Name column.
Enter EditID in the Name column.
| 9. | Select the dynamic data for the value.
Click the lightning bolt icon next to the Value column and, from the Dynamic Data dialog, choose EntryID from the Entries recordset. When you're done, click OK once to close the Dynamic Data dialog, and again to close the Parameters dialog.
| 10. | In the Select File dialog, select the file that will be used to edit the survey information.
Choose journal_editor in the Journal folder for your server model.
| 11. | When you're done, click OK to insert the link.
|
Step 5: Adding Repeat Region The final step on the Journal page is to apply the Repeat Region server behavior. Naturally, the server behavior should be applied only to that area containing multiple recordsin this case, dynamic data from the Entries recordset. 1. | Select any of the dynamic data fields in the entries content area.
| 2. | From the Tag Selector, choose the table row tag.
Select the <tr> tag from the Tag Selector.
| 3. | From the Server Behaviors panel, choose Add (+) and select Repeat Region.
| 4. | In the Repeat Region dialog, choose the recordset.
Choose Entries from the Recordset list.
| 5. | Set the Show option to display the number of records you want.
Choose Show All Records.
| 6. | Click OK when you're done, and save your page.
|
With this step, the page is now complete, and you can see how it looks in the browser or in Live Data view [r6-9]. If you're testing in Live Data view, make sure you have an active ID ready to go in the Live Data Settings. To set one up, choose View > Live Data Settings and then enter ID in the Name column and the ID value in the Value column. r6-9. 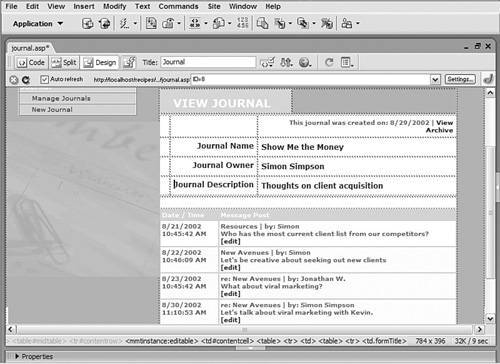
Note If the journals are too numerous, you might consider displaying only a limited number of entries. Of course, if you limit the records in the Repeat Region server behavior, you'll need to add recordset navigation controls, as we've done in previous recipes such as Recipe 2, "Employee Lookup."
|