| To make sure your new journal details aren't written in stone, an Edit Journal page is included in the application. The Edit Journal page allows you to modify all the fields set when the journal was created, including name, owner, description, and archive type. After the modifications are made, the Update Record server behavior is used to store the changes. Step 1: Implement Edit Journal Design The layout for the Edit Journal page replicates that of New Journal, with the single exception of an Update button being substituted for the Create Journal one. 1. | In the server model of your choice, create a dynamic page.
 In the Journal folder, locate the folder for your server model and open the edit_journal page from there. In the Journal folder, locate the folder for your server model and open the edit_journal page from there.
| 2. | Add a table to the content region of your page to contain the form elements for the application.
From the Snippets panel, drag the Recipes > Journal > Wireframes > Edit Journal - Wireframe snippet into the Content editable region.
| 3. | Insert the form and, within it, a two-column table. The table should include form elements and labels for a journal name, the owner, a description, and an archive list to accept the bound data. You'll also need a form button for modifying the new record.
Place your cursor in the row below the words EDIT JOURNAL and insert the Recipes > Journal > Forms > Edit Journal - Form snippet.
| 4. | Save the file [r6-5].
r6-5. 
|
Step 2: Add Database Components The Journals table again serves as the basis for this page's recordset. However, as the page is intended to just displayand modifya single record, the recordset is filtered by a URL parameter that reflects the desired journal's ID number. 1. | From the Bindings panel, choose Add (+) and select Recordset (Query).
| 2. | In the dialog's simple view, enter an appropriate name for the recordset.
Enter Journal in the Name field.
| 3. | Choose a connection (data source) to use.
Select Recipes from the Connection list.
| 4. | Choose the table in the data source to work with.
Select Journals (journals in PHP) from the Table list.
| 5. | Leave the Columns option set to All.
| 6. | In the Filter area of the Recordset dialog, set the four Filter list elements like this:
JournalID | = (Equals) | URL Parameter | ID |
| 7. | Leave the Sort option set to None and click OK to close the dialog.
|
Step 3: Data Binding Process Binding most of the elements on the page to the dynamic data of the recordset is a drag-and-drop affair. Only the Archive list element requires additional steps. However, even those can be handled through Dreamweaver's user interface without hand-coding. Because of the requirements of the Update Record server behavior, ColdFusion and PHP users will also need to include a hidden form field with the journal ID embedded in it. When we're through, the Archive list will automatically select the archive type previously chosen for the journal being modified. 1. | From the Bindings panel, expand the Journal recordset.
| 2. | Place the data source fields onto the page in their respective areas:
| Drag JournalTitle onto the JournalName text field. | | | Drag JournalOwner onto the JournalOwner text field. | | | Drag JournalDescription onto the JournalDescription text area. |
Now, let's bind the JournalArchive value to the Archive list.
| 3. | Select the Archive list form element.
| 4. | From the Property inspector, choose Dynamic.
| 5. | In the Dynamic List/Menu dialog, click the lightning bolt icon next to the Set Value Equal To field.
| 6. | In the Dynamic Data dialog, choose JournalArchive from the expanded Journals recordset.
| 7. | Click OK once to close the Dynamic Data dialog, and again to close the Dynamic List/Menu dialog [r6-6].
r6-6. 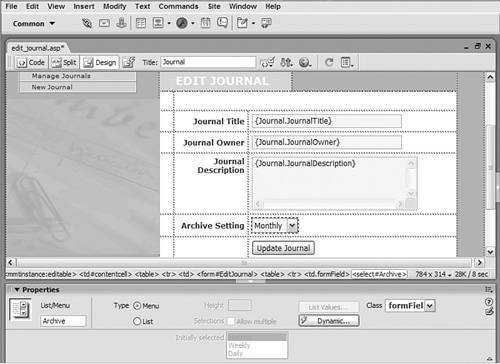
|
For ColdFusion and PHP The remaining steps in this section are for ColdFusion and PHP users only. 1. | From the Forms tab of the Insert bar, drag a Hidden Field form element onto the table cell next to the explanatory text.
| 2. | Enter JournalID as the name for the hidden element on the Property inspector.
| 3. | Click the lightning bolt icon to open the Dynamic Data dialog.
| 4. | From the Journal recordset, choose JournalID and click OK to close the dialog.
|
Step 4: Update RecordEdit Journal The standard Update Record server behavior is used to save any changes made through the Edit Journal page. After the record has been modified, the user is redirected to the Manage Journal page to make changes on another record or additions to the current one. For ASP 1. | From the Server Behaviors panel, choose Add (+) and then Update Record.
| 2. | In the Update Record dialog, select the data source connection.
Choose Recipes from the Connection list.
| 3. | Choose the table containing the data you are updating.
From the Table to Update list, choose Journals.
| 4. | Choose the recordset from which to get data source fields.
From the Select Record From field, choose Journal.
| 5. | Set the primary key for the recordset.
From the Unique Key Column list, choose JournalID and make sure the Numeric option is selected.
| 6. | Select the file you want to appear when the update is complete.
For the After Updating, Go To field, select the manage_journals.asp page.
| 7. | Choose the form on the page from which to get the values.
From the Get Values From list, choose EditJournal.
| 8. | In the Form Elements area, set the form elements to their corresponding data source fields.
| Set the JournalName form element to update the JournalTitle data source field as Text. | | | Set the JournalOwner form element to update the JournalOwner data source field as Text. | | | Set the JournalDescription form element to update the JournalDescription data source field as Text. | | | Set the Archive form element to update the JournalArchive data source field as Numeric. |
| 9. | Make sure your entries are correct, and then click OK to close.
| 10. | Save your page and begin testing if you want tothis page is complete.
|
For ColdFusion and PHP 1. | From the Server Behaviors panel, choose Add (+) and select Update Record.
| 2. | In the Update Record dialog, choose the current form.
Select EditJournal from the Submit Values From list.
| 3. | Select your data source from the list.
Choose Recipes from the Data Source list.
| 4. | Enter your user name and password, if needed.
| 5. | From the list, select the table in the data source into which to insert.
Choose Journals (journals in PHP) from the Insert Into Table list.
| 6. | Set the data source fields to their corresponding form elements.
| As the Primary Key, JournalID selects the record using FORM.JournalID as Numeric type for ColdFusion and Integer type for PHP. | | | Set JournalTitle to get its value from the FORM.JournalName form element as Text. | | | Set JournalOwner to get its value from the FORM.JournalOwner form element as Text. | | | Set JournalDescription to get its value from the FORM.JournalDescription form element as Text. | | | Set JournalArchive to get its value from the FORM.Archive form element as Numeric for ColdFusion and Integer in PHP. | | | JournalDate should be set not to get a value. |
| 7. | In the After Inserting, Go To field, enter the path to the file you want displayed after the record is updated.
Choose Browse and select the manage_journals.cfm file (manage_journals.php for PHP).
| 8. | Check your entries to verify they are correct and, if so, click OK.
| 9. | Save your page.
|
You're ready to begin testingthe Edit Journal page is now complete. |