Saving the Screen
Originally designed as a method of preserving displays from damage, screen savers are now as much a form of entertainment as they are a hardware-protection measure. Early Cathode Ray Tube (CRT) displays were victimized by an unfortunate condition known as phosphor burn-in. Phosphor burn-in occurs when a display shows the same image for too long. After a few days of displaying the same static image, the display is permanently scarred with a shadow of the image. That said, fundamental changes wrought in CRT display technology in the mid 1990s reduced the risk of phosphor burn-in to practically nil. Phosphor burn-in is also no longer a concern for CRT owners simply because lower prices and more demanding users result in the replacement of displays much more often. These factors combined to practically eliminate the need for screen savers. A new factor has arisen though. Many users are migrating to the Liquid Crystal Displays (LCD), which are again susceptible to a form of image burn-in. Screen savers are again a useful piece of software. In general though, the best protection for your screen and of your electric bill is to have your monitor completely switch off after a period of inactivity. This option is found in the Energy Saver preference pane.
| Cross Reference | For more on the Energy Saver preference pane, see Chapter 13. |
To use a screen saver, or to change the settings of the currently selected screen saver, follow these steps:
-
Click the System Preferences icon in the Dock (or System Preferences menu item in the Apple menu). The System Preferences window appears, showing buttons for many different settings. (Most are covered in Chapter 13.)
-
In System Preferences, click the Desktop & Screen Saver button or choose View Desktop & Screen Saver. The System Preferences window changes to show one of the two available panes in this preference panel. Screen saver controls are of course under the Screen Saver pane. Click the Screen Saver button (top right) to reveal the Screen Saver pane. Much like the Desktop pane, the Screen Saver pane is divided into two distinct panels. The left side has a list of available screen savers; the right side shows a preview display of the screen saver in action.
-
Choose the screen saver desired from the left panel.
-
Close the Desktop & Screen Saver preference pane with the Close button or quit system preferences via the Application menu to enable the screen saver.
The Screen Saver pane is shown in Figure 4-2. The standard preinstalled screen savers include the following:
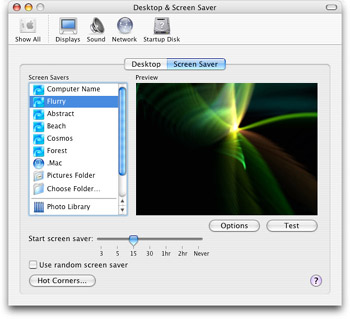
Figure 4-2: Screen savers engage after a set period of inactivity, replacing your screen’s displayed items by showing photos, cycling interesting patterns, or changing colors.
-
Computer Name: A simple display of a platinum-looking Apple logo, with an overlay of your computer’s name on a black background. The logo and name fade and reappear, each centered at different points onscreen. Your computer’s name is set during the installation process.
-
Flurry: The only truly animated screen saver provided by Apple. While Flurry may or may not be the most popular, it is definitely the most hypnotic! Flurry is perhaps best described as a single point of light erupting and spewing forth colorful streams of light while moving around the screen. ... you will buy apple computers... you will buy apple computers...
Cross Reference To change your computer’s name, consult Chapter 13.
-
Abstract: A collection of colorful patterns and swirls, cross-fading and panning across the screen. This is the first of the Ken Burns–style slideshow screen savers. (Ken Burns directed a series of famous documentaries, and is very creative in the use of still images throughout.)
-
Beach: Another of the slideshow-style screen savers. Rather than abstract images of color swirls, Beach is comprised of photos of various beach locations. Consider it inspiration for your next vacation.
-
Cosmos: Like the Beach screen saver, but designed by a Star Trek fan, Cosmos is comprised of various deep space photos.
-
Forest: Another of the slideshow-style screen savers, Forest is a collection of images of various wilderness locations.
-
.mac: allows you to access and display images from your .mac account, as well as any public images from your friends or family’s .mac accounts.
-
Pictures Folder: Any images stored in your Pictures folder (found in your Home Folder) will become the slides in the screen saver slideshow as they pan, zoom, crossfade, and are randomized. Moving items to and from folders is discussed in detail in Chapter 5.
-
Choose Folder: Just as with the Choose Folder option for the Desktop Picture, a dialog opens. Choose a folder containing images you desire to have as a screen saver. Click Open once you find the folder, and the dialog box closes. The screen saver will display images from the selected folder.
-
Photo Library: A tie-in to iPhoto, this screen saver option uses your entire iPhoto library as the slides in the screen saver.
-
Last Import: This is also a tie-in to iPhoto, but this option only uses images from your last import as the available elements of the slideshow.
Screen saver general settings
In addition to selecting a screen saver, there are a few settings available to optimize each screen saver’s functionality.
-
Test: Click the Test button under the preview area of the screen saver pane to preview your screen saver in full-screen mode. Move the mouse or click any key to return to the preference pane.
-
Start Screen saver: This slider, located at the bottom of the Desktop & Screen Saver window, allows you to set the screen saver’s activation time. The activation time is how long the computer will sit idle before engaging the screen saver. The slider ranges from 3 minutes to 2 hours, with Never at the far right. Setting activation to Never prevents any screen saver from engaging.
-
Random: If you click the Use random screen saver checkbox in the lower-left area of the pane, Mac OS X will choose one of the installed screen savers at random before each screen saver activation.
-
Hot Corners: When clicking on this push button in the lower-left corner, a dialog box appears. In the dialog, four pull-down menus in the corners surround a small window representing the Desktop. Clicking on any of these menus reveals options that engage when a user moves the mouse to that corner of the screen. The options include Activate Screen Saver, Disable Screen Saver, and any of the three modes of Expos . You can assign each corner one of these commands. Moving the pointer to the specified corner initiates that action. Activate Screen Saver immediately engages the screen saver. Disable Screen Saver prevents the screen saver from engaging at the specified activation time. The Expos features are covered in the Customizing Expos heading later in this Chapter. Figure 4-3 shows the Hot Corners dialog box, as well as the one of the pop-up menu’s options.
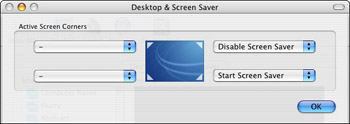
Figure 4-3: The Hot Corners dialog enables instant activation of screen savers, or a quick way to disable all screen savers, simply by moving the pointer to the appropriate corner.
Screen saver options
Each screen saver may have a series of options available to modify its performance. When you select a screen saver on the left side of the Desktop & Screen Saver dialog, click the Options button that sits underneath the preview. If the Options button is dimmed out, there are no available options. (For example, the Computer Name screen saver has no available options.)
Flurry’s options include the following:
-
Color: A pull-down menu with many options. There are six colors to choose from (each of which roots the Flurry’s eruptions in a particular color space), alternately; there are four cycle speeds (each sets the Flurry’s eruptions to cycle through all colors at varying speeds); and lastly, there are three brightness levels to choose from (each keeps the Flurry and its eruptions rooted at a particular degree of brightness). These options are mutually exclusive. The Flurry is set by default to Cycle, an average brightness setting, and cycling through all colors.
-
Streams: A slider ranging from Few to Many, Streams sets how many eruptions of color come from the Flurry. By default, this is set in the middle.
-
Thickness: A slider ranging from Thin to Thick, Thickness sets the width of the emerging streams of color. By default, this is set in the middle.
-
Speed: Another slider, ranging from Slow to Fast, Speed sets the pace at which the Flurry itself moves about the screen. By default, this is set in the middle.
All the slideshow-style screen savers have the same options set, with checkboxes to engage/disengage each option.
-
Cross-Fade between slides: This option enables the selected slides to cross-fade from one to the next; as one image is fading away, another is fading in. When not selected, each image fades to black before another fades in.
-
Zoom Back and Forth: Selecting this option causes the screen saver to zoom in and out on images, as well as to pan left and right.
-
Crop to Fit: This option ensures that your images displayed full screen, as opposed to displaying too small or radically oversized.
-
Centered Onscreen: This option modifies the Zoom Back and Forth option, as the slides will zoom in and out only, and will no longer move left to right. Having Zoom Back and Forth and Centered Onscreen unchecked disables all zooming and panning, and results in a more static (boring) screen saver.
-
Randomize: This option randomly selects the images from the available slides. In the case of large image collections, this option helps to alleviate boredom. (After all, screen savers are supposed to be fun!)
| Tip | Screen savers are also a very convenient way to secure your workstation if you walk away and forget to log out, as you can set the screen saver to lock down your workstation in the Security preference pane. The Security preference pane and this option are discussed in Chapter 13. |
EAN: 2147483647
Pages: 290