Chapter 4: Enhancing Your Workspace
You received an introduction to Mac OS X, the Finder, documents, the Dock, Expos , and the desktop in Chapters 2 and 3. Now you’re going to find out how to customize all the elements of the Mac OS X environment to suit your tastes and to improve your enjoyment and productivity. In this Chapter, you learn how to customize the overall appearance of the environment, and how to change the toolbar in Finder windows. You learn how to set View Options that affect the look of each Finder window and how to change the picture on the desktop. You also learn about screen savers, and how to change their options to suit your needs. You also explore ways to get the most from Expos and the Dock.
In addition, this Chapter describes techniques for working with aliases and labels. These techniques include applying labels and modifying label titles. You learn how to make aliases work for you- how to create them, change them, fix them if they break, and more.
The Desktop
The desktop, as you know, is the large expanse of color that comprises the background of your Mac OS environment. By default, this area has a swirling blue color, ostensibly to soothe your jangled nerves as you slave away at your computer. Of course, blue is a relaxing color, but it can be boring. You may want to change the color to black, red, or your favorite color. Or you may want to place a picture of your cat or your motorcycle as a desktop picture. To do so, you must delve into the System Preferences.
Desktop background customization
You can cover the Desktop with a solid color or a picture by choosing an image file as follows:
-
Click the System Preferences icon in the Dock (or System Preferences menu item in the Apple menu). The System Preferences window appears, showing buttons for different types of settings.
-
In System Preferences, click the Desktop & Screen Saver button or choose View Desktop & Screen Saver. The System Preferences window changes to show one of the two panes in this preference panel. The settings for changing the desktop background are of course under the Desktop pane. Click on the Desktop button if it isn’t already selected (top left) to reveal the Desktop pane. Divided into two distinct frames, the left side contains a list of options, while the right side is populated dynamically according to which list item you select on the left. The Desktop pane is shown in Figure 4-1.
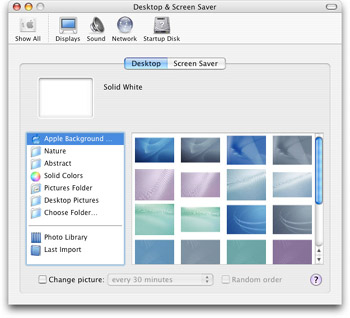
Figure 4-1: Set the Desktop background in the Desktop & Screen Saver pane of System Preferences. -
Select either a color or a picture for your background.
-
Close the window with the red Close button to complete setting the preference. Alternately, you can select Quit System Preferences from the System Preferences menu.
When choosing a background, you have a number of preinstalled options available to pick from. You can set your background as a solid color, or as one of many attractive pictures or patterns.
-
To choose a color: click the Solid Colors list item and then choose one of the preselected colors available in the right-side window pane.
-
To choose a picture, click any of the following list items:
-
Apple Background Images: A collection of swirly patterns. Typically these are attractive patterns, usually comprised of a single color. Click any patterns in the right-side frame to set it as the desktop.
-
Nature: A standardized preselected list of nature-themes pictures. The pictures include Snowy Hills, Water, Faux Fur, Ladybug, and more. Click any picture in the right frame to set it as the desktop.
-
Abstract: Another collection of swirly patterns. These are typically much more colorful, with two, three, or more colors per pattern (i.e., ugly). Click any picture in the right frame to set it as the desktop.
-
Pictures Folder: If your Pictures folder (found in your Home Folder) contains any images, they appear in the right-side pane. Click any picture displayed in the right frame to set it as the desktop.
-
Desktop Pictures: This contains the same images as the Apple Background Images folder.
-
Choose Folder: A dialog appears with this option. This dialog is like a column view of a Finder window. In this dialog, select a folder containing images you want to use, and click the Open button. Images from the selected folder appear in the right-side pane. Click any of the pictures in the right frame to set it as the desktop.
-
Photo Library: A nice tie-in feature to iPhoto. This list item displays all of the available photos from your iPhoto library. (iPhoto is covered in Chapter 20). Please note, if your iPhoto library contains many photos, this option will potentially make your computer slow down while it renders all the pictures. Click any picture in the right frame to set it as the desktop.
-
Last Import: Another nice tie-in to iPhoto, this option displays the last grouping of images imported into iPhoto in the right-side pane. This is a helpful option if your iPhoto library contains numerous images and you desire a recently imported image. Click any picture in the right frame to set it as the desktop.
-
| Tip | If you check the Change Picture checkbox, the operating system will cycle through pictures at the specified rate. To choose the change rate, select from the pull-down menu of time options. At the specified interval, your desktop image will change. The change picture option will use images from the same folder as your initially chosen image. Checking the Random button causes the system to randomly display your choices from the folder instead of displaying them in alphabetical order. The time interval options range from five seconds to every day, with additional options for changing at each login or after waking from sleep. |
EAN: 2147483647
Pages: 290