Automating Windows Desktop Tasks
| [ LiB ] |
Automating Windows Desktop Tasks
Tonight's final chapter will begin by showing you how to create JScripts that can configure Windows programmatically in a number of different ways using shortcuts. Shortcuts provide easy access to Windows resources and help make you more productive by reducing the number of steps required to locate and open a file, folder, application, or other Windows resource. For example, by placing a shortcut on your desktop, you provide quick access to a resource. By placing shortcuts on the Windows Start menu, you reduce desktop clutter. You can also reduce desktop clutter by placing shortcuts on the Windows Quick Launch toolbar. This toolbar provides single-click access to resources represented by shortcuts. When enabled, the Quick Launch toolbar resides on top of the Windows Taskbar.
You may be surprised at the number of resources you can administer using shortcuts. These Windows resources include
-
The Windows desktop
-
The Windows Start menu
-
The Quick Launch toolbar
-
Windows folders
Working with Shortcuts
Shortcuts represent links to other Windows resources. When you open a shortcut, Windows automatically locates and opens the resource associated with it just as if you had opened the actual resource. You work with shortcuts every day. You probably have some on the Windows desktop. The Windows Start menu is made up of them.
You can create shortcuts manually by clicking on an object, dragging the pointer to a new location, and then selecting Create Shortcut Here when prompted by Windows. You also can create new shortcuts using the Windows Create Shortcut Wizard, which you can start by right-clicking on an open area of the Windows desktop and selecting New followed by Shortcut.
Creating a single shortcut manually is relatively easy. Creating a bunch of them takes more time. If you work on a number of different computers (you may have more than one computer at home as well as a computer at work and school that you use), and you like to keep things consistent, creating a shortcut on one computer means re-creating that shortcut over and over again. In addition, if you replace one of your computers, you have to re-create your collection of shortcuts all over again. Alternatively, you could create a JScript that creates all your shortcuts for you. Then all you have to do to configure any computer is to run your script, which you might keep with you on a floppy disk.
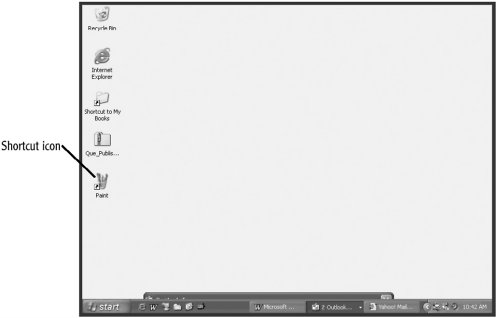
A shortcut is identified by the presence of a small black arrow in the lower left corner of its icon, as shown in Figure 7.1.
Figure 7.1. A desktop shortcut providing a link to the Windows Paint application
You can examine the properties for any Windows shortcut by right-clicking on it and selecting Properties, as demonstrated in Figure 7.2.
Figure 7.2. Examining shortcut properties for the Paint shortcut
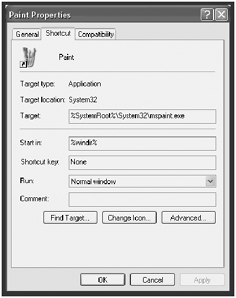
As you can see, this shortcut is to the Windows Paint program. A shortcut contains a lot of information about the Windows resource it represents. Table 7.1 defines each of the pieces of information stored in the shortcut.
Table 7.1. WINDOWS SHORTCUT PROPERTIES
| Property | Description |
|---|---|
| Target | Specifies the path and file name of the Windows resource |
| Start in | Specifies the default working directory |
| Shortcut key | Specifies a keystroke sequence that will open the shortcut |
| Run | Specifies the type of window to be used to open the application (normal window, minimized, or maximized) |
| Comment | An optional description of the shortcut |
Windows uses folders as the primary organizational structure for managing its file system. In addition, folders are used to configure the Windows desktop, Start menu, and Quick Launch toolbar. By adding or removing a shortcut to the appropriate folder, you can configure the appearance and functionality of any of those resources. For example, you can add a shortcut to the Windows desktop for a user by copying it to C:\Documents and Settings\UserName\Desktop .
UserName represents the account name used by the user to log in to the computer. Figure 7.3 shows the folder where all the icons that reside on my desktop are stored.
Figure 7.3. The shortcuts associated with an individual user's desktop
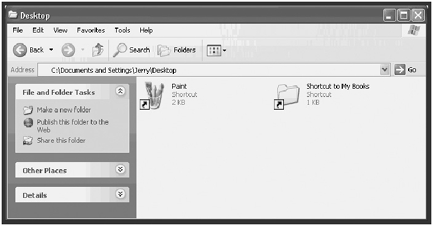
All I have to do is create a new shortcut and move or copy it into C:\Documents and Settings\Jerry\Desktop to make it appear on my Windows desktop.
NOTE
If you share your computer with others and want to share a shortcut with them by placing it on their Windows desktops, you can do so by moving or copying it to C:\Documents and Settings\All Users\Desktop.
Scripting Shortcut Creation
The first step in creating a shortcut is to instantiate the WshShell object, as shown here:
var wshObject = WScript.CreateObject("WScript.Shell"); Next you are going to need someplace to save the shortcut. For example, to save a new shortcut on the Windows desktop, you will need to set up a reference to a special folder called Desktop . To accomplish this, you will need to use the WshShell object's SpecialFolders() property as shown here:
desktopFolder = wshObject.SpecialFolders("Desktop"); Now that you have a place to put the shortcut, it is time to instantiate the WshShortcut object and define the shortcut. This is accomplished using the WScript object's CreateShortCut() method. For example, the following statement demonstrates how to define a shortcut for the Windows WordPad application:
var newShortcut = wshObject.CreateShortcut(desktopFolder + "\WordPad.lnk");
In this statement, the name of the shortcut is concatenated to the special folder where the shortcut is to be stored. Next you must specify the name and path of the Windows resource that the shortcut will represent. This is done using the WshShortcut object's TargetPath property, as shown here:
newShortcut.TargetPath = "c:\Program Files\Windows NT\ Accessories\WordPad.exe";
NOTE
Depending on which version of Windows your computer is running, the WordPad application may have a different path than the one shown in this example.
Finally, it's time to save the shortcut using the WshShortcut object's Save() method, as shown here:
newShortcut.Save();
The following script shows how these statements look when added together as a complete JScript.
//************************************************************ ************* //Script Name: Script 7.1.js //Author: Jerry Ford //Created: 09/12/03 //Description: This JScript creates a desktop shortcut for //the Windows WordPad application //************************************************************ ************* //Initialization Section //Instantiate the WshShell object var wshObject = WScript.CreateObject("WScript.Shell"); //Set up a reference to the Desktop special folder desktopFolder = wshObject.SpecialFolders("Desktop"); //Instantiate the WshShortcut object var newShortcut = wshObject.CreateShortcut(desktopFolder + "\WordPad.lnk"); //Main Processing Section //Call the function that creates the shortcut CreateShortcut() //Terminate script execution WScript.Quit() //Procedure Section //set the location of the WordPad application and save the shortcut function CreateShortcut() { newShortcut.TargetPath = "c:\Program Files\Windows NT\Accessories\WordPad.exe"; newShortcut.Save(); } NOTE
The Desktop special folder is just one of a number of special folders maintained by Windows. Others include these:
-
StartMenu.
Represents the Windows Start menu.
-
Programs.
Represents the All Programs or Programs menu.
In addition to these, there are a number of special folders that are applicable to all uses of a computer. These folders include
-
AllUsersDesktop. Stores content that is displayed on every user's desktop.
-
AllUsersStartMenu. Stores content that is displayed on every user's Start menu.
-
AllUsersPrograms. Stores content that is displayed on every user's All Programs or Programs menu.
Setting up Shortcuts for Windows Folders
Most of the time you will probably find yourself creating shortcuts and saving them in Windows special folders. However, there may be times when you will want to add one or more shortcuts to regular Windows folders. For example, if you find that having too many shortcuts on your Windows desktop makes things look cluttered, you might want to consider creating a folder on your desktop and storing your shortcuts in that folder. That way they are only a couple of clicks away.
When working with regular folders instead of a special folder, you need to instantiate the FileSystemObject and use it to set up a folder reference, as demonstrated here:
var fsoObject = new ActiveXObject("Scripting.FileSystemObject"); var destinationFolder = fsoObject.GetFolder("c:\MyDocs"); var wshObject = WScript.CreateObject("WScript.Shell"); var newShortcut = wshObject.CreateShortcut(destinationFolder + "\Notepad.lnk"); newShortcut.TargetPath = "%windir%\notepad.exe"; newShortcut.Save(); In this example, a shortcut is created for the Windows Notepad application, which is saved in a folder called MyDocs located on the computer's C drive.
NOTE
You may have noticed the use of variable %windir% in the previous example. %windir% is an example of an environment variable created and maintained by Windows. %windir% specifies the location of the folder where the Windows system files are stored.This also is the folder where the Windows Notepad application is installed.You can reference environment variables from within your scripts just as easily as you can define and reference your own variables .
Different versions of windows place the system files in different locations. By referencing %windir% within your scripts, you can find the system files without having to worry about where they actually reside.
Deleting Unused Shortcuts
If you no longer need a shortcut, you can delete it. You can write a script that removes your shortcuts. For example, if you like to stay up to date with the latest technologies, you may find yourself purchasing a new computer every year or two and selling your old computer. Since you'll probably want to clean up your old computer before you sell it, you might want to write a JScript to perform this task, as demonstrated here:
var wshObject = WScript.CreateObject("WScript.Shell"); desktopFolder = wshObject.SpecialFolders("Desktop"); var fsoObject = new ActiveXObject("Scripting.FileSystemObject"); var newShortcut = fsoObject.GetFile(desktopFolder + "\WordPad.lnk"); newShortcut.Delete(); As you can see, this script deletes the WordPad shortcut that was created earlier on the Windows desktop using the WshShortcut object's Delete() method. In similar fashion, you can delete the shortcut that was added to the C:\MyDocs folder, as demonstrated here:
var fsoObject = new ActiveXObject("Scripting.FileSystemObject"); fsoObject.DeleteFile("c:\MyDocs\Notepad.lnk"); This time, instead of the WshShortcut object's Delete() method, the FileSystemObject object's DeleteFile() method is used.
Configuring Shortcut Properties
As you saw earlier in this chapter, shortcuts contain a number of properties which affect their behavior. You can use the WshShortcut object to configure shortcut properties. Table 7.2 provides a list of WshShortcut properties that you can work with.
Table 7.2. PROPERTIES BELONGING TO THE WSHSHORTCUT OBJECT
| Property | Description |
|---|---|
| Arguments | Specifies arguments to be passed at startup to the application |
| Description | Adds a comment to the shortcut |
| Hotkey | Defines a combination of keystrokes that can be used to open the shortcut |
| IconLocation | Identifies the shortcut's icon |
| RelativePath | Sets the relative path for the object represented by the shortcut |
| TargetPath | Specifies the name and path to the object represented by the shortcut |
| WindowStyle | Sets the window style to use when opening the application |
| WorkingDirectory | Sets a default folder to be used by the application when saving files |
NOTE
Of all of the WshShortcut properties, only the TargetPath property must be specified in order to create and save a new shortcut.
As an example of how to work with WshShortcut properties, take a look at the following script:
//************************************************************ ************* //Script Name: Script 7.2.js //Author: Jerry Ford
//Created: 09/12/03 //Description: This JScript creates a desktop shortcut for //the Windows WordPad application //************************************************************ ************* //Initialization Section //Instantiate the WshShell object var wshObject = WScript.CreateObject("WScript.Shell"); //Set up a reference to the Desktop special folder desktopFolder = wshObject.SpecialFolders("Desktop"); //Instantiate the WshShortcut object var newShortcut = wshObject.CreateShortcut(desktopFolder + "\Personal Journal.lnk"); //Main Processing Section //Call the function that creates the shortcut CreateShortcut() //Terminate script execution WScript.Quit() //Procedure Section //set the location of the WordPad application and save the shortcut function CreateShortcut() { newShortcut.TargetPath = "c:\Program Files\Windows NT\ Accessories\WordPad.exe"; newShortcut.Arguments = "c:\MyDocs\Journal.rtf"; newShortcut.Hotkey = "CTRL+Alt+P"; newShortcut.IconLocation = "c:\Program Files\Windows NT\ Accessories\WordPad.exe, 2"; newShortcut.WindowStyle = 1; newShortcut.Description = "Personal diary file"; newShortcut.WorkingDirectory = "C:\Temp"; newShortcut.Save(); } As you can see, what makes this script different from all previous examples is the manipulation of WshShortcut properties other than the TargetPath property. The shortcut created by this script opens the WordPad application and loads a file called C:\Mydocs\Journal.rtf . The WordPad application can be opened by double-clicking on it or by pressing the Ctrl, Alt, and P keys simultaneously . In addition, the script specifies that the second indexed icon associated with the WordPad.exe file should be used to represent the shortcut. WordPad will be opened in normal windows and will use the C:\Temp folder as its working directory.
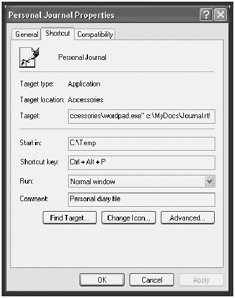
If you right-click on the shortcut and select Properties, as shown in Figure 7.4, you will see how all these properties have been set, including the Description property.
Figure 7.4. The properties configured by the JScript for the WordPad shortcut
NOTE
Specific icons represent many Windows resources. However, some contain a built-in indexed list of optional icons.You can view these icons and determine which ones are which by right-clicking on the application's icon, selecting Properties, and then clicking on the Change Icon button. For example, if you do this for the WordPad application, you will see the list of icons shown in Figure 7.5.
Selecting the icon to be used to represent a shortcut

Using Shortcuts to Configure the Windows Start Menu
At this point you know how to create a shortcut on the Windows desktop and in regular Windows folders. Now let's take a look at how to use shortcuts to configure the Windows Start menu. The Windows Start menu is organized as a collection of special folders. Therefore, all you have to do to create a new menu item is add a shortcut to the appropriate special folder.
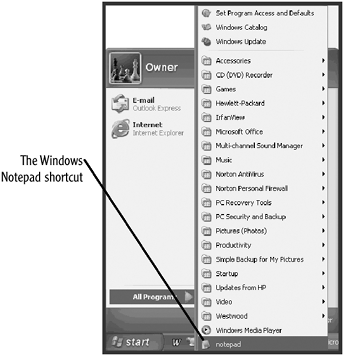
The following JScript statements demonstrate how to add a shortcut to the Notepad application to the All Programs submenu under the Windows Start menu.
var wshObject = WScript.CreateObject("WScript.Shell"); destionationFolder = wshObject.SpecialFolders("Programs"); var newShortcut = wshObject.CreateShortcut(destionationFolder + "\notepad.lnk"); newShortcut.TargetPath = "%windir%\notepad.exe"; newShortcut.Save(); Figure 7.6 shows how the Windows Start menu looks after the previous example has been run.
Figure 7.6. Adding a shortcut to the Windows All Programs menu
Using Shortcuts to Configure the Quick Launch Toolbar
The Windows Quick Launch toolbar resides on the Windows Taskbar, as demonstrated in Figure 7.7. It displays a list of shortcuts and provides single-click access to Windows resources that they represent. By default, the Quick Launch toolbar displays shortcuts for Internet Explorer, Outlook Express, and the Windows desktop.
Figure 7.7. The Quick Launch toolbar provides quick access to Windows resources
![]()
NOTE
The Quick Launch toolbar actually is just one of a collection of optional toolbars that you can tell Windows to display on the Taskbar.If you do not see it,you can enable it by right-clicking on an open area on the Windows Taskbar, clicking on Toolbars , and then selecting Quick Launch.
The special folder associated with the Quick Launch toolbar is called AppData . To reference it you must set up a reference to it as well as specify its location within the AppData special folder, as demonstrated in the following example:
var wshObject = WScript.CreateObject("WScript.Shell"); quickLaunchToolbar = wshObject.SpecialFolders("AppData"); destinationFolder = quickLaunchToolbar + "\Microsoft\Internet Explorer\Quick Launch"; var newShortcut = wshObject.CreateShortcut(destinationFolder + "\notepad.lnk"); newShortcut.TargetPath = "%windir%\notepad.exe "; newShortcut.Save(); | [ LiB ] |
EAN: 2147483647
Pages: 84