Simply having these development environments does not automatically facilitate best practice deployment strategy. The workflow of source code is important, too.
You may find the diagram shown in Figure 24-1 useful in illustrating the source code flow, from deployment to live.
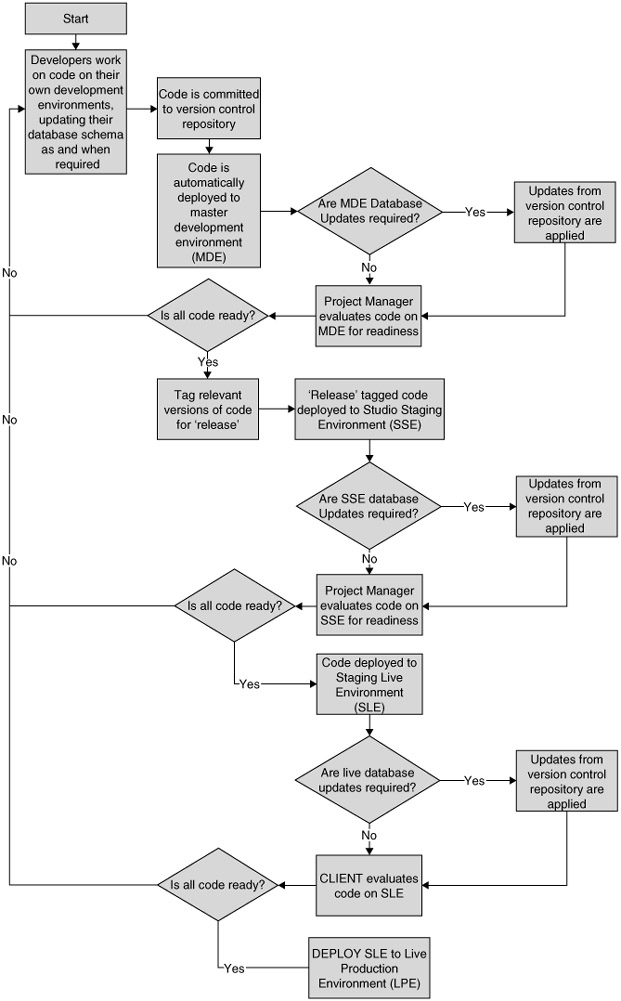
Figure 24-1
The crux of the process is that:
Individual developers develop against their own development environment, localized to their own database.
This code is deployed to a master development environment. This may happen automatically or be initiated by the project manager on a semi-regular basis. Any changes that need to be made to the master environment's database schema are also made at this time.
This code on the master development environment is tested, inspected, and approved by the project manager or, preferably, the project's lead architect. Certain files may be tagged as ready for the studio staging environment and, hence, release.
This code then makes its way either in full or in part to the studio staging environment, where it undergoes a final review before submission to the client. The studio staging environment database is also amended if required.
This code is then deployed to the live staging environment and the live database amended to support any schema changes. This is where the client approves or rejects the changes you have made.
Finally, the code makes its way from the live staging environment to the live production environment. There is no need to change the database at this transition, because the same "live'' database is used both for the live staging environment and the live production environment.
Let's now look at the technology behind these transitions.
Automated Version Control Repository Extraction
Many larger projects use a technique called version control, which is a technique for ensuring that the work done by different developers on a project does not conflict at any stage. It also keeps track of changes made to code as and when they are made, in case something goes wrong during the development process. More information on version control can be found in Appendix A.
When employing version control on a project, you may find it necessary from time to time to automate the retrieval of the latest versions from the repository. In the previous process, this is required for collating the efforts of your development team to assemble the snapshot master development environment.
Using CVS
Using CVS, this can be accomplished using syntax similar to the following. The following syntax is for UNIX implementations of CVS; using the Windows CVS client the process becomes a simple point and click.
cvs -d :pserver:username@cvsserver:/path checkout -r tag module
Here, module is the project name, username is a cvs username with access to that project, and cvsserver is the CVS server's hostname. Optionally, you can specify a tag This may be useful if you want to extract to your studio staging environment.
The tag can be used by the project manager or lead architect to designate different versions of each file on the project as part of a distinct release. For example, a latest stable release of your application might consist of version 1.3 of one file, 1.5 of another, 1.4 of a third, and so on. By tagging each relevant version with a tag such as lateststable, those wishing to retrieve a particular release of your application can do so easily.
Such a command may well be committed to your server's crontab so that it runs on a scheduled basis. For example, you may have two entries as follows:
Every day at 12 midnight, the contents of the repository, regardless of tag, are extracted to form the master development environment.
Every day at 3 a.m., the contents of the repository tagged release are extracted to form the studio staging environment.
Using Visual SourceSafe
In Appendix A, we champion Visual SourceSafe as a somewhat more usable and practical (albeit commercial) alternative to CVS. Unfortunately, the kind of automated release extraction described previously is one area in which it falls somewhat short.
Although a command-line version of VSS does exist, it is a Win32 binary. Accordingly, to automate checkouts to your various environments, a Win32 machine is required even if your environments are UNIX based.
Using Samba, you can expose the source code directories of your environments as network drives. This Win32 machine can then execute a scheduled command, much as with CVS, to do a "get latest versions'' straight to those network drives.
The command-line syntax for VSS is a complex topic, but the syntax you are likely to require most often is as follows:
SET SSDIR=\\sourcesafeserver\sourcesafeSET SSUSER=edss Workfold /$Widgets z:\public_html\livess Get /$Widgets -R
In the previous example, we set the working folder for the project Widgets to be z:\public_html\live , which we assume to be an exposed network drive from your UNIX development server. We also use environment variables to tell VSS where to find the repository, and what username to use to log in.
We then issue the Get command, which is effectively equivalent to Get Latest Versions in the SourceSafe Windows application. Using the -R directive, we tell SourceSafe to give us the contents of the repository in a recursive fashion.
Further information on the command-line syntax of SourceSafe can be found at:
It is not difficult to see that the most common deployment requirement is to upload the contents of folder A on server B, onto folder C on server D.
This is a simple operation in itself, but when the size of the source base of modern projects is taken into account, the task of shifting hundreds of megabytes across the Internet just to deploy a small change can rightly seem inefficient.
This is where rsync comes in. The rsync utility is a UNIX-only utility, although recently a number of authors have attempted to produce Windows ports. It provides a means to copy the contents of a given folder on a local server to another given folder on a remote server, while copying only the files that have changed. In other words, it synchronizes the two folders.
However, this is a synchronization in only one direction; from A to B. Files that have changed on A since the last deployment to B are copied, but anything that has changed on B in the meantime is not be copied back to A. This is not a problem, however, if the pattern of deployment discussed in this chapter is followed.
The most likely two occasions on for you to use rsync are as follows:
For the deployment of the contents of the studio staging environment to the live staging environment
For the deployment of the contents of the live staging environment, after being approved, to the live production environment
rsync even works across two folders on the same server; accordingly, even if your live production environment is the same physical server as your live staging environment, you can still use it to make your deployment. When copying from server to server, rsync makes use of the SSH (or, in a pinch, RSH) protocol. Hence, the only firewall rule required to allow the copy to take place is port 22 to be opened for TCP traffic. There is an rsync-specific protocol, too, but unless for some reason you cannot use SSH, you will not need to use it.
Basic rsync Usage
You will normally use rsync as part of a shell script; for example, you might create a script called deploy-studio-staging-to-live-staging and another called deploy-live-staging-to-live-production. They all work in much the same way, however, and call rsync using syntax as follows:
The -a flag causes directory permissions and symbolic links to be left intact when the transfer is initiated.
The -v flag causes verbose output; you will see a detailed list of which files are in fact being chosen to be copied.
The -r flag causes the copy to take place recursively.
The -z flag causes data being transferred to be compressed before transfer; on a same-server copy, this should be omitted.
The -e ssh directive tells rsync to use SSH to transfer files, rather than RSH.
The source directory is specified as /local/directory/* (the * simply meaning that all files within that directory should be copied).
The remote directory is specified as username@remotehost:/remote/directory, but if you're copying to another folder on the same server, the username@remotehost directive should be omitted.
Upon executing an rsync command, you may be prompted for a password. This is the login password associated with the username on the remote server specified, as if you were ssh'ing into that server in the normal fashion.
Let's look at some examples of this syntax at work.
rsync Syntax Examples
Let's first see how we might deploy the contents of our studio staging environment to our live staging environment at our client's data center. We would use the following syntax:
If the client then approves the changes on the staging server, we can put them live. In this example, say that we put live simply to another folder on the same server. We would use the following syntax:
Note now we omit the protocol directive because this is a local-only synchronization; also, we do not enable compression because we assume that the speed increase will be minimal.
If our client's live production server were a physically different server, we might use the following syntax:
Alternatively, if our client used load balancing across three servers, we would have to execute the deployment three times, once for each target server:
If your live production environment does involve multiple Web servers, there's another phenomenally useful role for rsync, too.
Many sites involve the use of server-writable data folders. These are containers for large binary files and other data that is not appropriate for a database such as PostgreSQL or MySQL. Often included are user-uploaded documents. For example, a user may have uploaded a photograph for a "my profile'' page.
In setups with multiple live Web servers, a dilemma arises: How does one make newly uploaded data accessible to all the Web servers in the cluster?
One way is to use a centralized file server, much as a centralized database server is used, perhaps exporting its contents via NFS. This can be very slow, however, and is an additional overhead that must be considered.
The alternative is to use rsync between the servers in the cluster on a very frequently scheduled basis, so that when a new binary is uploaded, it is leaked into the other servers in the cluster within just a few minutes.
This approach can be accomplished quite effectively using rsync, but the password prompt discussed previously could prove to be a barrier if we try to schedule any such commands; after all, crontab can't type passwords for us.
There is a workaround, mercifully; it is the use of what is known as passwordless SSH and involves the placement of a key file on both client and server prior to connection. Because rsync depends on SSH in an environment with passwordless SSH setup, rsync is also passwordless, hence the scheduling or such tasks is made much easier.
Setting up key-driven SSH is slightly challenging and outside the scope of this chapter, but further information can be found on the Web; check out the following excellent "How To'' document for all the configuration details you'll need:
One word of warning: If you do adopt this approach, make sure that your PHP is aware of the fact that binary data may not necessarily be available in the minutes immediately following an upload. For example, if you know that your cron job is set to run every five minutes, you should suppress the display of any user profile photograph until five minutes after the upload has completed in favor of displaying a "photo coming soon'' message. After the five minutes have elapsed, you can be sure that the photo exists on all Web servers in the cluster, and you can safely attempt to display the photo normally. Accomplish this by simply adding a time_photo_uploaded property to the user's database record and measuring the time elapsed since.
If for some reason you simply must allow instant access to such uploaded photographs, you can consider implementing a system whereby the first time that photograph is requested on a Web server that does not have that photograph (for example, web01), that Web server immediately initiates an rsync for that file in isolation with other Web servers until it finds one that does (for example, web04) and then displays the newly copied photograph to the user. This may sound long winded, but in practice the user will experience a very short delay while the file is copied; subsequent visitors requesting that photograph from that Web server will be served it in the normal way.
If you do adopt this approach, consider ensuring the uniqueness of filenames of uploaded data so that if they are replaced with a new version, you won't have some servers serving the old version and others serving the new. For example, if your user profile photographs are named using the user's ID from the database table user, for example, /data/userpics/193913.JPG, consider using a serial number suffix, so that the filename becomes 193913_1.JPG, and the next version 193913_2.JPG, and so forth. You would store which serial number was current against the user's record in the database, and hence display only the most recent version.