Chapter 2: Putting the Pieces in Place: Installing Reporting Services
Before you can begin to enjoy all the benefits of Reporting Services discussed in Chapter 1, you, of course, have to install the Reporting Services software. This chapter will guide you through that process so that you can quickly move on to creating and managing reports.
In this chapter, we will look at the various types of Reporting Services installations and how to plan for each installation type. As part of that planning, we will note the software that must be in place prior to installing Reporting Services. After considering these preliminaries, we will walk through the installation process. Finally, we will look at some of the problems you may encounter during installation and some of their common remedies.
Preparing for the Installation
The most important part of the Reporting Services installation is not what you do as you run the setup program, but what you do before you begin. In this section, we will look at the knowledge you need and the steps you need to take to prepare for installation. With the proper plan in place, your Reporting Services installation will go smoothly and you will be creating reports in no time.
The Parts of the Whole
Reporting Services is not a single program that runs on a computer to produce reports. Instead, it is a series of services, web applications, and databases that work together to create a report development environment. As you plan your Reporting Services installation, it is important that you understand a little bit about each piece of the puzzle and how they all work together to create a complete system.
Figure 2-1 shows all the parts that make up a complete Reporting Services installation. Each part has a specific role to play in the development, management, and delivery of reports or in the management of the Reporting Services environment itself. Not all these items are installed with Reporting Services. Some are prerequisites and must be installed before you can begin the Reporting Services installation process.
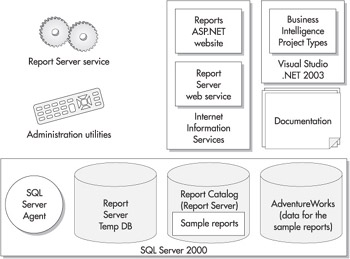
Figure 2-1: Reporting Services component parts
Let’s take a look at each part and see how it fits into the whole.
| Note | Not all Reporting Services installations include all the items shown in Figure 2-1. The following sections of this chapter will discuss the various types of installations and which components they include. |
The Report Server Service
The Report Server service is the heart of Reporting Services and is, of course, installed as part of the Reporting Services installation. As you saw in Figure 1-4 of Chapter 1, the Report Server is responsible for processing any report requests. This includes fetching the report definition, retrieving the data used in the report, and rendering the report in the desired format.
The Report Server is a Windows service, and it makes its functionality available as web services. This means that it does not directly interact with the user. Instead, the Report Server Windows service runs in the background and handles requests made by other programs through the web services. Like other Windows services, such as SQL Server and Internet Information Services (IIS), the Report Server begins running when the computer starts up and continues running until the computer shuts down.
Because the Report Server service starts up on its own, it needs to have a valid username and password that it can use to log on to the server when it starts up. This login information, along with other information that determines how the Report Server will operate, is stored in the RSReportServer.config file. The content of this configuration file is determined by the choices you make during the setup process. We will talk more about this and other configuration files later in this chapter.
| Note | Most of the information in the RSReportServer.config file is stored as plain text and can be modified using Notepad or a similar text editor. The login information, however, is encrypted when it is stored in this file. It cannot be changed except through one of the Administration Utility programs. |
The Administration Utilities
The administration utilities are tools for managing the Report Server service and for making changes to its configuration. These utilities take care of tasks such as manually starting the Report Server service if it fails to start up automatically. The utilities can also be used to change the login information used by the service when it starts up.
These utility programs are run in a command window. There isn’t a user interface with menus, buttons, and text boxes. Instead, the utilities use parameters specified as part of the command line that launches the program. These parameters determine what changes the utility program will make in the Reporting Services configuration.
The administration utilities can be run on the computer that is hosting the Report Server service to manage the configuration on that computer. Most of the administrative utilities can also be used to manage a Report Server service that is running on another computer. This is called remote administration.
The administration utilities are installed as part of the Reporting Services installation.
SQL Server 2000
SQL Server 2000 holds the database where Reporting Services stores its Report Catalog database. Reporting Services also uses the SQL Server Agent, which we will discuss shortly. In addition, databases in SQL Server 2000 can be used as data sources for Reporting Services reports.
The Reporting Services installation process creates several databases. For this reason, SQL Server 2000 must be installed before you begin the Reporting Services installation.
SQL Server Agent
SQL Server Agent is part of SQL Server 2000 and is created as part of the SQL Server 2000 installation process. It is used by SQL Server to execute jobs that are scheduled to run at a certain time. These jobs might back up a database or transfer information from one database to another. Jobs may be scheduled to run once or they may run on a regular basis, such as once a day or once a week.
Reporting Services also uses the SQL Server Agent to execute scheduled jobs. These jobs are used to run reports and distribute the results. In Chapter 1, we talked about users who subscribe to a report. When users subscribe to a report, they ask for it to be run and delivered to them on a regular basis. When a user creates a subscription, Reporting Services creates a SQL Server Agent job to handle that subscription.
For example, our Production Manager in Chapter 1 wanted an inventory report to be printed every four hours during the workday. He subscribes to the inventory report and creates a delivery schedule of 8:15 A.M., 12:15 P.M., and 4:15 P.M. When this subscription is created, Reporting Services creates a SQL Server Agent job scheduled to run at 8:15 A.M., 12:15 P.M., and 4:15 P.M. each day. The job takes care of running the report and e-mailing it to the Production Manager.
The Report Server and Report Server Temp DB Databases
During the Reporting Services installation process, two databases are created within SQL Server 2000: the Report Server and Report Server Temp DB databases. The Report Server database is used to store the Report Catalog. (Recall from Chapter 1 that the Report Catalog holds the information about all the reports that have been deployed to a Report Server.) The Report Server database also holds information about the Report Manager website. This includes such things as the folder structure of the website and the security settings for each folder and report.
As the name implies, the Report Server Temp DB database is used as temporary storage for Reporting Services operations. Information can be stored here to track the current users on the Report Manager website. Short-term copies of some of the most recently executed reports are also stored here in what is known as the execution cache.
Sample Reports and the AdventureWorks Database
As part of the Reporting Services installation process, you can choose to install several sample Reporting Services reports. These reports end up in the Report Catalog within the Report Server database. If you choose to install the sample reports, another database, called AdventureWorks 2000, is installed in SQL Server 2000. The AdventureWorks 2000 database serves as the data source for the sample reports.
Internet Information Services
Internet Information Services (IIS) is used to host Internet and intranet websites. It also serves as the host for web services. A website, of course, is used by a person to request information from a computer over the Internet or some other network. A web service is used by a computer to request information from another computer over the Internet or some other network.
When Reporting Services is installed, it creates a website and a web service hosted by IIS. Therefore, IIS must be installed before you begin the Reporting Services installation.
The Reports Website
The Reporting Services installation creates a website called Reports. The Reports website is what provides the Report Manager interface for Reporting Services. If Reporting Services is installed on a server named www.MyRSServer.com, then when you surf to www.MyRSServer.com/Reports, you will see the Report Manager home page.
The Reports website is built using ASP.NET. This means that ASP.NET support has to be enabled on IIS in order for the website to function. We will discuss how to do this in the “Installation Requirements” section of this chapter.
Report Server Web Service
A web service called Report Server is also created by the Reporting Services installation. The Report Server web service allows other programs to interact with and even administer Reporting Services. In addition, it allows other programs to request reports without having to go through the Report Manager interface. In short, the Report Server web service allows Reporting Services to be tightly integrated into other applications. Because web services work across an intranet or across the Internet, the web service interface allows Reporting Services to be integrated with applications running in the next room or in the next country.
The Report Server web service is also built using ASP.NET, so once again, ASP.NET support must be enabled on IIS in order for this feature to function.
Visual Studio .NET 2003
As discussed in Chapter 1, Reporting Services reports are created using Visual Studio .NET 2003. When Reporting Services is installed, it creates the Business Intelligence Project Types in Visual Studio. For this reason, if you are going to be creating reports on a particular computer, Visual Studio .NET 2003 needs to be installed on that computer before installing Reporting Services.
Business Intelligence Project Types
Reporting Services reports can only be created in Visual Studio projects that are initiated with one of the Business Intelligence Project Types. These project types are only created within Visual Studio if Visual Studio is found on the computer during installation.
Documentation
The final piece of Reporting Services is the documentation. The bulk of this documentation is Reporting Services Books Online. After Reporting Services is installed, you can view the Reporting Services Books Online through your Start menu. You’ll find it under Programs | Microsoft SQL Server | Reporting Services | Reporting Services Books Online. In addition to this is a set of help screens for the Report Manager interface that can be accessed through the Reports website.
Editions of Reporting Services
Reporting Services is available in three editions: Standard Edition, Enterprise Edition, and Developer Edition. Reporting Services is licensed as part of your SQL Server 2000 license. Therefore, in a production environment, the Reporting Services edition you are licensed to use is the same as the SQL Server 2000 edition you are licensed to use. For example, if you have a Standard Edition of SQL Server 2000, you are only licensed for the Standard Edition of Reporting Services.
The Standard Edition
All editions of Reporting Services provide a rich environment for report authoring, report management, and report delivery. There are just a few of the more advanced features of Reporting Services that are not included in the Standard Edition. These advanced features are listed in “The Enterprise Edition” section that follows.
The Enterprise Edition
The following features require the Enterprise Edition of Reporting Services:
-
Security Extension API Create your own custom security structure rather than requiring Windows Integrated security for the Report Manager web application and the web service. The Security Extension API is discussed in Chapter 12.
-
Data-Driven Subscriptions Send a report to a number of users from a predefined mailing list. Data-driven subscriptions are discussed in Chapter 11.
-
Web Farm Configuration Configure several IIS servers running the Report Manager web application and the web service to point to a single SQL Server 2000 server hosting the report catalog. The web farm configuration is discussed in the “Types of Reporting Services Installations” section of this chapter.
-
Advanced Server Support Multiple symmetric multiprocessing to support more than four processors and additional memory support to handle more than 2GB of RAM.
The Developer Edition
The Developer Edition provides support for all the features of the Enterprise Edition. The Developer Edition does not, however, require that you have an Enterprise Edition license of SQL Server 2000. Of course, the Developer Edition is only for development and testing. It cannot be used in a production environment.
Types of Reporting Services Installations
The first decision you need to make when installing Reporting Services is which of the items mentioned in the previous section you want to include. Although you can choose to include or exclude items in any combination you like, in the end there are really just three combinations that make sense: the full installation, the server installation, and the report designer installation.
In addition to these are a couple specialized installation types. These are the distributed installation and the web farm installation. These installations are for high-end, high-volume Reporting Services sites. We will discuss these configurations briefly so you are familiar with the variety of ways that Reporting Services can be configured.
The Full Installation
The full installation, as the name implies, is the “everything including the kitchen sink” installation. All the items shown in Figure 2-1 and discussed in the previous section are included in this installation. Nothing is left out.
The full installation is most likely to be used in a development environment. This might be on a server that is used by a group of developers or on a power workstation used by a single developer. In either case, we want to have all the bells and whistles available to us as we figure out how to best use Reporting Services to suit our business needs.
The Server Installation
The server installation is most likely to be used when we’re setting up Reporting Services on a production server. On a production server, we only want those items that are going to be used to deliver reports or help us manage Reporting Services. We don’t want to include anything that will take up space unnecessarily. Figure 2-2 shows the items included in the server install.
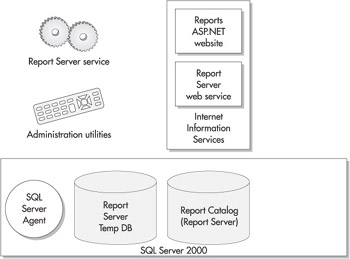
Figure 2-2: The server installation
The server installation includes the Report Server service and the administration utilities used to manage it. This type of installation also includes the Reports website and the Report Server web service for managing and delivering reports. In addition, Reporting Services will need the SQL Server Agent and the Report Server and Report Server Temp DB databases for its operations.
We won’t be doing any development work on the production server, so we will not need Visual Studio or the Business Intelligence Project Types. It is possible that you would want the documentation on the production server for questions on managing Reporting Services. It is probably a better idea, however, to have the documentation handy on a development computer and keep the production installation as uncluttered as possible. The same can be said for the sample reports and the AdventureWorks database. You may want these on your production server for demonstration purposes, but again, it is probably better to do this on a different computer and reserve your production server for reports and data required by your users.
The Report Designer Installation
The report designer installation is for individuals who are creating Reporting Services reports but not doing heavy-duty development. These report designers may even be creating ad hoc reports in order to find the answers to business questions as they arise. Report designers will not be creating full-blown applications that incorporate Reporting Services as part of a larger business system. The items included in the report designer installation are shown here.

Report designers need the capability to create and preview reports. This capability is found within Visual Studio and the Business Intelligence Project Types. Report designers may also want access to the Reporting Services Books Online to look up information as they create reports. (Although, in my humble opinion, this book would serve as a better resource.) When report designers have completed their reports and are ready to have others use them, they will deploy the reports to a production Reporting Services server.
The Distributed Installation
In a distributed installation, the Reporting Services items we have discussed are not installed on a single computer. Instead, they are split between two computers that work together to create a complete Reporting Services system. One computer runs SQL Server 2000 and hosts the Report Server database. This is the database server. The other computer runs the Report Server service and IIS. This is the Report Server.
Figure 2-3 shows a distributed installation. Note that Figure 2-3 shows the servers and the report designer workstations. It does not show computers used for viewing reports.
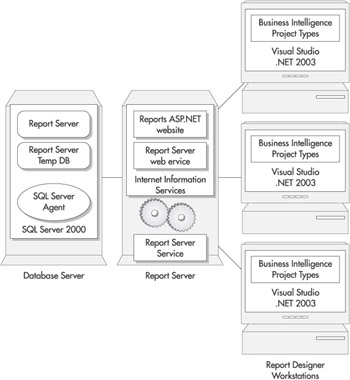
Figure 2-3: A distributed installation of Reporting Services
The distributed installation has advantages when it comes to scalability. Because the workload of the three server applications—IIS, SQL Server, and the Report Server—is divided between two servers, it can serve reports to a larger number of simultaneous users. The disadvantage of this type of installation is that it is more complex to install and administer. However, if you need a high-volume solution, it is certainly worth the effort to obtain a solution that will provide satisfactory response times under a heavy workload.
The Web Farm Installation
The web farm installation is a specialized form of the distributed installation, as shown in Figure 2-4. In a web farm, a single database server interacts with several Report Servers. Each of the Report Servers uses the same Report Server database for its information. By using additional Report Servers, we can handle even more simultaneous users with the web farm installation than we could with the distributed installation.
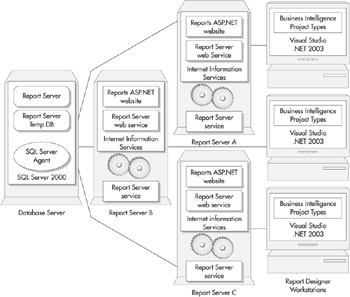
Figure 2-4: A web farm installation of Reporting Services
Again, note that Figure 2-4 shows only the servers and the report designer workstations. It does not show computers used for viewing reports.
When report designers create reports, they can deploy them to any of the Report Servers. No matter which server is used, the reports will end up in the single Report Server database. Once the reports are in the Report Server database, they can be delivered by any of the Report Servers. In addition, because all the information about the Report Manager is stored in the Report Server database, any changes to the Report Manager configuration made on one server will take effect on all the servers.
For example, suppose an administrator uses the Reports website to access the Report Manager through Report Server A. The administrator creates a new folder in Report Manager called “Sales Forecasts 2004,” sets the security so the sales staff can access this folder, and places the Sales Forecast report in the folder. Immediately after the administrator is finished, a sales person brings up Report Manager through Report Server C. The sales person can browse the contents of the Sales Forecasts 2004 folder and will be able to run the Sales Forecast report.
As with the distributed installation, the web farm installation provides a way to handle a large number of simultaneous requests for reports. Even though the web farm uses a number of servers to deliver reports, it allows the Report Manager interface to be administered without duplication of effort. The web farm installation may take additional effort to get up and running, but once it is ready to go, it provides a very efficient means of serving a large number of users.
Installation Requirements
We have briefly touched on some of the required software for many of the Reporting Services items. In this section, we will itemize these requirements with respect to each of the three installation types. Before we get to that, however, let’s take a look at the hardware requirements for Reporting Services.
Hardware Requirements
The first thing to keep in mind when considering what computer hardware to use for Reporting Services is “bigger and faster is better.” With Reporting Services, we are dealing with a server application that will be handling requests from a number of users at the same time. In most installations, the Report Server service will be sharing processor time and computer memory with IIS and SQL Server 2000. We need to have enough server power so that all three of these systems can happily coexist.
Processor Microsoft’s stated minimum processor is a 500 MHz Pentium II. You should install Reporting Services on this type of computer only if you are a very patient person. A more realistic low end is probably a Pentium III at or near 1 GHz. This is true even for the report designer installation. Visual Studio .NET 2003 demands a fair amount of horsepower to keep it from being sluggish.
Computer Memory Microsoft’s minimum requirement for computer memory is 256MB with a recommendation of 512MB or more. In this case, you should treat the recommended amount as your minimum. If you are running Reporting Services on the same server with IIS and SQL Server, that minimum should probably go up to 1GB.
Disk Space A server installation of Reporting Services requires a minimum of 50MB of disk space. This does not include the space required for SQL Server 2000 or IIS. Consult the Microsoft website for information on the disk space requirements for these items.
A report designer installation requires a minimum of 30MB of disk space. Plan on using an additional 145MB if you are installing the sample reports. Taken all together, you are going to need a minimum of 225MB of disk space for a full installation of Reporting Services.
Remember that these requirements are minimums. Also, keep in mind that they do not include the space required for reports to be deployed to the server or project files created by Visual Studio. A Reporting Services installation is not very useful if there is no room for reports.
Software Requirements
As we consider the software requirements, we will first look at the requirements for a server installation and then the requirements for the report designer installation. From these, you can determine the requirements for the other installation types.
Server Installation The following software must be installed and running properly on your computer before you can complete a server installation:
-
The latest service pack for your Windows version. (For Windows 2000, this is SP4. For Windows XP, this is SP1a.)
-
SQL Server 2000 with Service Pack 3a.
-
Internet Information Services (IIS) 5.0 or higher.
-
The .NET Framework version 1.1. (This is installed as part of Windows 2003 or Windows XP. It must be installed separately on Windows 2000.)
-
ASP.NET support must be enabled in IIS. (See the “Other Installation Considerations” section for more on this.)
-
Microsoft Data Access Components (MDAC) 2.6 or higher.
Report Designer Installation The following software must be installed and running properly on your computer before you can complete a report designer installation:
-
Visual Studio .NET 2003.
-
.NET Framework version 1.1. (If it is not already available on your computer, this is installed as part of the Windows Component Update that is done as the first step in installing Visual Studio .NET 2003.)
Other Installation Considerations
You need to keep several other tidbits of information in mind as you are planning your Reporting Services installation. Many of these items are listed here.
General Server Considerations
The following are some of the things to keep in mind as you are planning which server or servers to use for your installation:
-
You cannot install more than one copy of the Report Server service on a single computer.
-
Reporting Services cannot be installed on a Windows 2003 computer configured as a primary domain controller (PDC).
-
If you create a distributed installation, the Reporting Services server, the IIS server, and the database server must all be in the same domain or in domains that have a trust relationship. If you create a web farm installation, all the report servers and the database server must be in the same domain or in domains that have a trust relationship.
Database Server Considerations
The following are some of the things to keep in mind as you are determining which server will host the Reporting Services databases:
-
The Report Server and Report Server Temp DB databases must be hosted by SQL Server 2000. They cannot be hosted by an earlier version of SQL Server, SQL Server Personal Edition, or the Microsoft Data Engine (MSDE).
-
If you do not wish to use the default name for the Reporting Services database (ReportServer), you can specify a different name. The database name you specify must be 117 characters or fewer.
IIS Server Considerations
The following are some of the things to keep in mind as you are determining which server will host the Reporting Services website and web service:
-
You must be able to use http://<servername> to access the default website on the IIS server. For example, if the server is named MyRSServer, the default website on this server must have a URL of http://MyRSServer.
-
The Reporting Services installation creates two virtual directories under the default website. The Reports virtual directory hosts the website that provides the Report Manager interface. The ReportServer virtual directory hosts the Report Server web service.
-
If you do not wish to use the default names for these virtual directories (Reports and ReportServer), you may specify different names. The virtual directory names that you specify must be 50 characters or fewer.
E-Mail (SMTP) Server
If you are going to allow users to subscribe to reports and have them e-mailed, you will need to specify the address of an SMTP server during the Reporting Services installation. SMTP stands for Simple Mail Transfer Protocol. It is the standard for exchanging e-mail across the Internet. You need to specify the address of an e-mail server that will accept e-mail messages from the Report Server service and send them to the appropriate recipients.
In many cases, the address of your e-mail server is the same as the portion of your e-mail address that comes after the “@” sign, prefaced by “www.”. For example, if your e-mail address is MyEmail@Galactic.com, your e-mail server’s address is probably either www.Galactic.com or smtp.Galactic.com. Be sure to verify the address of your e-mail server with your e-mail administrator. Also, make sure that this e-mail server supports the SMTP protocol and that it will accept and forward mail originating from other servers on your network.
Enabling ASP.NET
Support for ASP.NET must be enabled in IIS before the Report Manager interface will work properly. You can check if ASP.NET support is enabled by doing the following:
-
Start the Internet Information Services Management Console from the Control Panel. (You may need to switch to Administrative Tools when in the Control Panel.)
-
Expand the Local Computer node.
-
Expand the Web Sites node.
-
Right-click the Default Web Site node and select Properties from the context menu.
-
Select the Home Directory tab of the Default Web Site Properties dialog box.
-
Click Configuration.
-
On the Mappings tab of the Application Configuration dialog box, you should see an entry for “.aspx” as shown in Figure 2-5. If this entry exists, ASP.NET is enabled in IIS.
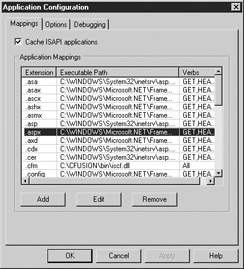
Figure 2-5: Checking for ASP.NET support -
Click and drag the line between the Executable Path and Verbs headings to widen the Executable Path column. You’ll see a folder in this path that includes the version number of the .NET Framework. For example, the path may be
C:\WINDOWS\Microsoft.NET\Framework\v1.1.4322
where v1.1.4322 is the version of the .NET Framework.
Note If you are using a version of the .NET Framework prior to v1.1.4322, you will have to upgrade to the current version of the .NET Framework. This can be downloaded from Microsoft at no charge.
-
Click Cancel to exit all dialog boxes; then exit the Internet Information Services Management Console.
If there is not an entry for .aspx, use the following procedure to enable ASP.NET support:
-
Open a command window. (One way to open a command window is to select Start | Programs | Accessories | Command Prompt.)
-
Change to the C: drive if you are not already there.
-
If you are using Windows XP or Windows 2003, type
cd \windows\microsoft.net\framework
and press ENTER.
If you are using Windows 2000, type
cd \WINNT\microsoft.net\framework
and press ENTER.
-
Type the following and then press ENTER:
dir v*
-
Look at the directories that were returned by the dir command. One or more of these directories will have a “v” followed by a version number. For example, you may see a directory with the name v1.1.4322. These directories represent the versions of the .NET Framework installed on this computer. Determine which directory has the latest version of the .NET Framework (the directory with the biggest number after the “v”).
-
Change to the directory with the latest version of the .NET Framework by typing a command similar to
cd v1.1.4322
and pressing ENTER.
-
Type the following and press ENTER:
aspiis_regiis –i
This program will enable ASP.NET support.
-
Type exit and press ENTER.
Encrypting Reporting Services Information
One of the options you may select during the Reporting Services installation process is to require the use of a Secure Sockets Layer (SSL) connection when accessing the Reports website and the Report Server web service. When an SSL connection is used, all the data transmitted across the network is encrypted so that it cannot be intercepted and read by anyone else. This is very important if your reports contain sensitive personal or financial information.
To use SSL on a server, the server must have a server certificate. Server certificates are purchased from a certificate authority and installed on your server. You can find information on certificate authorities on the Internet.
Each server certificate is associated with a specific URL. To use SSL with the Reports website and Report Server web service, your server certificate must be associated with the URL that corresponds to the default website on the server. If www.MyRSServer.com takes you to the default website on your server, then the server certificate must be associated with www.MyRSServer.com. If you are planning on requiring an SSL connection, you should obtain and install the appropriate server certificate prior to installing Reporting Services.
When you require the use of an SSL connection to access the Reports website and the Report Server web service, your users must specify a slightly different URL to access these locations. For instance, if the users would normally use http://www.MyRSServer.com/Reports to get to the Reports website, they will now have to use https://www.MyRSServer.com/Reports. The “https” in place of the “http” creates the SSL connection.
Microsoft Distributed Transaction Coordinator
The Reporting Services setup program uses the Microsoft Distributed Transaction Coordinator (MS DTC) to help control the setup process. You need to make sure that the MS DTC will be available to the setup program. To do this, go to the Control Panel and select Administrative Tools and then double-click Services. In the list of services, find the entry for Distributed Transaction Coordinator. The entry in the Startup Type column should be Manual or Automatic, as shown in Figure 2-6.

Figure 2-6: The services entry for the Distributed Transaction Coordinator
If the Startup Type is Disabled, use the following procedure:
-
Double-click the entry for Distributed Transaction Coordinator in the
-
Services window.
-
Select Manual from the Startup Type drop-down box in the Distributed Transaction Coordinator Properties (Local Computer) dialog box (see Figure 2-7).
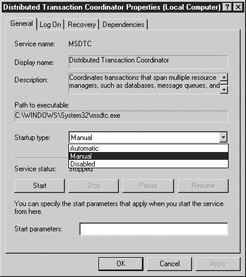
Figure 2-7: The Distributed Transaction Coordinator Properties (Local Computer) dialog box -
Click OK.
-
Close the Services window.
Login Accounts
The login account you are logged in as when you run the setup program must have administrative rights on the computer where the installation is being done. If you are doing a distributed or web farm installation, the login account must have administrative rights on both the computer that will be the Report Server and the computer that will be the database server.
The login account you are logged in as must also have system administration rights in the SQL Server 2000 installation that will contain the Report Catalog. The setup program uses this login to access SQL Server and create the items necessary for the Report Catalog. You may specify a different login, either a SQL login or a Windows login for the Report Server to use when accessing the Report Catalog after the installation is complete.
You will be asked to specify several login accounts during the Reporting Services installation. Make your choices ahead of time and track down any passwords you may need before you begin the installation process.
The Report Server Service Login Account for Windows First of all, you will be asked to specify the login account used by the Report Server service. You can choose from the following types of accounts:
-
The built-in account NT AUTHORITY\SYSTEM (also called the local system account) The local system account has access to almost all resources on the local computer and may or may not have access to resources on other computers in the network.
-
The built-in local service account This account exists on Windows 2003 servers for running services. This account cannot access other servers on the network. This choice will only be available if you are installing Reporting Services on Windows 2003.
-
The built-in network service account This account exists on Windows 2003 servers for running services. This account can access other servers on the network. This choice will only be available if you are installing Reporting Services on Windows 2003.
-
A domain user account This is a regular user account that exists in the domain in which this server resides.
Microsoft recommends that the local system account be used as the login for the Report Server service. Using the local system account ensures that the Report Server service has all the rights it needs on the local server.
The Report Server Web Service Login Account for Windows The second login account required by the Reporting Services installation is used by the Report Server web service. If you are installing on any Windows platform other than Windows 2003, you do not have a choice here. The Report Server web service will be required to use the login account configured for ASP.NET on this computer.
If you are installing Reporting Services on Windows 2003, you will be able to choose between the network service account and the local system account for this login. The network service account is used by services to log on to the local machine. It has the added advantage of being able to log on to other computers in the network. When you’re installing on Windows 2003, the network service account is the default for the Report Server web service login.
The Report Server Service Login Account for the Database Server The third login account required by the Reporting Services installation is used by the Report Server service to log in to SQL Server and access the Report Server and Report Server Temp DB databases. As noted earlier, this login account is used after the installation is complete. It is not used to access SQL Server during the installation process.
You have four options:
-
The login account used by the Report Server service to log in to Windows
-
The built-in local system account
-
A domain user account
-
A SQL Server login
You will need to work with the database administrator of your SQL Server to determine which of these options to use.
| Note | If a SQL Server login other than sa is used, the SQL Server login must be added to the RSExecRole role in the ReportServer, ReportServerTempDB, master and msdb databases. |
Running the Reporting Services Setup Program
When you run the Reporting Services setup program, you need to run it under a login that is a member of the local system administrators group. In addition, your login will need to have administrator permissions in SQL Server so you can perform the following tasks:
-
Create SQL logins
-
Create SQL roles
-
Create databases
-
Assign roles to logins
EAN: 2147483647
Pages: 109