The Installation Process
Now that you have worked through all the preparation, it is finally time to install Reporting Services. We will walk through the steps necessary to perform each type of Reporting Services installation.
The Full Installation and the Server Installation
The steps for performing a full installation are very similar to the steps for performing a server installation. This section covers both of these installations and points out the few differences as they occur in the procedure.
Begin the installation by inserting the Reporting Services installation CD into your CD or DVD drive. In most cases, the autorun process should start the setup program. If this does not happen automatically, navigate to the setup.exe program on the installation CD and execute it.
Preliminaries
The setup process begins by taking care of some housekeeping and checking to make sure all the prerequisite software is installed and properly configured.
The End User License Agreement Screen The first step of the Setup Wizard is the End User License Agreement screen. Review the license agreement as needed. When you are comfortable with the terms of the license agreement, check the check box to accept the terms and click Next to continue.
The Component Update Screen The next step is the Component Update screen. Here, the wizard will check your system to make sure it has all the components needed to run the setup itself. It is making sure that you have the following:
-
Windows Installer 2.0
-
Microsoft .NET Framework version 1.1
-
Setup support files (any compressed files on the installation CD that need to be expanded before they can be used)
You may have to wait a moment or two while the Component Update screen checks to make sure these items are installed. If it discovers one or more of these components are not available, the Install button will appear on the screen. Click Install to install the missing components. You will need to wait again for the install to complete.
When the install is complete, or if all the components were found, the Next button will appear on the screen, as shown in Figure 2-8. Click Next to continue.
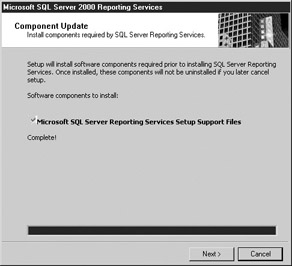
Figure 2-8: The Component Update screen
The System Prerequisites Check Screen After the Component Update screen, you will see the System Prerequisites Check screen. Here, the wizard will check for the following:
-
Internet Information Services is installed and running.
-
The default website is enabled.
-
ASP.NET support is enabled in IIS.
-
Visual Studio .NET 2003 is installed.
Any of these not found by the System Prerequisites Check screen will be marked with a red X, as shown in Figure 2-9.
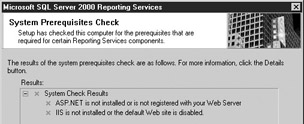
Figure 2-9: The System Prerequisites Check screen with required software missing
If you are doing a full installation, all the required items should be found, as shown in Figure 2-10. If any of these items are not found, you need to cancel the setup, remedy the problem, and start the installation again. See the previous sections of this chapter if you need more information on these prerequisites.
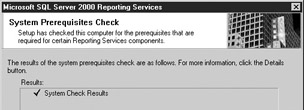
Figure 2-10: The System Prerequisites Check screen with all required software detected
If you are doing a server installation, Visual Studio .NET 2003 is not needed. If Visual Studio .NET 2003 is marked with a red X, you may ignore it. If any of the other items are not found, you need to cancel the setup, remedy the problem, and start the installation again. Again, see the previous sections of this chapter if you need more information on these prerequisites.
When all the required items for your type of installation have been found, click Next to continue.
Now that the preliminaries are completed, the setup program collects the configuration information and completes the actual software installation.
The Welcome to Microsoft SQL Server 2000 Reporting Services Setup Screen After you click Next on the System Prerequisites Check screen, the Preparing to Install… dialog box will appear briefly. This will be replaced by the Welcome to Microsoft SQL Server 2000 Reporting Services Setup screen. It may take a few moments for the Next button to appear on this screen as the setup finishes loading. When the Next button does appear, click it to continue.
The Registration Information Screen The Welcome screen is followed by the Registration Information screen. Fill in the Name and Company items, if they are blank. Click Next to continue.
The Feature Selection Screen for the Full Installation
| Note | If you are doing a full installation, follow the instructions in this section. If you are doing a server installation, follow the instructions in the section “The Feature Selection Screen for the Server Installation.” |
The Feature Selection screen will appear next. By default, the Feature Selection screen will appear as shown in Figure 2-11. All the features that make up Reporting Services are marked for install except for Reporting Services Sample Reports and AdventureWorks database.
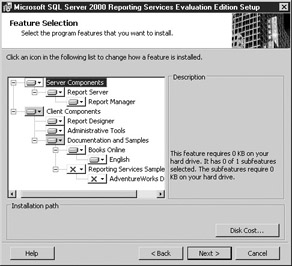
Figure 2-11: The Feature Selection screen with the default configuration
To perform a full installation of Reporting Services, click on each red X and select Will Be Installed on Local Hard Drive from the context menu. This is shown here.

When you have everything selected for a full installation, the screen will appear as shown in Figure 2-12. When you have all the features selected, click Next. Skip over the next section and continue with the section “The Service Account Screen.”

Figure 2-12: The Feature Selection screen for a full installation
The Feature Selection Screen for the Server Installation The Feature Selection screen will appear next. By default, the Feature Selection screen will appear as shown in Figure 2-11. All the features that make up Reporting Services are marked for install except for Reporting Services Sample Reports and AdventureWorks database.
To perform a server installation of Reporting Services, click the computer icon next to Client Components and select Entire Feature Will Be Unavailable from the context menu. This is shown here.

Next, click the X next to the Administrative Tools and select Will Be Installed on Local Hard Drive from the context menu. Your screen should now appear as shown in Figure 2-13. Click Next.
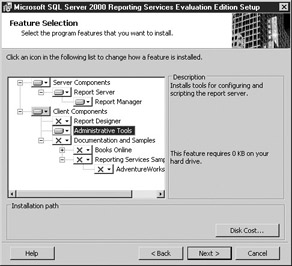
Figure 2-13: The Feature Selection screen for a server installation
The Service Account Screen Next you will see the Service Account screen, as shown in Figure 2-14. On this screen you will select the login account used by the Report Server service. If you are installing on Windows 2003, you will also be able to select the login account used by the Report Server web service. If you are installing on any other version of Windows, the Report Server web service login account will be displayed in the lower part of the screen, as shown in Figure 2-14, and no selection will be necessary. If you have any questions on specifying either of the login accounts required on this screen, refer back to the “Login Accounts” section in this chapter.
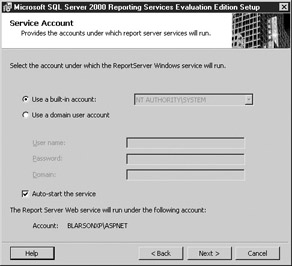
Figure 2-14: The Service Account screen
The other option that must be specified on this screen is whether the Report Server service should start automatically each time the computer starts up. This is known as auto-starting the service. This option should be checked in almost all cases.
If you are doing a full installation of Reporting Services on a development computer where Reporting Services development will be done only occasionally, you may not want to have the Report Server service running all the time. In this case, the option should be unchecked. If the Auto-start the Service check box is unchecked, you will have to manually start the Report Server service any time you want to make use of it.
If you are doing a server installation, the Auto-start the Service check box should be checked. On a server machine, we want the Report Server service to run all the time so it is available to deliver reports.
Once you have made your selections on the Service Account screen, click Next.
The Reporting Services Virtual Directories Screen The Reporting Services Virtual Directories screen will appear next. This screen is shown in Figure 2-15. On this screen you specify the names that will be assigned to the web service and the website used by Reporting Services. As we have discussed, the default name for the web service is ReportServer, and the default name for the website is Reports. These names should not be changed unless they conflict with websites or web services already in use on this computer.
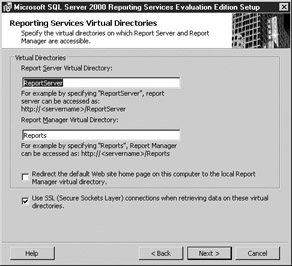
Figure 2-15: The Reporting Services Virtual Directories screen
Two other options must be specified on this page. First of all, you can make the Reporting Services website the default website on this server. For example, if you do so and the server is called MyRSServer, when you enter http://MyRSServer in your browser, you will be taken to the Reporting Services website. You should make the Reporting Services website the default website only if it is the main website hosted by this server.
The final option on this screen is to use Secure Sockets Layer (SSL) when retrieving data from the Reporting Services website and web service. If you have any questions on this option, refer back to the “Encrypting Reporting Services Information” section in this chapter.
The Use SSL (Secure Sockets Layer) Connections When Retrieving Data on These Virtual Directories check box is checked by default. If you wish to require an SSL connection and you have the appropriate server certificate installed on your server, you may leave this item checked. If, however, you do not have a server certificate installed, you must uncheck this item.
Once you have made your selections on the Reporting Services Virtual Directories screen, click Next. If you left the Use SSL… check box checked and you do not have the appropriate server certificate installed, you will see a warning dialog box when you click Next. If this occurs, click OK in the dialog box, uncheck the Use SSL… check box, and click Next again.
The Report Server Database Screen Next you will see the Report Server Database screen. This screen is shown in Figure 2-16. It allows you to specify where the SQL Server databases used by Reporting Services will be created, what they will be called, and how they will be accessed.
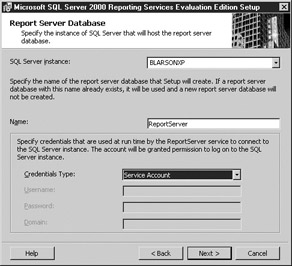
Figure 2-16: The Report Server Delivery Settings screen
For a full installation or a server installation, the SQL Server databases used by Reporting Services will reside on the computer on which you are running the setup. The name of this computer will be the default value for the SQL Server instance. We will discuss distributed and web farm installations later in this chapter.
Next, you will need to specify the name of the database. The default value is ReportServer. You should leave the default value unless this name conflicts with another database already installed on this computer.
Finally, you will need to specify the login account used to access this database. If you have any questions on specifying the login account required on this screen, refer back to the “Login Accounts” section in this chapter.
Once you have made your selections on the Report Server Database screen, click Next.
The Report Server Delivery Settings Screen The Report Server Delivery Settings screen will be displayed next, as shown in Figure 2-17. If you plan on allowing users to have report subscriptions e-mailed to them, enter the address of the SMTP server that should be used by Reporting Services to deliver these e-mails. If you have any questions on specifying an SMTP server address, refer back to the “E-Mail (SMTP) Server” section in this chapter.
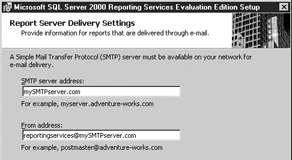
Figure 2-17: The Report Server Delivery Settings screen
You can also specify the e-mail address that will be placed in the from field of any e-mails sent by Reporting Services. This does not need to be a valid e-mail address. However, in many cases, it is a good idea to use an address that is monitored by the person responsible for administering Reporting Services. That way, if a user has a problem with a subscription report and sends a reply e-mail to the subscription, they will actually contact someone who can help them out.
If you do not want to enable e-mail subscriptions, you may leave all the items on this screen blank. Once you have made your selections on the Report Server Delivery Settings screen, click Next.
The Report Server Samples Setup Screen If you are doing a full installation, you will see the Report Server Samples Setup screen. This is shown in Figure 2-18. If you are doing a server installation, skip to the section “The License Mode Screen.”
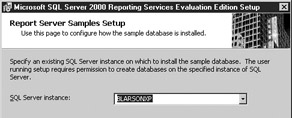
Figure 2-18: The Report Server Samples Setup screen
Here, you can specify the SQL Server that will contain the AdventureWorks database used by the sample reports. For a full installation, the AdventureWorks database will reside on the computer on which you are running the setup. The name of this computer will be the default value for the SQL Server instance.
Once you have made your selection on the Report Server Samples Setup screen, click Next.
The Licensing Mode Screen You will now see the Licensing Mode screen, as shown in Figure 2-19. The information you enter here should match the licensing you have for the SQL Server that is hosting the Reporting Services databases. For example, if the computer you are using for this full installation of Reporting Services has a per-processor license of SQL Server and has two processors, you should select the Per Processor License radio button and enter 2 in the Processors text box.
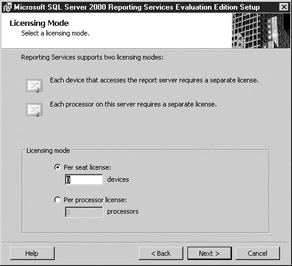
Figure 2-19: The Licensing Mode screen
Once you have entered your licensing information, click Next.
Completing the Installation
The next screen is the Ready to Install screen. You have supplied all the necessary information for the setup program to complete the installation. Click Install.
The Installing Reporting Services screen appears. This screen shows you the progress of the installation process. This may take a few minutes. Once the installation process completes, the Completing the Microsoft SQL Server 2000 Reporting Services Setup screen appears. Click Finish.
Congratulations, you have successfully completed a Reporting Services installation. If you encountered problems during the installation process, refer to the “Common Installation Issues” section later in this chapter.
The Report Designer Installation
The report designer installation includes fewer steps than the full or server installations. Because we are not installing any databases, websites, or services, fewer configuration choices are required.
Begin the report designer installation by inserting the Reporting Services installation CD into your CD or DVD drive. In most cases, the autorun process should start the setup program. If this does not happen automatically, navigate to the setup.exe program on the installation CD and execute it.
Preliminaries
The setup process begins by taking care of some housekeeping and checking to make sure all the prerequisite software is installed and properly configured.
The End User License Agreement Screen The first step of the Setup Wizard is the End User License Agreement screen. Review the license agreement as needed. When you are comfortable with the terms of the license agreement, check the check box to accept the terms and click Next to continue.
The Component Update Screen
The next step is the Component Update screen. Here, the wizard will check your system to make sure it has all the components needed to run the setup itself. It is making sure that you have the following:
-
Windows Installer 2.0
-
Microsoft .NET Framework version 1.1
-
Setup support files (any compressed files on the installation CD that need to be expanded before they can be used)
You may have to wait a moment or two while the component update is being done. When the update is complete, as shown in Figure 2-20, click Next to continue.

Figure 2-20: The Component Update screen
The System Prerequisites Check Screen After the Component Update screen, you will see the System Prerequisites Check screen, as shown in Figure 2-21. Here, the wizard will check for the following:

Figure 2-21: The System Prerequisites Check screen for a report designer installation
-
Internet Information Server is installed and running.
-
The default website is enabled.
-
ASP.NET support is enabled in IIS.
-
Visual Studio .NET 2003 is installed.
Since we are doing a report designer installation, some or possibly all of these items may not be found. The first three prerequisite items are not required for a report designer installation, so you may ignore those red X’s and click Next to continue. However, if Visual Studio is not found, you will need to cancel the installation and install Visual Studio .NET 2003 before continuing.
Now that the preliminaries are completed, the setup program collects the configuration information and completes the actual software installation.
The Welcome to Microsoft SQL Server 2000 Reporting Services Setup Screen After you click Next on the System Prerequisites Check screen, the Preparing to Install… dialog box will appear briefly. This will be replaced by the Welcome to Microsoft SQL Server 2000 Reporting Services Setup screen. It may take a few moments for the Next button to appear on this screen as the setup finishes loading. When the Next button does appear, click it to continue.
The Registration Information Screen
The Welcome screen is followed by the Registration Information screen. Fill in the Name and Company items, if they are blank. Click Next to continue.
The Feature Selection Screen
The Feature Selection screen will appear next. By default, the Feature Selection screen will appear as shown in Figure 2-22. All the features that make up Reporting Services are marked for install except for Reporting Services Sample Reports and AdventureWorks database.
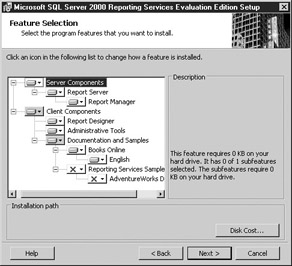
Figure 2-22: The Feature Selection screen with the default configuration
To perform a report designer installation of Reporting Services, click the computer icon next to Server Components and select Entire Feature Will Be Unavailable from the context menu. This is shown here.

When your screen appears as shown in Figure 2-23, click Next.
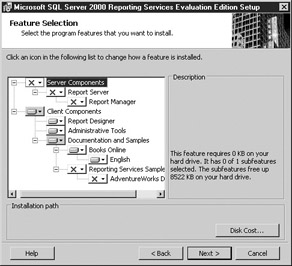
Figure 2-23: The Feature Selection screen for a report designer installation
Completing the Installation
The next screen is the Ready to Install screen. You have supplied all the necessary information for the setup program to complete the installation. Click Install.
The Installing Reporting Services screen appears. This screen shows you the progress of the installation process. Once the installation process completes, the Completing the Microsoft SQL Server 2000 Reporting Services Setup screen appears. Click Finish.
Congratulations, you have successfully completed a report designer installation. The Business Intelligence project types are now available in Visual Studio and the Reporting Services Books Online can be viewed on this computer. If you encountered problems during the installation process, refer to the “Common Installation Issues” section later in this chapter.
The Distributed Installation
The distributed installation is similar to the server installation. To create a distributed installation, run the setup program on the computer you will be using as a report server. Follow the procedures for a server installation except as specified in the following section.
The Report Server Database Screen for a Distributed Installation
When you reach the Report Server Database screen, you will not be using the default value for the SQL Server instance. Instead, enter or select the name of the server that you will be using for the database server. The database server should, of course, already have SQL Server 2000 installed and running on it.
Next, you will need to specify the name of the database. The default value is ReportServer. You should leave the default value unless this name conflicts with another database already installed on the database server.
Finally, you will need to specify the login account used to access this database. You will need to either use a SQL Server login or use a domain login that has rights on the report server and the database server.
Once you have made your selections on the Report Server Database screen, click Next.
The Web Farm Installation
The web farm installation is similar to the distributed installation. In fact, the way to create a web farm installation is to run the distributed installation on several computers that will be Report Servers. The key to creating a web farm is the selections you make each time you reach the Report Server Database screen.
The Report Server Database Screen for a Web Farm Installation
When you reach the Report Server Database screen, you will not be using the default value for the SQL Server instance. Instead, enter or select the name of the server that you will be using for the database server. The database server should, of course, already have SQL Server 2000 installed and running on it.
In order to create a web farm, you must specify the same server name each time you reach the Report Server Database screen. This will cause all your Report Servers to connect to the same database server to access the Report Server database.
Next, you will need to specify the name of the database. The default value is ReportServer. You should leave the default value unless this name conflicts with another database already installed on the database server.
Again, in order to create a web farm, you need to specify exactly the same name for the database each time. This will cause all your Report Servers to connect to the same Report Server database. When you install the first Report Server, the setup program will create the Report Server database on the database server. Each subsequent time you install a Report Server, the setup program will not create a new database but instead will configure Reporting Services to use the database that already exists.
Finally, you will need to specify the login account used to access this database. You will need to either use a SQL Server login or use a domain login that has rights on the Report Server and the database server.
Once you have made your selections on the Report Server Database screen, click Next.
The Report Server Web Farm Setup Screen
When doing a web farm installation, you will see a new screen after the Report Server Database screen. This is the Report Server Web Farm Setup screen, shown in Figure 2-24. In the Report Server text box, type the name of the Reporting Services server that originally created the Report Server database that this computer will be using. For example, if ReportServerA is the first server you installed in the web farm, this installation will create the database on the database server. When you do subsequent installations on computers that are joining the web farm, you will enter ReportServerA in the Report Server text box on the Report Server Web Farm Setup screen.
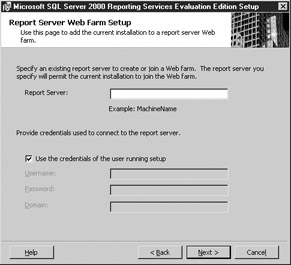
Figure 2-24: The Report Server Web Farm Setup screen
In the lower portion of the screen, enter a login account that has administrative rights on the computer whose name you entered at the top of the screen. For example, if you entered ReportServerA in the Report Server text box, you need to specify a login account that has administrative rights on ReportServerA.
Once the Report Server Web Farm Setup screen is complete, click Next. The setup will continue with the Report Server Delivery Settings screen.
EAN: 2147483647
Pages: 109
- The Second Wave ERP Market: An Australian Viewpoint
- Context Management of ERP Processes in Virtual Communities
- Intrinsic and Contextual Data Quality: The Effect of Media and Personal Involvement
- Healthcare Information: From Administrative to Practice Databases
- A Hybrid Clustering Technique to Improve Patient Data Quality