Working with Tools of Mass Distortion
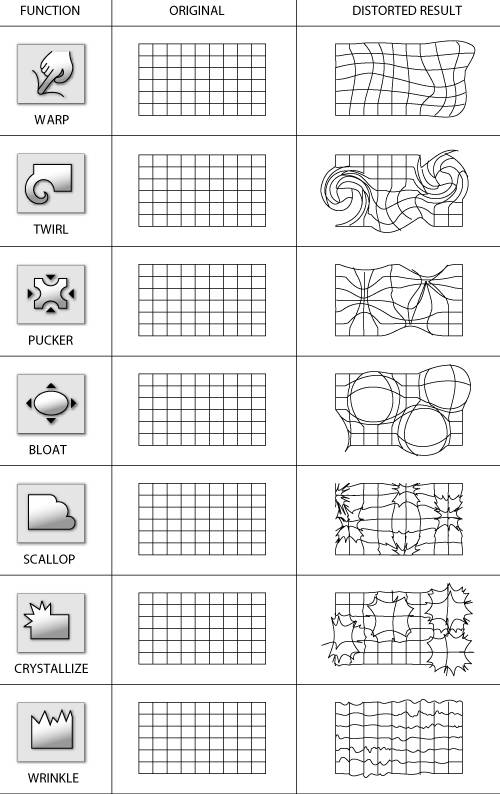
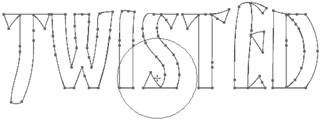
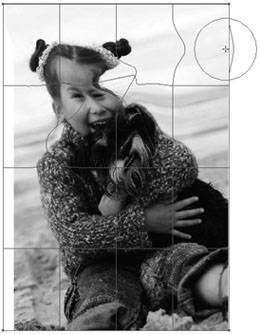
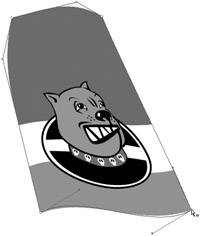
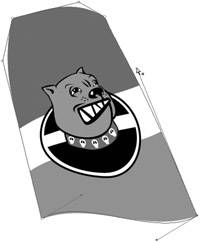
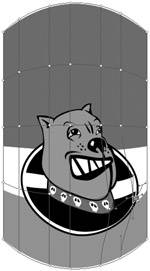
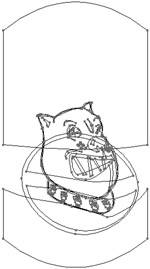
| Illustrator has a plethora of tools that can help you create crisp, clean paths with extreme precision. But there are times when a design calls for something less perfect, and when it is also appropriate to bend or stretch artwork to achieve a distorted effect. That's where the distortion tools come into play. You have already caught a glimpse of Illustrator's Warp effect, which was discussed in Chapter 7, 3D and Other Live Effects. In addition, Illustrator contains a suite of distortion tools, dubbed the Liquify tools, and a feature called Enveloping, which allows you to squeeze artwork into a customized shape. Let's take a closer look at these two additional distortion techniques. Painting with Distortion: The Liquify ToolsIn your average box of classic toys, you'd surely find an Etch A Sketch, a Slinky, a collection of Tinkertoy parts, and undoubtedly, a plastic egg filled with Silly Putty. For those not familiar with the popular toy, Silly Putty is this gooey plastic substance that looks much like a wad of chewing gum. Once you've flattened the plastic out, you can press it firmly on newsprint (we always used the comics section) to transfer the images or text to the plastic surface. Then the fun begins; you can pull and twist and stretch the plastic to distort the pictures or comics. If you've missed out on all of the fun over the years, fear not, you can perform the same distortion to your artwork using Illustrator's suite of Liquify distortion tools (although your hands won't smell of Silly Putty afterward). The Liquify toolset includes the Warp, Twirl, Pucker, Bloat, Scallop, Crystallize, and Wrinkle tools (Figure 9.19, next page). Each of these tools allows you to "paint" with distortion effects by simply clicking and dragging over vector art. The tools feature a brush size, which helps determine how large of an area is distorted (Figure 9.20). You can change the brush size for any of the Liquify tools interactively by holding the Option (Alt) key while dragging with the tool. Adding the Shift key while dragging constrains the brush size to a perfect circle. Figure 9.19. The Liquify tools appear grouped together in the Toolbox and offer a wide range of distortion effects. Figure 9.20. Changing the size of a Liquify brush allows you to control how much a selection becomes distorted with each drag of the mouse. You'll have to be careful when using the Liquify tools, because they exhibit different behavior based on your selection. If you have artwork selected before you start dragging with a Liquify tool, only the selected art becomes distorted. However, if you have not made a selection, clicking and dragging with a Liquify tool distorts any path that you touch. The Liquify tools don't work on live text (you'll need to convert text to outlines first), but the tools do work on embedded images. As you drag a Liquify tool over an embedded image, Illustrator creates a mesh that is used to distort the image beneath it (Figure 9.21). In fact, if you've created a gradient mesh object, using the Liquify tools on the mesh object produces interesting effects as well. Figure 9.21. Although you can't change actual pixels in Illustrator, you can apply Liquify distortions to embedded images. Controlling the Behavior of the Liquify ToolsDouble-clicking any of the Liquify tools in the Toolbox brings up a dialog offering a variety of settings. The top half of the dialog features Global Brush Dimensions settings, which control the size (width and height), angle, and intensity of the tools. In addition, if you are using a pressure-sensitive tablet, you can choose to control the intensity with pen pressure by checking the Use Pressure Pen check box. Any changes you make to the Global Brush Dimensions settings are applied to all of the Liquify tools (Figure 9.22). Figure 9.22. If you have a pressure-sensitive tablet, you can achieve greater control over the Liquify tools.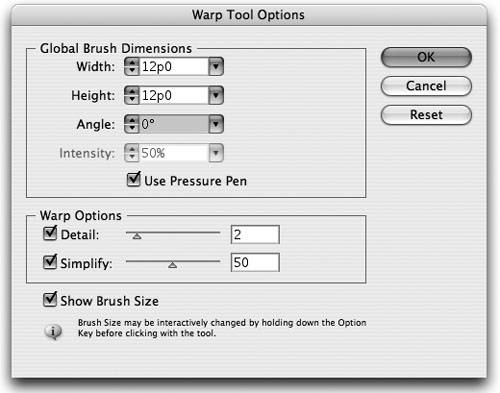 The bottom half of the dialog offers options for the specific tool that you double-clicked. Most tools offer Detail and Simplify settings, although the Wrinkle tool offers many additional options as well. The changes you make to each of these tool-specific settings only affect the tool you double-clicked. Getting into Shape: Envelope DistortionEver see those cartoons where one of the characters gets his head stuck in a glass jar? And when he pulls his head out of the jar, his head is in the shape of the jar? Wouldn't it be cool if you could do the same thing with your artwork? Well, you can, using Illustrator's enveloping features. An envelope is a regular vector shape that can contain other artwork. And any artwork that is contained inside the envelope becomes distorted to take on the shape of the envelope itself. As you will soon learn, envelopes use Illustrator's mesh technology to distort artwork. In fact, these envelope meshes, as they are called, are identical to the gradient meshes you created back in Chapter 5, Brushes, Symbols, and Masks. There are actually three different ways to create an envelope distortion in Illustrator, and naturally, each offers a slightly different approach and warrants its own benefits. As you learn about these three different types of envelopes, you will understand when it's best to use them for a specific project or desired result. These three methods are found in the Object > Envelope Distort submenu and are named Make with Top Object, Make with Mesh, and Make with Warp. Method One: Make with Top ObjectA commonly used Envelope distortion technique in Illustrator is the Make with Top Object method. Creating an Envelope distortion using the Make with Top Object method is similar to creating a mask. A regular vector shape at the top of the stacking order acts as the envelope, and all selected artwork that appears beneath the envelope becomes distorted to fit within the envelope shape. Here are the steps you'll need to follow to perform this technique:
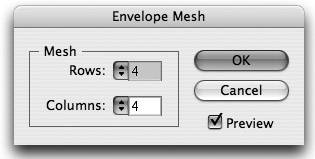
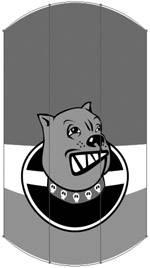
Once you've created an Envelope distortion, you can edit the envelope shape using your direct selection tooljust as you'd do with any other vector shape. As you adjust the shape of the envelope, the distorted artwork updates to match the edited shape (Figure 9.24). Pay close attention to the position of the control handles that appear on the anchor points of your envelope path, because they also have an effect on how art within the envelope shape is distorted (Figure 9.25). Figure 9.24. Changing the shape of the envelope after you've applied the distortion makes it easy to tweak your distortion to perfection. Figure 9.25. When you drag one of the control handles higher on the shape, you can see that the Envelope distortion also pulls the artwork up higher near that point. Using a distinct custom shape as a distortion envelope is useful for times when you need artwork to fit within the confines of a specific shape. However, you'll notice that although you can easily adjust the outside path to change the overall shape of the distortion, you have little control over how the artwork inside the envelope is distorted. To control distortion across the entire object, not just the edges, you need to employ one of the next two methods: Make with Mesh, or Make with Warp. Method Two: Make with MeshWhen using the Make with Mesh method, Illustrator creates the envelope shape for you, so you don't need to create a shape first. The shape that Illustrator creates is a rectangle, so no immediate distortion is visible when you apply this kind of envelope. Once the envelope is created, you can edit the mesh points to control how the distortion affects the artwork. Editing an envelope mesh is identical to editing a gradient mesh. To create an Envelope distortion using the Make with Mesh method, perform the following steps:
If you want to add mesh points to your envelope, select the Mesh tool and click anywhere within the selected envelope. Hold down the Option (Alt) key while clicking with the Mesh tool to remove mesh points. Although you start out with a rectangle mesh shape, moving the individual mesh points on the envelope gives you control over not just the outer edge of the distortion, but also any points within the envelope shape. However, this method is harder to use only because you aren't starting with a distorted shape, just a grid of mesh points.
Method Three: Make with WarpThe Make with Warp method of applying envelope distortion is nearly identical to the Make with Mesh methodonly with a twist (sorry, couldn't resist). Instead of starting with a rectangular shaped mesh, Illustrator gives you the option of choosing from several different preset shapes. Actually, they are the same presets as those found in the Warp effect. Follow these steps to apply an Envelope distortion using the Make with Warp method:
Overall, this third method of creating an envelope mesh is a combination of the first two. You start with an initial distortion using a warp, then you complete the distortion by editing the envelope as a mesh object. This method is useful for times when you want to use a warp shape but need the ability to tweak the distortion a bitsomething that isn't possible with the Warp effect. Refer to "Featured Match-Up: Envelopes vs. the Warp Effect" for an in-depth comparison of the Envelope and Warp effect distortion features.
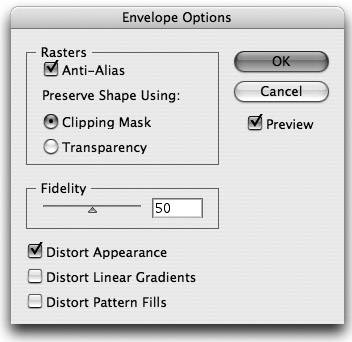
Adjusting Envelope Distortion SettingsBy default, Illustrator tries to create Envelope distortions as quickly as possible. Artwork that takes longer to distort, like Live Effects, gradients, or patterns, are not distorted at all, and images or other complex artwork may not fit perfectly within the envelope shape. Don't assume that Illustrator's Envelope distortion is below par; rather, select your envelope and choose Object > Envelope Distort > Envelope Options. This opens the Envelope Options dialog where you can adjust the settings that Illustrator uses to create Envelope distortions (Figure 9.30). Figure 9.30. The Envelope Options dialog gives you greater control over how Illustrator distorts artwork within envelopes.
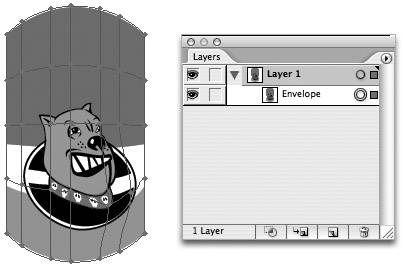
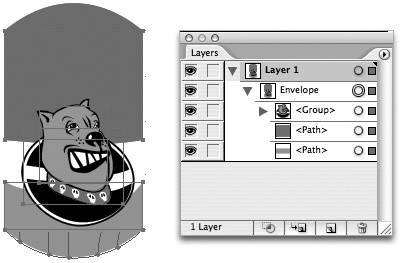
Editing Envelopes and Their ContentsIt is certainly no coincidence that many of Illustrator's features exhibit live functionality, thus allowing you to perform edits without having to re-create art. Live Effects, symbols, Live Trace, Live Paint, and Compound Shape modes are all examples of effects that are live and can be edited at any stage of the workflow. Envelope distortion is no exception. Once you apply an Envelope distortion using any of the three methods described earlier, you can continue to make adjustments to either the envelope itself, or to the artwork that it contains. Illustrator manages the process of editing envelopes and their contents by giving you two distinct modes in which to work. At any one time, you can either work with the envelope shape itself, or you can change modes and edit the contents of the envelope. Unfortunately, Illustrator doesn't clearly identify the difference between these two modes so we'll take a closer look at how you can edit Envelope distortions and the artwork within them. When you first create a new Envelope distortion, Illustrator is in the Edit Envelope mode. In this mode, you can select and edit the shape of the envelope, but you have no way to access the art that is distorted within the envelope. If you look at the Layers palette, you'll notice an object named Envelope, but you won't find the distorted artwork listed anywhere (Figure 9.31). Figure 9.31. The Layers palette lists only one object on Layer 1the envelope. The artwork that appears distorted within the envelope doesn't appear listed in the Layers palette at all. In order to edit the contents of an envelope, select it on your artboard and choose Object > Envelope Distort > Edit Contents, or press Command-Shift-V (Ctrl-Shift-V). Doing so puts Illustrator into the Edit Contents mode, where you can select the artwork and edit it as normal. In the Edit Contents mode, you cannot adjust, or even select, the envelope. If you look at the Layers palette, you'll see that the Envelope object now contains a triangle to the left of its name, which you can click to reveal the objects contained within the envelope (Figure 9.32). This triangle is your only clue in figuring out what mode you are in. If you see the disclosure triangle, you're in Edit Contents mode, and if you don't, then you are in Edit Envelope mode. If you are in Edit Contents mode and want to return to Edit Envelope mode, use the same keyboard shortcut mentioned earlier, or choose Object > Envelope Distort > Edit Envelope. Figure 9.32. When you're in Edit Contents mode, Illustrator reveals the artwork within the envelope on Layer 1.
Keep in mind that Illustrator maintains each Envelope distortion in your file as a separate entity. Therefore, it's entirely possible to have one envelope in Edit Envelope mode and have another envelope in Edit Contents mode. Releasing and Expanding EnvelopesAt any time, you can select an existing envelope and choose Object > Envelope Distort > Release, which returns the artwork to an undistorted state. In addition, you can choose Object > Envelope Distort > Expand, which applies the Envelope distortion to the artwork itself. You can then edit the distorted paths freely (Figure 9.33) although you won't be able to edit or change the Envelope distortion itself after this point. Figure 9.33. When you expand an envelope, the distortion is applied permanently to the artwork, as seen here, in Artwork Preview mode. |


EAN: 2147483647
Pages: 147
- Chapter II Information Search on the Internet: A Causal Model
- Chapter VII Objective and Perceived Complexity and Their Impacts on Internet Communication
- Chapter XIV Product Catalog and Shopping Cart Effective Design
- Chapter XVII Internet Markets and E-Loyalty
- Chapter XVIII Web Systems Design, Litigation, and Online Consumer Behavior