Lesson 1: Resolving Physical Connectivity Issues
Many connectivity problems occur because the physical connection between the end user’s computer and the hub, router, switch, phone jack, or server or between the user’s computer and the Internet is not working properly. These connectivity problems are virtually the same for both home users and network domain users. Connection problems can be the result of malfunctioning cables, network interface cards (NICs), modems, hubs, or wireless access points, or they can be caused by the incorrect configuration of these devices. In this lesson, you learn some basic troubleshooting techniques that can be used to diagnose physical connectivity problems. If you determine that the physical connections are good, you can move on to checking the configurations of the network connections.
After this lesson, you will be able to
-
Check physical network connections.
-
Troubleshoot installed networking hardware.
-
Troubleshoot modem hardware.
Estimated lesson time: 25 minutes
Checking Connections
Many of the service calls you will be asked to handle as a tier 1 desktop support technician (DST) are resolved by simply reconnecting the Ethernet cable or phone line to the computer, modem, or hub. This is especially true in an office or corporate environment where the furniture is moved or relocated often, or when a cleaning crew comes in each night and works around users’ computers. When a user reports that he or she cannot access the workgroup computers, the LAN, the domain, or the Internet, check these physical connections first.
| Note | A workgroup or domain client cannot access workgroup or domain resources if their network server is down or the workgroup computer they are trying to reach is not turned on or is otherwise unavailable. Before getting too far into the troubleshooting procedure, verify that network computers are functional. |
In addition to the physical connection of the cable or phone line to the NIC or modem, verify that these other items are properly connected (if applicable):
-
The Ethernet cable to the hub
-
The Ethernet cables from the hub to other computers
-
The physical connections to and from routers and firewalls
-
The phone line to the phone jack
-
The modem, hub, and other devices that need power to the wall jack
-
The universal serial bus (USB) or FireWire cable from and to the personal digital assistant (PDA), handheld PC, or other device
-
Any other connection to and from any other device on the user’s computer
In addition, if a wireless access point is configured, make sure that it is within the range that is listed in its documentation. The wireless access point might have been moved or might have fallen behind a user’s desk. A wireless user will not be able to connect if the wireless access point is not within the required range.
| Note | If you notice that a desk, chair, or other piece of furniture is positioned on top of an Ethernet cable, or that the Ethernet cable is crimped, try replacing the cable with a new one. The cable could be damaged. |
Troubleshooting Installed Hardware
If the physical network connections look OK, your next step is to check the networking hardware that is installed on the computer so that you can rule out malfunctioning hardware as the cause of the problem. Checking physical hardware connections includes verifying through Device Manager that the connectivity devices are working properly. If they are not, you must troubleshoot those devices. If problems persist, you also need to verify that the hardware is installed properly.
Using Device Manager
Device Manager details the hardware components that are on the computer and denotes any malfunctioning hardware with either a red X or a yellow exclamation point. You should check Device Manager if physical connectivity is not the problem, and before you attempt other troubleshooting techniques. If you find a problem with a modem or NIC, the hardware can be repaired or replaced quickly, and the user can be connected to the network again promptly.
To use Device Manager to locate and troubleshoot hardware devices installed on the computer, follow these steps:
-
Open Control Panel, open Performance And Maintenance, open System, and in the System Properties dialog box, select the Hardware tab.
-
Select Device Manager.
-
Check for red Xs or yellow exclamation points. Expand any tree to see the name of the device. Figure 8-1 shows Device Manager with the Modems and Network Adapters trees expanded. In this figure, each component is functioning correctly.
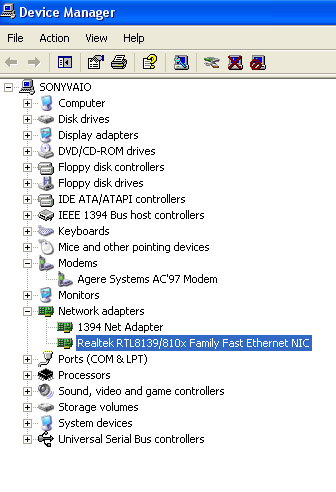
Figure 8-1: Device Manager shows installed hardware, including modems and NICs.
If problems are denoted in Device Manager, the component most likely has a device driver issue, is disabled, or has malfunctioned. You can troubleshoot the device in the device’s Properties dialog box by using the General tab. Figure 8-2 shows the General tab for a modem that appears to be working correctly. Notice that the device is enabled in the Device Usage list box.
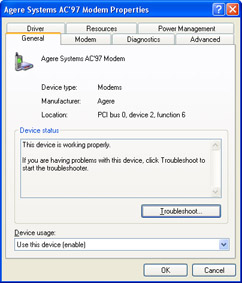
Figure 8-2: The General tab details the device status.
If you believe that a device is the cause of the problem, if the device is disabled, or if it has a red X or a yellow exclamation point beside it, you can use Device Manager to troubleshoot it by following these steps:
-
Open Device Manager.
-
Expand the tree for the component to troubleshoot. Double-click the device name.
-
In the Properties dialog box, select the General tab.
-
Verify that the Device Usage option is set to Use This Device (Enable). If it is not, use the drop-down list to select it. (This might solve the problem.)
-
Select Troubleshoot.
-
Work through the Help and Support Center’s Troubleshooting Wizard to resolve the problem.
The Help and Support troubleshooting wizards are a great way to troubleshoot a piece of hardware because they walk you through current, reliable techniques for solving common problems with hardware. In addition, they offer exceptional learning tools for beginning DSTs.
| Note | To learn more about Device Manager, read Microsoft Knowledge Base (KB) article 314747. |
Checking Physical Connections
If Device Manager finds a problem and you cannot resolve it by using the troubleshooting wizards, or if the device that you are looking for is missing from the Device Manager list (no modem listed, no NIC listed), check the physical connection of the networking hardware.
Occasionally, especially after a computer has been moved or bumped, a component inside the computer slips out of place just enough to cause the component to fail. When a modem or NIC is not seated properly, it cannot work properly. If you have the proper credentials (A+ certification or approval from your superiors, for instance), you should open the case and check these connections.
To check for the proper connections inside a computer case, follow these steps:
-
Turn off the computer and unplug it.
-
Remove the cover from the computer case.
-
Ground yourself to the computer by using an antistatic wrist strap.
-
Locate the modem or NIC, and press lightly on the card to verify that it is seated properly. If the card is not properly seated, remove the card from the computer chassis and remove and reseat the card.
-
Replace the cover, plug in the computer, and turn it on.
If the connection still does not work or if there were no obvious problems with the hardware, continue working through the troubleshooting techniques listed in the following sections.
Using the Modem Troubleshooter
The Microsoft Windows Help and Support files offer a modem troubleshooter (among others). If you believe that the modem is the cause of the connectivity problem, if it is configured correctly and enabled in Device Manager, and if you know it is seated correctly or connected properly at the computer, you can try the Modem Troubleshooter in Help and Support.
This troubleshooter guides you through what to do if users have problems connecting to the Internet by using the modem, if Windows does not detect the modem, or if the Network Setup and New Connection Wizards are not working properly. In this case, you would choose to follow the wizard through the options for solving a problem using the modem to connect to the Internet.
To use the Modem Troubleshooter, follow these steps:
-
From the Start menu, select Help And Support.
-
Under Pick A Help Topic, select Fixing A Problem.
-
Under Fixing A Problem, select Networking Problems, and from the right pane, select Modem Troubleshooter.
-
On the What Problem Are You Having page, select I Have Problems Using My Modem To Connect To The Internet. Click Next.
-
Work through the various troubleshooting pages to do the following:
-
Verify that the COM port is turned on.
-
Verify that the modem is functional.
-
Verify that the physical connection is configured properly.
-
Verify that the modem is turned on.
-
Verify that the COM port settings are correct.
-
Verify that the modem is on the Microsoft Hardware Compatibility List (HCL).
-
Verify that the COM port, modem, or cable is not faulty.
-
Upgrade the basic input/output system (BIOS) of the internal modem if necessary.
-
Locate conflicting devices.
-
Upgrade the modem’s .inf file (a file that lists commands that the modem supports) or driver.
-
Verify that the modem is installed correctly.
-
Re-create dial-up connections.
-
Visit the Windows Update website or the manufacturer’s website.
-
As you can see from this list, the Windows Help and Support troubleshooting wizards are quite thorough. Whenever possible, access these wizards to help you to resolve end-user problems. In your spare time, work through the wizards to learn new techniques for resolving problems.
| Note | If you believe that the NIC is not functioning properly, work through Help and Support’s Drives And Network Adapters Troubleshooter. |
Lesson Review
The following questions are intended to reinforce key information presented in this lesson. If you are unable to answer a question, review the lesson materials and try the question again. You can find answers to the questions in the “Questions and Answers” section at the end of this chapter.
-
What is the name of the Windows utility that lists the current state of the hardware installed on the system?
-
msconfig
-
System Information
-
Device Manager
-
Computer Management
-
-
You are troubleshooting a networking problem for a user. The user was having no problems connecting to her network when she left the office yesterday afternoon. This morning, when she came to work, she could not connect to the network. You know that other users on the network are not having the same problems. What is the first thing you should check?
Lesson Summary
-
To resolve connectivity problems on a workgroup or a domain, check all physical connections, including cables, hubs, switches, routers, and network computers first.
-
Use Device Manager to ensure that connectivity devices installed on the computer are working properly.
-
Use the Windows troubleshooters to help when troubleshooting network connectivity and hardware issues.
EAN: N/A
Pages: 237