Lesson 2: Resolving Network Configuration Issues
If the physical connections are not the cause of connectivity problems, the configuration of those connections might be. For instance, although the modem might be working properly, the user will not be able to connect to the Internet if the phone number that is used to dial the Internet service provider (ISP) is configured incorrectly. If a DSL line is used but the connection is configured incorrectly or is unavailable, the user will not be able to connect either. Configuration problems such as these are quite common. In this lesson, you learn how to troubleshoot configuration settings for these types of Internet connections plus two other types: workgroup connections and domain connections.
After this lesson, you will be able to
-
Troubleshoot modem connections.
-
Troubleshoot cable and DSL connections.
-
Troubleshoot workgroup connections.
-
Troubleshoot domain connections.
Estimated lesson time: 50 minutes
Troubleshooting Modem Connections
Internet connectivity problems involving modems occur for a variety of reasons. A problem can be caused by something as simple as dialing an incorrect phone number or having the connection automatically disconnect after a period of time or something as complicated as an improperly configured name server address. In this section, you learn about the most common problems with configured Internet connections; later you learn about more complicated name resolution problems.
Users often report connectivity problems that are fairly common. These include:
-
My modem will not connect to my ISP.
-
I get an error message when the modem dials, stating that the number is not in service.
-
I cannot hear my modem when it dials.
-
I hear my modem when it dials.
-
I keep getting disconnected from the Internet after 20 minutes of inactivity.
-
When I get disconnected from the Internet, the connection is not redialed automatically.
-
When I disconnect from my ISP at night, the computer redials and connects even though I do not want it to.
-
I keep getting prompted for my name and password, phone number, and other information.
-
Sometimes my ISP’s phone number is busy. I have an alternative number. How do I change the number that the computer dials?
Each of these problems can be resolved in the same place: the Properties dialog box of the Internet connection.
Resolving Tier 1 Internet Connectivity Calls
You can resolve the problems listed in the preceding list from the Internet connection’s Properties dialog box, shown in Figure 8-3. To access this dialog box, open Control Panel, click Network And Internet Connections, click Network Connections, right-click the Internet connection, and then click Properties.
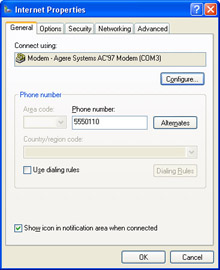
Figure 8-3: The Internet Properties dialog box is the place to configure the modem.
Table 8-1 details how to resolve each of the calls in the preceding list by using the Internet Properties dialog box.
| Complaint/Report | Possible Solution |
|---|---|
| My modem will not connect to my ISP. | Call the ISP, and verify or obtain a phone number. On the General tab, retype the phone number. |
| I get an error message when the modem dials, indicating that the number is not in service. | Call the ISP, and obtain a new phone number. On the General tab, insert the phone number. |
| I cannot hear my modem when it dials. | On the General tab, click Configure. Select the Enable Modem Speaker check box. In Device Manager, double-click the modem; and on the Modem tab, configure the speaker volume. |
| I hear my modem when it dials. | On the General tab, select Configure. Clear the Enable Modem Speaker check box. |
| I keep getting disconnected from the Internet after 20 minutes of inactivity. | On the Options tab, change the setting for Idle Time Before Hanging Up to Never, 24 Hours, 8 Hours, 4 Hours, or any other setting. |
| When I get disconnected from the Internet, the connection is not redialed automatically. | On the Options tab, select the Redial If Line Is Dropped check box. |
| When I disconnect from my ISP at night, the computer redials and connects even though I do not want it to. | On the Options tab, change the value for Redial Attempts to 0. Clear the Redial If Line Is Dropped check box. |
| I keep getting prompted for my name and password, phone number, and other information. | On the Options tab, clear the Prompt For Name And Password, Certificate, Etc.; Include Windows Logon Domain; and Prompt For Phone Number check boxes as applicable to the network. |
| Sometimes my ISP’s phone number is busy. I have an alternative number. How do I change the number that the computer dials? | On the General tab, click Alternates. In the Alternate Phone Numbers dialog box, click Add. Add the new number, and click OK to exit the dialog boxes. |
When you are finished making changes, click OK in the Internet Properties dialog box and disconnect and redial the number to activate the changes.
Troubleshooting Cable and DSL Connections
Internet connectivity problems involving cable and DSL modems occur for a variety of reasons. A problem can be caused by something as simple as a disconnected cable or a dial-up modem that is not disabled or something as complicated as troubleshooting a slow connection or identifying the source of DSL interference. In this section, you learn about the most common problems with these types of configured Internet connections; later you learn about more name resolution problems and problems with DNS and WINS servers.
Users often report connectivity problems that are fairly common. These include:
-
My dial-up modem keeps trying to dial out.
-
My Internet connection is unavailable.
-
I try to connect, but nothing happens at all.
-
My Internet connection is slow.
-
I think I am getting interference. Could something be causing that?
Resolving Tier 1 Internet Connectivity Calls
You can resolve the problems listed in the preceding list by using common sense and familiar troubleshooting techniques. Table 8-2 details how to resolve these calls.
| Complaint/Report | Possible Solution |
|---|---|
| My dial-up modem keeps trying to dial out. | Open Control Panel, open Network And Connections, and then open Internet Options. Choose the Connections tab, and select LAN Settings. Clear all selected settings. Click OK twice to close the two open dialog boxes. Open Internet Explorer, and from the Tools menu, select Internet Options. On the Connections tab, select Never Dial A Connection. Click OK. |
| My Internet connection is unavailable. | Check all physical connections to and from modems, routers, and the computer. Swap out questionable cables for new ones. If problems still exist, right-click the connection in Network Connections, choose Properties, select Internet Protocol (TCP/IP), and click Properties. Note that if you are using a dial-up connection, the Internet Protocol (TCP/IP) information is on the Networking tab of the network connection’s Properties dialog box. Verify with the ISP that the settings are correct. A common setting is Obtain An IP Address Automatically. Click OK to work out of the dialog boxes. |
| I try to connect, but nothing happens at all. | Verify that all power supplies to modems or routers are plugged in and that all hardware is turned on. Verify that the NIC and all hardware are functional by using Device Manager as detailed earlier. |
| My Internet connection is slow. | Contact the ISP first. The problem could lie in the ISP’s capabilities. It is possible that the servers are overloaded. A newer modem might also be available. |
| I think I am getting interference. Could something be causing that? | Yes. Interference can be caused by lighting dimmer switches, AM radio stations, and other sources. |
For more information about troubleshooting cable modems, read Knowledge Base article 310089, “Troubleshooting Cable Modems.”
Troubleshooting Workgroup Connections
A workgroup is a common network configuration. Generally, a workgroup consists of a few computers, each of which is connected to a hub, router, or switch through an Ethernet cable or wirelessly, for the purpose of sharing files in a small office or a home. Problems in this type of network occur for many reasons. When troubleshooting a user’s access to another workgroup computer or resource on the network, check the physical connections first, check the status of the hub and NIC, verify the workgroup name in My Computer, and try repairing or disabling and enabling the connection from Network Connections. If the problem cannot be resolved by using any of these techniques, you might have to re-create the network connection.
| Note | Before performing any of the following troubleshooting techniques, verify that the user is logged on to the computer appropriately, that physical connections are solid, that the NIC has a green light indicating that it is functional (if the NIC has diagnostic LEDs), and that the hub, switch, or other device is working properly. |
Resolving Tier 1 Workgroup Connectivity Calls
If the physical connections and hardware are all functional and connected properly, you can begin troubleshooting the connection’s properties. These properties might have been changed because the user ran the Network Connections Wizard, the Network Setup Wizard, or the New Connection Wizard; because the user changed the name of the workgroup or the name of the computer in the System Properties dialog box; or for a number of other reasons. You should first verify that the workgroup name and computer name are correct in the System Properties dialog box by following these steps:
-
Open Control Panel, open Performance And Maintenance, and then open System.
-
On the Computer Name tab, verify that the computer is a member of a workgroup and that the workgroup name is correct. If these settings are correct, click OK.
-
If the workgroup name is incorrect, click Change, and in the Computer Name Changes dialog box, shown in Figure 8-4, type the correct workgroup name and click OK.
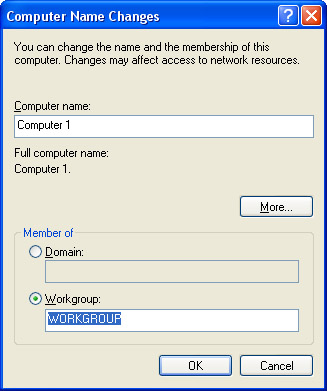
Figure 8-4: Verify the workgroup name from System in Control Panel. -
If the computer name is incorrect, click Change, and in the Computer Name Changes dialog box, shown in Figure 8-4, type the correct computer name and click OK.
-
If the information on the Computer Name tab states that the computer is a member of a domain instead of a workgroup, click Change, and in the Computer Name Changes dialog box, select Workgroup and type the correct workgroup name. Click OK.
-
Click OK to close the System Properties dialog box, and reboot the computer if prompted.
You can also check the computer name, user name, workstation domain, and other information by using the command-line utility net config workstation. The information provided can be quite useful when troubleshooting tier 1 connectivity calls. To see what information can be obtained, follow these steps:
-
From the Start menu, point to All Programs, point to Accessories, and select Command Prompt.
-
At the prompt, type net config workstation, and press Enter on the keyboard. Figure 8-5 shows a sample result.
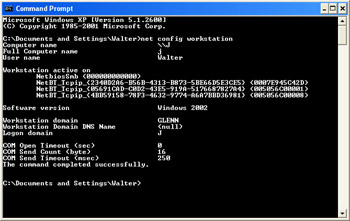
Figure 8-5: The command-line utility net config workstation offers plenty of information.
Notice in Figure 8-5 that the following pertinent information is offered (among other items):
-
Computer name
-
User name
-
Workstation domain
-
Logon domain
This command-line utility thus offers another way to locate and obtain information about the computer, and this information can prove quite helpful in troubleshooting connectivity problems.
If the workgroup name and the computer name are correct, try repairing and then disabling and enabling the connection by following these steps:
-
Open Control Panel, open Network And Internet Connections, and open Network Connections. Verify that the local area connection is enabled. If it is not, right-click the connection and choose Enable. Check to see whether this resolves the problem.
-
Right-click Local Area Connection, and choose Repair. Choosing this option forces a network adapter to acquire a new IP address and thus resets the network connection for that computer. Wait to see the status of the attempted repair.
-
If the repair is successful, double-click the Local Area Connection icon. Verify that packets are being sent and received, as shown in Figure 8-6. This denotes a healthy network connection. Click Close.
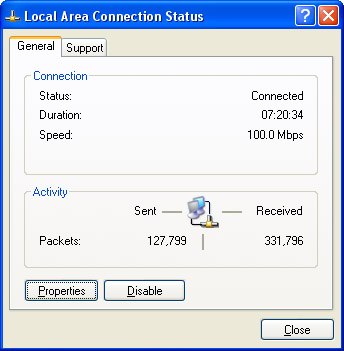
Figure 8-6: A working network connection shows packets being sent and received. -
If the repair procedure fails, right-click Local Area Connection and choose Disable. Right-click again, and choose Enable.
-
If enabling is successful, double-click the Local Area Connection icon. Verify that packets are being sent and received, as shown in Figure 8-6. This denotes a healthy network connection. Click Close.
If the local area connection is still not working properly, clear all network connections by clicking an empty area of the Network Connections window. In the left pane, under See Also, click Network Troubleshooter. Next follow these steps:
-
From the Help And Support Center Networking Problems page, select Home And Small Office Networking Troubleshooter.
-
On the first page, under What Problem Are You Having?, select I’m Having Problems Sharing Files Or Printers. Click Next.
-
On the following wizard pages, make sure that I Want The Troubleshooter To Investigate Settings On This Computer is selected as you work through the options.
If the problem cannot be resolved by using any of these techniques, you might have to re-create the network connection.
Re-Creating the Network Connection
As a last resort before tackling advanced command-line utility troubleshooting techniques, and prior to making complicated changes to DNS or WINS server addresses, re- create the network connection and reintroduce the computer to the network. This often works to bring the computer back online.
Because there are many ways in which a network can be configured, and because a computer in a network can be configured in multiple ways as well, the steps that are involved in re-creating a network connection can take many different forms. For instance, a computer configured to provide (or host) a shared dial-up Internet connection has a much different configuration from a computer that connects to the Internet through a router. Therefore, the following procedure details how to re-create the connection for a computer that connects directly to the Internet and provides shared Internet access to the other computers on the network. Procedures for other configurations are performed similarly.
To re-create a LAN connection and reintroduce the computer to the network, follow these steps:
-
From the Start menu, point to All Programs, point to Accessories, point to Communications, and select Network Setup Wizard. Click Next to start the wizard.
-
Read the information on the Before You Continue page, and click Next.
-
On the Select A Connection Method page, shown in Figure 8-7, select the statement that best describes the computer you are troubleshooting:
-
This Computer Connects Directly To The Internet. The Other Computers On My Network Connect To The Internet Through This Computer. (The rest of the steps in this example show the procedure when this option is selected.)
-
This Computer Connects To The Internet Through Another Computer On My Network Or Through A Residential Gateway.
-
Other. (If you select this option, the Network Setup Wizard offers you additional choices, and you need to make the appropriate choice depending on the circumstances.)

Figure 8-7: Select the statement that best describes the computer.
-
-
When prompted to select an Internet connection, select the connection that the client uses to connect to the Internet from the list offered. Click Next.
-
If prompted that the computer has multiple connections, choose Let Me Choose The Connections To My Network. On the resulting wizard page, make the appropriate selections for your network. Click Next.
-
On the Give This Computer A Description And Name page, type a computer description (this is optional), and type the computer name. Click Next.
-
On the Name Your Network page, in the Workgroup Name box, type the name of the existing workgroup. Click Next.
-
On the Ready To Apply Network Settings page, verify that the settings are correct and click Next. (Click Back if they are not, and make any necessary changes.)
-
Wait while the Network Setup Wizard completes. When prompted to add other computers to the network, select Just Finish The Wizard; I Don’t Need To Run The Wizard On Other Computers. Click Next, and then click Finish.
The user should now be able to access network resources on the computers running Microsoft Windows XP on the network and should have access to the Internet. Open My Network Places to verify this.
If problems still exist after you work through the troubleshooting techniques in this section, you need to apply some advanced techniques. These advanced procedures are detailed in the following sections of this chapter.
| Note | Workgroups can use Automatic Private IP Addressing (APIPA) to connect workgroup resources, and this type of addressing can cause connectivity issues. APIPA can also be used in domains. For more information about APIPA, see the section “APIPA Connections” later in this chapter. |
Troubleshooting Domain Connections
A domain is another type of network configuration. Generally, a domain consists of many computers (10, 100, 1000, or more), each of which can be connected to a server (or servers) on the network through an Ethernet cable, wirelessly, through fiber-optic cable, through a T1 line, over the Internet, or by using a combination of these or other connectivity options. A server called a domain controller authenticates the user onto the domain for the purpose of sharing files and folders, hardware, and other network resources. Those resources can be in the same office or anywhere in the world.
| Note | A computer running Windows XP Home Edition cannot join a domain. |
Problems can occur with this type of network for many reasons. When troubleshooting a user’s access to a domain server or resource on the network, you must verify that the user is logged on to the domain with the correct credentials and password, check the status of the servers and the physical connections, and check the status of the NIC. As with a workgroup connection, you can also try repairing and disabling and then enabling the connection from Network Connections. If you cannot resolve the problem by using any of these techniques, you will have to use more advanced troubleshooting techniques, including troubleshooting Transmission Control Protocol/Internet Protocol (TCP/IP) settings.
| Note | Before performing any of the following troubleshooting techniques, verify that physical connections are solid, that the NIC has a green light indicating that it is functional (if the NIC has diagnostic LEDs), and that switches, routers, and other devices are working properly and are available. |
Resolving Tier 1 Domain Connectivity Calls
If the physical connections and hardware (including servers) are all in working order and connected properly, you can begin troubleshooting the connection’s properties. You should first verify that the connection is functional and that packets are being sent and received. As with a workgroup, try repairing and then disabling and enabling the connection by following these steps:
-
Open Control Panel, and open Network Connections. Verify that the local area connection to the server is enabled, if such a connection exists. If it is not enabled, right-click the connection and choose Enable. Check to see whether this resolves the problem.
-
Right-click the local area connection for the domain if it exists, and choose Repair. (See Figure 8-8.) This connection might be a network bridge, a wireless connection, or another type of local area connection. Wait to see the status of the attempted repair.
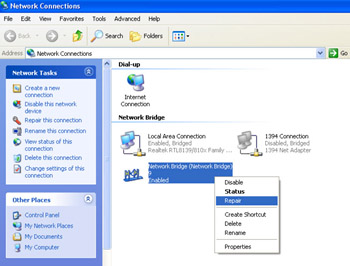
Figure 8-8: Repair network connections as a first step in troubleshooting. -
If the repair is successful, double-click the connection’s icon. Verify that packets are being sent and received. Click Close.
-
If the repair procedure fails, right-click the connection and choose Disable. Right- click again, and choose Enable. Repeat this with the network bridge if one exists.
-
If enabling is successful, double-click the Local Area Connection icon. Verify that packets are being sent and received. This denotes a healthy network connection. Click Close.
-
If the user connects to the domain over the Internet, verify that the user’s Internet connection is active. If it is not, connect to the Internet before continuing. Double- click that connection to verify that data is being sent and received. Additionally, verify the speed, errors, and compression numbers. These might produce significant hints as to the source of the connectivity problem. For instance, if the user’s Internet connection speed is 28.8 Kbps, the user’s requests for data will probably time out before they ever reach the server.
Note If a user’s Internet connection is the source of the problem, you might have to troubleshoot the modem or contact the ISP for information about the problem.
If the physical connection to the server or domain is functional and packets are being sent and received or an Internet connection is working properly, verify that the user is logging on to the domain and not the computer. When a computer running Windows XP Professional is a member of a domain, users can log on to either the domain or the local computer. If a user has logged on to the computer instead of the domain, that user might not be able to access domain resources. To verify that the user is logging on to the domain, follow these steps:
-
Log off Windows XP by clicking Start, selecting Log Off, and then selecting Log Off again.
-
When you see the Welcome To Windows dialog box, press Ctrl+Alt+Delete to open the Log On To Windows dialog box.
-
In the Log On To drop-down list, make sure you select the name of the domain to which you want to log on. This list also holds an option for logging on to the local computer.
-
Enter the user’s user name and password, and click OK.
If the user is logging on to an incorrect domain (for instance, if the user is trying to log on using a laptop normally used for accessing the corporate domain and is now trying to use that same computer to log on to a different local domain), you have to change the computer’s domain or workgroup membership on the Computer Name tab. Note that in order to do this, you must have a user account in the domain with administrative rights to create new computer accounts in the domain. If you do not, you must have a domain administrator add the computer for you. To change the computer’s domain membership, follow these steps:
-
Right-click My Computer and select Properties, or open System from Control Panel.
-
Select the Computer Name tab, and choose Change.
-
In the Computer Name Changes dialog box, shown in Figure 8-9, select Domain and type the name of the new domain. Click OK.
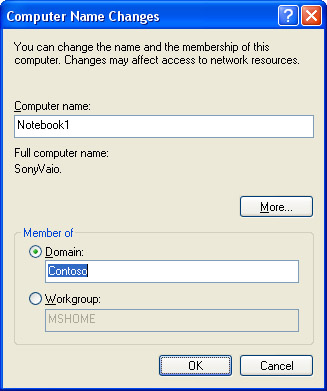
Figure 8-9: Make domain changes from the Computer Name Changes dialog box. -
You are prompted for the user name and password of an account with permission to create a new computer account in the domain. Enter the proper credentials, and click OK.
-
Reboot as prompted, and have the user log on to the new domain.
Caution If the computer is not configured with the correct DNS server addresses (or cannot contact the DNS servers), you will not be able to change the computer’s membership. There will be more on DNS servers later in this chapter.
If the user has logged on to the domain correctly and the connection is functioning properly, open Network Connections, and clear all network connections by clicking an empty area of the Network Connections window. In the left pane, under See Also, click Network Troubleshooter, and then follow these steps:
-
On the Help And Support Center Networking Problems page, select Diagnose Network Configuration And Run Automated Networking Tasks.
-
Select Set Scanning Options, and select each item in the list. Click Save Options when you are done.
-
Click Scan Your System. The results will help you diagnose the problem, and this is a good first step. Figure 8-10 shows a sample report.

Figure 8-10: A system scan using the Network Troubleshooter can offer assistance.
Notice that this report produces a few failures, including contacting the mail server configured in Outlook Express, a problem with the wide area network (WAN) Miniport (IP) network adapter, and issues with the connection to a DNS server. Expanding each tree offers more information, including how the error was discovered (such as a ping failure or a server timeout).
In this case, each failure revolved around accessing the same IP address. All other network components, including modems, are functioning properly. IP addressing information and other networking configurations on the local computer are set up properly. The problem thus lies with that particular resource. Sometimes the information here is just enough to get you started on the right track when troubleshooting domain access.
DHCP Connections
On a domain, most computers are configured to get their TCP/IP addresses automatically from a Dynamic Host Configuration Protocol (DHCP) server. These unique TCP/IP addresses allow computers to communicate with other computers and resources on the network and, in many cases, on the Internet. The DHCP server is responsible for automatically configuring IP addresses for computers and other resources on both local and remote networks. DHCP prevents an administrator from having to manually configure static IP addresses for individual resources.
When a problem occurs with users’ TCP/IP configurations, the users will not be able to access the network’s resources. For example, if the DHCP server is offline, users cannot obtain the necessary addresses from the DHCP server, and without a valid TCP/IP address from the DHCP server, the user will not be able to communicate with anyone on the network or access network resources.
When a DHCP server is unavailable, APIPA takes over. APIPA offers a temporary TCP/ IP addressing scheme so that computers that are on the local network can communicate with each other until a DHCP server becomes available again. However, because APIPA uses a different addressing scheme from all other networks (the addresses are reserved for this purpose), it also causes problems on networks that use DHCP because the two schemes cannot communicate. Even though APIPA causes some problems, it still allows communication between computers on the local network until the issue causing the problem is resolved. APIPA is detailed further next.
APIPA Connections
APIPA is a feature of Windows XP TCP/IP that automatically configures a unique IP address for each computer on a network when the TCP/IP protocol is configured for dynamic addressing and a DHCP server is not available. APIPA thus automates the IP configuration of all network resources and connections. These addresses are always in the range 169.254.0.1 through 169.254.255.254 and use a subnet mask of 255.255.0.0. The purpose of APIPA is to allow a network to be easily and quickly configured for both workgroups and domains and to allow resources to be available even if the DHCP server is offline.
| Exam Tip | On the exam, you will often be shown IP addressing information for use in troubleshooting a networking problem. Remember the range of IP addresses used by APIPA. If you see that a computer has an IP address starting with 169.254, it is a dead giveaway that a DHCP server is not being reached. This could happen because of a networking problem or a DHCP issue. |
When you configure a TCP/IP connection to obtain an IP address automatically, by default the computer attempts to contact a DHCP server for that address. If the server is available, a user is given an address from the scope of addresses on the DHCP server. If a DHCP server is not configured or not available, the computer uses the alternate configuration to determine whether to use APIPA.
| Note | APIPA addresses are never used on the Internet. In addition, because APIPA does not offer a gateway address, APIPA clients cannot access anything outside the local subnet. APIPA is useful only in emergencies in domain subnets and on small LANs that have only a single subnet and do not access outside resources. |
To configure a computer to use automatic TCP/IP addressing and APIPA when necessary, follow these steps:
-
Open Network Connections.
-
Right-click the configured network connection, and then choose Properties.
-
On the General tab for a local area connection or on the Networking tab for all other connections, select Internet Protocol (TCP/IP), and then click Properties.
-
Verify that Obtain An IP Address Automatically is selected, and click OK. Click OK again to close the Local Area Connection Properties dialog box.
You can easily find out whether a computer is using an APIPA address and whether APIPA is enabled by typing ipconfig /all at the command prompt and proceeding as follows:
-
From the Start menu, choose All Programs, Accessories, and Command Prompt.
-
Type ipconfig /all and press Enter.
Note You can also type ipconfig without the /all switch if you need less information. Ipconfig with no switch offers the IP address, subnet mask, and default gateway of each connection, including any local area networks and the Internet connections.
-
Under Windows IP Configuration, locate the Autoconfiguration IP Address. If the IP address is in the range 169.254.0.1 through 169.254.255.254, the computer is configured with an APIPA address, and APIPA is active.
-
To see whether APIPA is enabled, check the Autoconfiguration Enabled parameter. If the parameter is set to Yes, APIPA is enabled.
If APIPA is active, it automatically checks every five minutes for an available DHCP server, just in case one comes back online.
Practice: Resolve Network Configuration Issues
In this practice, you will configure an Internet connection, install a modem, and change workgroup names.
| Note | In Exercise 1, you will configure a nonfunctioning Internet connection using a modem that does not exist. In Exercise 2, you will install a nonfunctioning modem. When you are done with these exercises, delete the items that you have created. |
Exercise 1: Configure an Internet Connection
-
Log on to Windows XP using an account with administrator privileges.
-
From the Start menu, select My Computer.
-
In the Other Places section in the left pane, select My Network Places.
-
In the My Network Places window, in the Network Tasks section, click View Network Connections.
-
In the Network Connections window, in the Network Tasks section, click Create A New Connection.
-
In the New Connection Wizard, on the Welcome To The New Connection Wizard page, click Next.
-
On the Network Connection Type page, verify that Connect To The Internet is selected, and click Next.
-
On the Getting Ready page, select Set Up My Connection Manually, and click Next.
-
On the Internet Connection page, verify that Connect Using A Dial-Up Modem is selected, and click Next.
-
On the Connection Name page, in the ISP Name text box, type Contoso, and click Next.
-
On the Phone Number To Dial page, in the Phone Number text box, type 1-000- 000-0000. Click Next.
-
On the Connection Availability page, click Next.
-
On the Internet Account Information page, in the User Name text box, type your name. In the Password and Confirm Password text boxes, type password. Click Next.
-
On the Completing The New Connection Wizard page, click Finish.
Exercise 2: Install a Modem
-
Log on to Windows XP using an account with administrator privileges.
-
From the Start menu, select Control Panel.
-
In Control Panel, click Printers And Other Hardware.
-
In the task pane, under See Also, click Add Hardware.
-
In the Add Hardware Wizard, on the Welcome To The Add Hardware Wizard page, click Next.
-
On the Is The Hardware Connected? page, select Yes, I Have Already Connected The Hardware and click Next.
-
On the The Following Hardware Is Already Installed On Your Computer page, in the Installed Hardware list, scroll to the bottom and select Add A New Hardware Device. Click Next.
-
On the The Wizard Can Help You Install Other Hardware page, select Install The Hardware That I Manually Select From A List (Advanced), and click Next.
-
On the From The List Below, Select The Type Of Hardware You Are Installing page, in the Common Hardware Types list, select Modems. Click Next.
-
On the Install New Modem page, select the Don’t Detect My Modem; I Will Select It From A List check box, and click Next.
-
On the Install New Modem page, in the Manufacturer list, ensure that (Standard Modem Types) is selected. In the Models list, select Standard 56000 bps Modem, and click Next.
-
On the Install New Modem page, in the Ports window, select COM1. Click Next.
-
The Install New Modem page appears. Click Finish when it becomes active.
-
Close all open windows.
Exercise 3: Change Workgroups
-
Log on to Windows XP using an account with administrator privileges.
-
From the Start menu, right-click My Computer and select Properties.
-
In the System Properties dialog box, on the Computer Name tab, click Change.
-
In the Computer Name Changes dialog box, under Member Of, in the Workgroup text box, enter a new workgroup name.
-
Click OK.
-
In the Computer Name Changes message box welcoming you to the new workgroup, click OK.
-
In the Computer Name Changes message box instructing you to restart to activate changes, click OK.
-
In the System Properties dialog box, click OK.
-
In the System Settings Changes message box asking whether you want to restart your computer, click Yes.
Lesson Review
The following questions are intended to reinforce key information presented in this lesson. If you are unable to answer a question, review the lesson materials and try the question again. You can find answers to the questions in the “Questions and Answers” section at the end of this chapter.
-
You are troubleshooting a network connectivity problem for a workgroup containing 12 computers. One of the computers cannot access network resources. After verifying that the physical connections are good, that the NIC light is on and the NIC produces no errors in Device Manager, and that the computer name and workgroup name are correct in System Properties, you still cannot solve the problem. What should you try next?
-
Remove two of the computers from the workgroup; workgroups can have only 10 or fewer computers connected.
-
Open Network Connections, and try to repair the connection.
-
Re-create the network connection.
-
Configure the workgroup to use APIPA.
-
-
A user complains to you that he is not able to connect to any network resources after installing a new networking card. You open the Command Prompt window on the user’s computer and type ipconfig /all. You get the following results:
Ethernet adapter Local Area Connection: Connection-specific DNS Suffix Description . . . . . . . . . . . : Intel(R) PRO/1000 CT Physical Address. . . . . . . . . : 00-05-E8-45-B4-2E DHCP Enabled. . . . . . . . . . . : Yes IP Address. . . . . . . . . . . . : 169.254.011.202 Subnet Mask . . . . . . . . . . . : 255.255.0.0 Default Gateway . . . . . . . . . : DNS Servers . . . . . . . . . . . :
What do these results tell you? (Choose all that apply.)
-
The computer is configured to connect to a DHCP server.
-
The computer is not configured to connect to a DHCP server.
-
The computer is successfully connecting to a DHCP server.
-
The computer is not successfully connecting to a DHCP server.
-
Lesson Summary
-
Home and small business users are likely to connect to the Internet by using a modem or by a broadband connection such as cable or DSL. Troubleshooting problems for these users involves ensuring that the user has the correct information from his or her ISP and that Windows is configured correctly for the user’s type of connection.
-
Users on networks will be members of one of two types of networks: a workgroup or a domain. Workgroups are small collections of computers that do not rely on a server for authentication. Domains are larger networks wherein servers called domain controllers authenticate users and provide network security and administration.
EAN: N/A
Pages: 237