Lesson 2: Supporting and Troubleshooting Hardware
Windows XP provides many tools for managing and troubleshooting a computer. The key tools that are used for troubleshooting hardware problems include the System Information and Device Manager utilities, and various Windows troubleshooters that can help walk you through the troubleshooting process.
After this lesson, you will be able to
-
Use the System Information tool to view configuration information.
-
Use Device Manager to manage hardware devices.
-
Use Windows troubleshooters to help determine the cause of and solution for a problem.
-
Explain general hardware troubleshooting procedures.
Estimated lesson time: 50 minutes
Using the System Information Tool
System Information allows you to view a vast amount of Windows XP configuration information. The majority of this information is available in other utilities, but System Information consolidates it into a single source. You can easily document a system’s current configuration by printing the information that is in System Information or by saving the information to a file.
You can launch System Information in one of two ways:
-
From the Start menu, select All Programs, Accessories, System Tools, and then System Information.
-
Type msinfo32.exe in the Run dialog box.
When you first open the System Information window, you might experience a delay while the utility scans your system for the most current configuration information. After the scan is complete, a System Summary (shown in Figure 6-8) displays general information about the system, including the operating system version, computer name, processor type, BIOS version, and memory statistics.

Figure 6-8: System Information provides a detailed summary of a system.
In addition to viewing the System Summary, you can also find more detailed information in the following categories:
-
Hardware Resources Expanding the Hardware Resources node displays resources that are in use, including interrupt requests (IRQs), Input/Output (I/O) addresses, direct memory access (DMA), and memory addresses. You can also view conflicts and shared resources. System Information allows you only to view this information; to change resource assignments, you must use Device Manager.
-
Components Expanding the Components node displays a summary of the hardware components that are on the system and their associated settings.
-
Software Environment Expanding the Software Environment node displays device driver status, environment variables, processes that are currently running, service status, and programs that load automatically at startup.
-
Internet Settings Expanding the Internet Settings node displays many configuration settings that are related to Microsoft Internet Explorer. Other available information includes cipher strength, cached objects, and security configuration information.
Saving System Information
You can save the report that is displayed by System Information. Saving a report provides a way to document a system’s condition at a specific point, which often is useful in troubleshooting. Also, if you have previously saved a baseline configuration of the system (a snapshot of the system when it is performing properly), you can compare the baseline information with the information at the point at which the system experiences problems and potentially determine what changes have occurred to the system that could contribute to the problem.
You can save System Information to a file in one of two ways:
-
The Save command on the File menu saves the information to a System Information file (.nfo). Only the System Information utility can read these files. You can open, view, and print them at any time.
-
The Export command on the File menu saves information to a text file, which you can then view or print from any text editor.
Note Extracting the volume of information from the system that is required to create either an .nfo or .txt file in System Information takes several minutes and may consume a noticeable amount of system resources during the export process.
Using the System Information Tools Menu
The Tools menu in System Information provides shortcuts to many other system and troubleshooting utilities. Table 6-1 lists these tools and alternate methods of accessing the tools.
| Tool | Use | Alternate Method of Accessing the Tool |
|---|---|---|
| Net Diagnostics | Gathers information about your computer to help troubleshoot network-related problems. For more information, see Chapter 10, "Supporting Network Connectivity." | From the Start menu, select Help And Support. In the Pick A Task section of the Help And Support Center window, select Use Tools To View Your Computer Information And Diagnose Problems. From the list of tools, select Network Diagnostics. |
| System Restore | Creates restore points by saving Windows configuration information. You can revert to a previous restore point to restore important configurations. | On the Start menu, select All Programs, then Accessories, then System Tools, and then System Restore. |
| File Signature Verification Utility | Scans hardware drivers on a computer and displays any unsigned drivers. See Lesson 3, "Supporting and Troubleshooting Device Drivers." | Type sigverif.exe at the command prompt or in the Run dialog box. |
| DirectX Diagnostic Tool | Displays information about and lets you troubleshoot the DirectX graphics engine. | Type dxdiag.exe at the command prompt or in the Run dialog box. |
| Dr. Watson | Traps program faults so that you can troubleshoot program errors. | Type drwtsn32.exe at the command prompt or in the Run dialog box. |
| See Also | For detailed information on using Dr. Watson to troubleshoot program errors, see the Microsoft Knowledge Base article 308538, "Description of the Dr. Watson for Windows (Drwtsn32.exe) Tool." |
Using Device Manager
Device Manager, shown in Figure 6-9, displays all installed devices and provides an environment for managing those devices. Device manager allows you to perform the following types of tasks:
-
View current device settings
-
View the names of the device driver files
-
Reconfigure devices
-
Update device drivers
-
Scan for hardware changes
-
Remove devices
-
Enable/disable devices
-
Troubleshoot devices
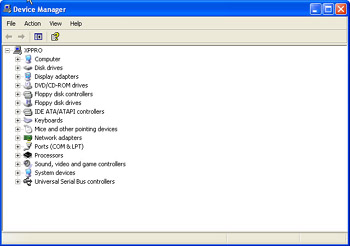
Figure 6-9: Device Manager provides a central interface for managing hardware devices.
You can access Device Manager in the following ways:
-
Select Performance And Maintenance in Control Panel, select the System tool, and then click the Device Manager button on the Hardware tab of the System Properties dialog box.
-
Right-click My Computer and then select Properties. Click the Device Manager button on the Hardware tab of the System Properties dialog box.
-
Right-click My Computer and then select Manage. Expand the System Tools node and then select Device Manager.
Changing Views in Device Manager
You can change the view in Device Manager by selecting a command from the View menu. Device Manager offers the following views:
-
Devices By Type This is the default view. Devices are organized by device type such as display adapters, keyboards, modems, and network adapters.
-
Devices By Connection This view organizes devices by how they are connected to the computer. This is useful if you want to see all the devices that are connected to a Peripheral Component Interconnect (PCI) bus or see how devices are linked together in a universal serial bus (USB) chain.
-
Resources By Type This view is organized by the four major resource types: DMA channels, I/O port addresses, IRQs, and memory addresses. Expanding a resource type displays devices that are using that resource and details on resource allocation.
-
Resources By Connection This view is also organized according to the four major resource types. Within each resource type, devices are organized by the way they are connected.
Device Manager hides some devices by default. For example, Device Manager hides printers because you typically manage them by using the Printers And Faxes folder. Device Manager also hides many non-Plug and Play devices that you normally would not need to configure and devices that were connected to the computer at one time but are not currently connected. To view hidden devices in Device Manager, from the View menu, select Show Hidden Devices.
Identifying Devices in Device Manager
The icon that Device Manager displays next to each device indicates the device’s type. When a device is working normally, a standard icon appears. However, when a specific condition exists for a device (such as being disabled), Device Manager overlays the device’s icon with a symbol. Device Manager uses the following symbols on device icons to denote particular conditions:
-
Yellow exclamation point Indicates a problem with a device. This could mean that the device has a resource conflict or that Windows is unable to locate the device.
-
Red "x" Indicates that the device is disabled.
-
Blue lowercase "i" Indicates that the device has been configured manually. This icon is viewable only in the Resources By Type and Resources By Connection views.
-
Yellow question mark Indicates that Windows recognizes that a device is present, but cannot determine the correct device type. This usually means that drivers have not yet been installed for the device.
Viewing and Modifying Device Properties
In Device Manager, you can access the Properties dialog box of any device either by double-clicking the device or by right-clicking the device and selecting Properties. Figure 6-10 shows the Properties dialog box of a typical network adapter. The tabs available in a device’s Properties dialog box vary depending on the device being examined.
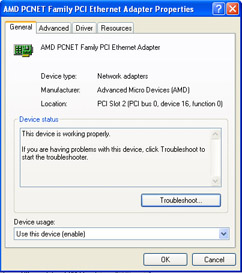
Figure 6-10: A device’s Properties dialog box provides tools for configuring the device.
The standard tabs that you encounter on the Properties dialog boxes for hardware devices include the following:
-
General tab The General tab shows basic information about the device, such as device type and manufacturer. The Device Status section lets you know that the device is working properly and provides access to the Windows Troubleshooter for the device. You can also enable or disable the device from this tab.
-
Driver tab The Driver tab shows details about the driver currently installed for the device and provides tools for managing the driver. Drivers are covered in Lesson 3, "Supporting and Troubleshooting Device Drivers."
-
Resources tab The Resources tab shows the system resources used by the device. Managing resources is covered in the section, "Resource Assignments."
-
Device-specific tabs Most devices also feature tabs for viewing and configuring device-specific settings. The options available on these tabs vary widely with the type of device that you are working with. The names of these tabs also vary with the type of device. For example, network adapters have a tab named Advanced (shown in Figure 6-10), whereas modems have a tab named Modem.
Resource Assignments
Windows XP Professional automatically handles the assignment of resources to Plug and Play devices, but you can manipulate resource assignments on some Plug and Play devices. Non-Plug and Play devices generally require that you manually configure resource assignments, including DMA channels, I/O port address, IRQs, and memory addresses.
The Resources tab, shown in Figure 6-11, lets you configure the hardware resources that are assigned to the device. The Conflicting Device List notifies you if any other devices are configured to use the same resources. This makes it easier to troubleshoot resource conflicts.
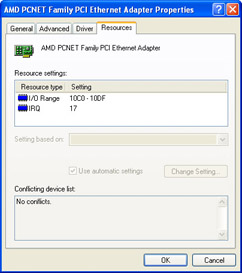
Figure 6-11: Managing resources by using the Resources tab.
Occasionally, you may run into situations in which two devices are requesting the same resource. To remedy the situation, you must use Device Manager to identify the conflict, determine what resources are currently available, and try to reconfigure one of the devices to eliminate the conflict.
Hardware manufacturers limit the settings that you can configure for each required resource. For example, a particular non-Plug and Play network card might permit you to configure only an IRQ value of 3 or 10. If both of those IRQ values were in use, you would need to reconfigure the device that is using either an IRQ value of 3 or 10 to free up that resource and then assign it to the network card.
Device Manager’s Resources By Type view (configurable from the View menu) is useful for determining which devices are using which resources and which resources are currently available. Figure 6-12 displays the Resources By Type view.
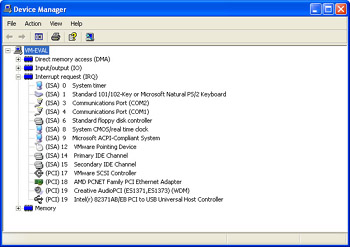
Figure 6-12: The Resources By Type view is useful for troubleshooting resource conflicts on non- Plug and Play devices.
| Note | Plug and Play devices have a Use Automatic Settings option, which allows Windows XP to determine the resource assignments for the device. Unless you have a compelling reason to do otherwise, you should always choose Use Automatic Settings if the option is available. This allows the operating system to ensure that resource assignments do not conflict. |
Scanning for Hardware Changes
Windows XP detects and installs most Plug and Play devices without requiring any configuration by the user. Windows might not automatically detect some Plug and Play devices. Although you can force Windows to detect such devices by restarting Windows or by running the Add Hardware Wizard, you can also initiate the detection process by right-clicking the computer name in Device Manager and selecting Scan For Hardware Changes. Scanning for hardware changes in Device Manager is equivalent to the hardware search performed by the Add Hardware Wizard.
Removing and Disabling Devices
You can remove a device in Device Manager by right-clicking the device and then selecting Uninstall. If you remove a Plug and Play device from Windows by using Device Manager, but do not physically disconnect the device from the computer, Windows will automatically detect and install the device again the next time you restart the computer. If you want to leave a Plug and Play device connected to the computer, but do not want it to be initialized, disable the device instead of removing it.
You disable a device in Device Manager by right-clicking the device and then selecting Disable. Device Manager overlays a red x on the device icon to indicate a disabled state. Disabling a device makes the device temporarily unavailable. The device driver and all configuration information are still present; the device is simply not activated. A disabled device does not consume any system resources. If two devices in a system are experiencing a resource conflict, disabling one of the devices will resolve the conflict. However, if both devices are required and should not be disabled, you will need to take further action to remove the conflict so that both devices can be accessible simultaneously.
Right-click a disabled device in Device Manager and then select Enable to enable the device. You can also enable and disable devices using the General tab of the Properties dialog box for a device.
Safely Removing Hot-Plugged Devices
A hot-plugged device is one that you can connect or disconnect while a computer is running. Most PC Card (PCMCIA), USB, and FireWire (IEEE 1394) devices fall into this category.
Some hot-plugged devices require the extra step of stopping the device in Windows before you can safely disconnect it from the computer. If any connected devices require safe removal, the Safely Remove Hardware icon appears in the notification area of the taskbar, as shown in Figure 6-13. Double-click this icon to open the Safely Remove Hardware dialog box. Select the device you want to disconnect and then click Stop. Windows notifies you when it is safe to disconnect the device.
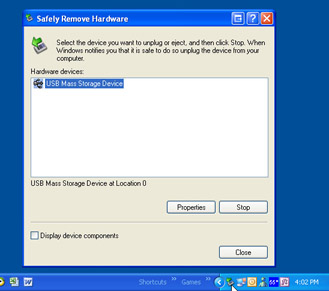
Figure 6-13: Use the Safely Remove Hardware dialog box to stop a device before disconnecting it.
The practice of disconnecting a device that requires safe removal without first stopping the device is referred to as a surprise removal. If the device is being accessed in any way when it is disconnected, Windows may react unpredictably. If the device is a hard disk with write caching enabled, for example, data in the cache that has not yet been saved to disk will be lost.
Using Windows Troubleshooters
Windows Troubleshooters are special types of help files available in the Windows XP Help And Support Center. Troubleshooters help you pinpoint problems and identify solutions by asking a series of questions and then providing you with detailed troubleshooting information based on your responses to those questions.
Troubleshooters provide support for hardware and software issues. When troubleshooting problems with a specific device, the easiest way to access an appropriate troubleshooter is to click the Troubleshoot button on the General tab of the device’s Properties dialog box in Device Manager. Figure 6-14 displays a generic hardware troubleshooter.
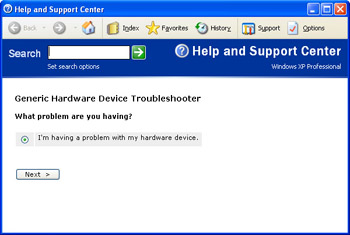
Figure 6-14: Troubleshooters walk you through the potential solutions to a problem.
In addition to using troubleshooters yourself to help solve problems, you should also teach users how to access them. Often, a user can identify and solve minor problems themselves with pointers in the right direction.
Access the full list of troubleshooters by following these steps:
-
From the Start menu, select Help And Support.
-
In the Help And Support Center window, select the Fixing A Problem link.
-
In the Fixing A Problem section, select Troubleshooting Problems.
-
In the Troubleshooting Problems list, select List Of Troubleshooters.
Tip You can use the troubleshooting wizards to practice and enhance your troubleshooting skills and to look for answers to common problems. The troubleshooters work through the problem-solving process as you should, suggesting obvious solutions first and then moving on to more complex ones. Take the time to work through the available troubleshooters, and you can learn a lot about troubleshooting hardware in Windows XP.
Troubleshooting General Hardware Problems
You can use Device Manager to identify devices that are not functioning correctly, either because the device is not properly configured or because it has become inoperable. You may receive an error when the system starts up that sends you to Device Manager to troubleshoot the problem, or you may simply notice a loss of functionality. When you open Device Manager, devices that are experiencing problems are identified with either a yellow exclamation point or a red x icon.
If a device is not functioning, consider the following:
-
Verify that the device is plugged in and turned on.
-
Verify that the device is listed on the Hardware Compatibility List (HCL).
-
If the device has been functioning for a time and suddenly stops functioning, determine whether there have been any configuration changes to the system. If changes have occurred, look for potential conflicts associated with new hardware or software. If there have not been any configuration changes (hardware or software), most likely the device drivers have become corrupted and need to be updated, or else the device is physically damaged in some way and needs to be repaired or replaced.
-
Make sure that you are using the latest version of the device drivers. You can use the Drivers tab in the device properties to update device drivers to the most current version. You will learn more about working with drivers in Lesson 3, "Supporting and Troubleshooting Device Drivers."
-
Consider shutting Windows down and turning the computer off. This action causes all hardware to reinitialize and all device drivers to reload, potentially eliminating a transient problem.
-
In some cases, you may need to update the firmware on a device. (Firmware is a set of software instructions written onto read-only memory (ROM) on a device.) If there is a firmware update for the device, attempt to apply it to see whether the problem is corrected.
-
Move the device to another slot or port on the system to determine whether the slot or port is malfunctioning.
-
If you suspect a physical device malfunction, install a known good replacement for the device that is configured in the same fashion and determine whether the replacement device functions. If it does, the original device is most likely damaged and needs to be replaced.
-
If you have installed a device driver that is causing the system to crash, attempt to boot into Safe Mode and update or remove the driver. If you are unable to boot into Safe Mode, try the Last Known Good Configuration. If both of these methods fail, use the Recovery Console. The Recovery Console’s Disable command will disable a driver, enabling the system to boot properly so that the driver can be updated or removed.
Practice: Troubleshoot Hardware Problems
In this practice, you will disable and re-enable a hardware device. You will also use the System Information tool to determine information about your computer.
Exercise 1: Disable and re-enable a device
| Note | The information and procedures in this chapter are based on a default installation of Windows XP Professional. Some of the information and procedures may change if you have installed Windows XP Service Pack 2. For more information, see Appenidx A, "Windows XP Service Pack 2." |
-
Log on to Windows XP using an account with administrator privileges.
-
From the Start menu, select Control Panel.
-
In Control Panel, select Performance And Maintenance.
-
In the Performance And Maintenance window, select System.
-
On the Hardware tab, select Device Manager.
-
Expand Ports (COM & LPT), right-click the parallel port (almost always named Printer Port (LPT1)), and choose Properties.
-
On the General tab of the Printer Port (LPT1) Properties dialog box, in the Device Usage drop-down list, select Do Not Use This Device (Disable). Click OK.
-
In the Device Manager window, note that the icon for Printer Port (LPT1) has a red x on it, indicating that the device is disabled. Right-click the Printer Port (LPT1) and choose Properties.
-
On the General tab of the Printer Port (LPT1) Properties dialog box, in the Device Usage drop-down list, select Use This Device (Enable). Click OK.
-
Close all open dialog boxes.
Exercise 2: Use System Information to find information about your computer
-
Log on to Windows XP.
-
On the Start menu, choose Run. In the Run dialog box, in the Open text box, type msinfo32 and press Enter.
-
In the System Information window, under System Summary, note the processor and the total physical memory on your computer.
-
Expand the Components node and click the Display component. Note the information and settings for your display adapter.
-
From the File menu, select Save.
-
In the File Name box, type My System. Select a location to save the file and then click Save.
-
Close the System Information window.
Lesson Review
The following questions are intended to reinforce key information presented in this lesson. If you are unable to answer a question, review the lesson materials and try the question again. You can find answers to the questions in the "Questions and Answers" section at the end of this chapter.
-
Which Windows XP Professional tool would you use to check for resource conflicts, and what indications does the tool give when it detects such a conflict?
-
Which Windows XP utility can you use to both remove and disable services?
-
Add Hardware Wizard
-
Task Manager
-
Device Manager
-
Administrative Tools
-
Lesson Summary
-
System Information displays configuration information about a computer. Most of this information is available in other utilities, but System Information consolidates it into a single source. You can document the system’s current configuration by printing the System Information report or by saving the report to a file.
-
Device Manager is the primary tool used for managing and troubleshooting hardware devices. Device Manager provides a central location to view the status hardware devices, enable and disable devices, change hardware settings, and troubleshoot hardware problems.
-
Troubleshooters are special types of help files that pinpoint problems and identify solutions by asking you a series of questions.
EAN: N/A
Pages: 195
- OSPF PE-CE Routing Protocol Overview, Configuration and Verification
- Option 2: Inter-Provider VPNs Using ASBR-to-ASBR Approach
- Deployment Scenarios with CSC Architecture
- Implementing MPLS QoS for Layer 2 VPN Implementations
- Case Study 2: Implementing Multi-VRF CE, VRF Selection Using Source IP Address, VRF Selection Using Policy-Based Routing, NAT and HSRP Support in MPLS VPN, and Multicast VPN Support over Multi-VRF CE