Lesson 1: Installing Hardware
Installing new hardware on a computer is typically a three-step process. First, you must physically connect the hardware device to the computer. Second, you must install the device in Windows, which usually means installing hardware drivers and any other software that is used to control the device. Third, you must test the device to make sure that it works as you expect. This lesson focuses on installing hardware in Windows XP.
After this lesson, you will be able to
-
Explain how hardware is installed in Windows XP.
-
Add a hardware device to Windows XP.
-
Work with hardware drivers in Windows XP.
Estimated lesson time: 20 minutes
Installing Hardware in Windows XP
It is easier to install hardware in Windows XP than it is in any previous version of Windows. Support for Plug and Play devices that largely configure themselves and the inclusion of more hardware drivers than ever before with Windows XP means that users are more comfortable installing hardware themselves. However, there are still many details that you must get right, and often users will call on you to help a user install and configure new hardware.
To install any new hardware, you must perform the following general steps:
-
Connect the device to the computer. Sometimes, this means opening the computer case and adding new memory or an expansion card. Other times, it simply mean plugging a new device into an external port and turning the device on.
-
Install the device drivers and other software in Windows so that the operating system can recognize and communicate with the device. Windows XP may already have the necessary drivers, or you may need to supply them.
-
Test the new device to make sure that it works properly and that it does not interfere with other devices on the computer.
Note Although the previous steps are accurate most of the time, you will occasionally encounter a device that requires a different method. For example, some devices require that you first install the drivers and software for the device and then connect the device to the computer. You should always read the manufacturer’s instructions before installing a hardware device. If you are troubleshooting a device for a user, ask the user to locate the instructions and tell you how she installed the device.
Understanding Plug and Play Devices
Plug and Play is a set of specifications that is used to design and build devices that install with little or no user intervention. Windows XP Professional contains comprehensive Plug and Play support, but is reliant on the hardware, device drivers, and the basic input/output system (BIOS) to provide full functionality.
Installing Plug and Play devices is usually straightforward. When the device is connected to the computer, Windows XP detects it, installs any necessary drivers, and automatically configures the device. Windows makes sure that there are no resource conflicts between the new device and other Plug and Play devices on the computer.
| Note | Windows XP Plug and Play support works optimally on computers that use the Advanced Configuration and Power Interface (ACPI) (covered in detail in Chapter 7, “Supporting Display Devices, I/O Devices, and ACPI”). Windows supports the use of Plug and Play devices on older computers that use Advanced Power Management (APM) or Plug and Play BIOS, but a computer must have ACPI to support the full scope of Plug and Play features. |
The level of Plug and Play support for any device depends on both the device and the device drivers. If the device supports Plug and Play but the driver does not (or vice versa), the device presents itself as a non-Plug and Play device to the operating system. This can result in a loss of functionality.
If you connect a new hardware device to a computer running Windows XP Professional and the device is not automatically recognized, the device is most likely to be one of two types:
-
A Plug and Play device that Windows does not recognize automatically Windows XP does not recognize some Plug and Play devices until you either restart the computer or run the Add Hardware Wizard (discussed in the next section).
-
A Non-Plug and Play device Non-Plug and Play devices do not contain Plug and Play functionality at all. If you install a non-Plug and Play device, you must run the Add Hardware Wizard and manually install the device driver. It is your responsibility to ensure that the hardware resource settings for non-Plug and Play devices do not conflict with any other devices on the computer. Windows XP does not configure non-Plug and Play devices automatically.
Installing Hardware by Using the Add Hardware Wizard
As a DST supporting Windows XP, the vast majority of devices that you encounter are likely to be Plug and Play devices, which makes your job a lot easier. However, if you are supporting computers with older devices or older computers that have been upgraded to Windows XP, you may run into non-Plug and Play devices that require a little more effort to install than simply connecting the device.
You can use the Add Hardware Wizard to install and configure non-Plug and Play devices and Plug and Play devices that have been recently connected to the system (but for whatever reason were not detected automatically). You can also use the Add Hardware Wizard to access Windows XP troubleshooting tools for all installed hardware.
| Exam Tip | For the exam, remember that you must use the Add Hardware Wizard for all non- Plug and Play devices. You can use the Add Hardware Wizard or restart the computer for Plug and Play devices that Windows does not recognize automatically. |
Adding a Device by using the Add Hardware Wizard
To install a new device by using the Add Hardware Wizard, follow these steps:
-
From the Start menu, select Control Panel.
-
In the Control Panel window, select Printers And Other Hardware.
-
In the Printers And Other Hardware window, in the See Also list, select Add Hardware to start the Add Hardware Wizard. After reading the Welcome To The Add Hardware Wizard page, click Next.
-
The wizard searches the system for new devices and then asks whether the new hardware is attached to the computer, as shown in Figure 6-1. Select Yes, I Have Already Connected The Hardware, and then click Next.
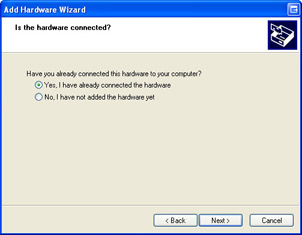
Figure 6-1: You can specify whether or not you have already connected the hardware device. -
The Add Hardware Wizard displays a list of the hardware it detected, as shown in Figure 6-2. Scroll down the list to see whether you can locate the device that you want to install.
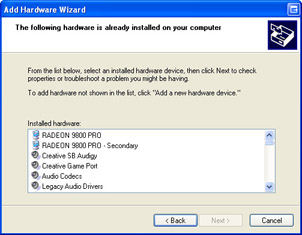
Figure 6-2: The Add Hardware Wizard displays a list of detected hardware. -
If you find the device in the list, select the device and click Next. Windows displays the current status of the device, as shown in Figure 6-3.
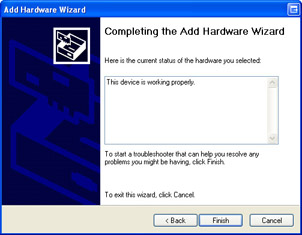
Figure 6-3: If Add Hardware Wizard detects a device, it shows you the device’s status. -
If your device is not listed in the Installed Hardware window in Step 6 (see Figure 6-2), scroll to the bottom of the list and choose Add A New Hardware Device, as shown in Figure 6-4. Click Next.
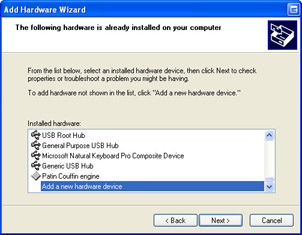
Figure 6-4: Use the Add A New Hardware Device option if the device is not detected. -
The wizard offers to help you install other hardware, as shown in Figure 6-5. You can choose one of two options:
-
You can have the wizard search for and install the hardware device automatically. If you choose this option and the wizard finds the appropriate device and drivers, the installation finishes. If the wizard fails to find any new hardware, it informs you that the detection has failed and prompts you to choose the device from a list.
-
You may also skip the automatic detection and install the device manually by selecting the device from a list. The remainder of this procedure assumes that you are choosing the device from this list.
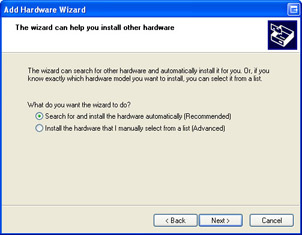
Figure 6-5: Choose whether to perform an automatic search or to select a device manually.
-
-
Whether you choose from the outset to select a device from a list of available hardware devices or whether you are forced to choose from the list because the Add Hardware Wizard cannot detect a new device, the process from this point is the same. The wizard displays a page with a list of device types for you to choose from, as shown in Figure 6-6. Select the correct category for your type of hardware and then click Next.
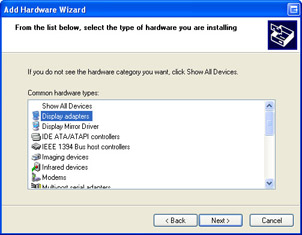
Figure 6-6: Choose from a list of device types. -
Next, the Add Hardware Wizard displays a list of hardware manufacturers for the chosen device type in a column on the left and the different models that the selected manufacturer offers on the right, as shown in Figure 6-7. When you select a manufacturer from the list on the left, the list on the right is updated to include only the drivers that are available for that manufacturer’s devices. If the device you are trying to install appears in this list, select it and then click Next to continue.
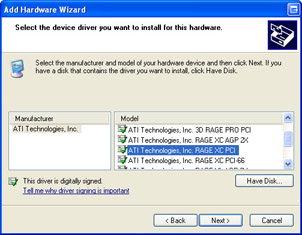
Figure 6-7: Choose the manufacturer and model of the device. -
If the Add Hardware Wizard cannot locate the installation files, you are prompted for the location of the necessary drivers. If the device you are installing does not appear anywhere in the list, you must click the Have Disk button and provide the path to the drivers.
Note It is a good idea to install the latest version of any device driver. The drivers that ship with Windows XP are current as of the release date of the installation CD. Microsoft also updates the driver.cab file with new drivers each time they release a new service pack. If the device you are installing comes with a newer Windows XP-compatible driver, choose the Have Disk option and install the new driver, rather than use the driver from the Windows XP installation CD.
-
When the installation and configuration processes are complete, the wizard displays the Completion page. If prompted, click Finish and restart your computer.
Tip In some cases, Windows XP prompts you to restart the computer after a configuration change. It is not always necessary to restart immediately. If you are in the process of making several changes that will require restarting, you can try performing all the changes and then restarting only once.
Practice: Run the Add Hardware Wizard
In this practice, you manually will install the software for a printer that is not actually connected to your computer. This practice assumes that you do not already have a hardware device connected to a parallel port named LPT2 on your computer. Do not worry if you do not have an LPT2 port; the exercise will work anyway.
-
From the Start menu, select Control Panel.
-
In the Control Panel window, select Printers And Other Hardware.
-
In the Printers And Other Hardware window, in the See Also section, select Add Hardware.
-
On the Welcome To The Add Hardware Wizard page of the Add Hardware Wizard, click Next.
-
The Add Hardware Wizard searches for any new Plug and Play devices, and then displays the Is The Hardware Connected page. Select Yes, I Have Already Connected The Hardware, and then click Next.
-
In the list of installed hardware, scroll to the bottom and select Add A New Hardware Device. Click Next.
-
Select Install The Hardware That I Manually Select From A List (Advanced) and click Next.
-
In the list of common hardware types, select Printers and then click Next.
-
On the Select A Printer Port page, on the Use The Following Port drop-down list, select LPT2: (Printer Port), and then click Next.
-
On the Install Printer Software page, in the Manufacturer list, select Alps. In the Printers list, select Alps MD-1000 (MS). Click Next.
-
On the Name Your Printer page, click Next.
-
On the Print Test Page page, select No and then click Next.
-
If you are using Windows XP Professional and you have Simple File Sharing disabled, you next will see a page asking whether you want to share the new printer. Select Do Not Share This Printer, and then click Next.
-
Click Finish to exit the Add Hardware Wizard.
Lesson Review
The following questions are intended to reinforce key information presented in this lesson. If you are unable to answer a question, review the lesson materials and try the question again. You can find answers to the questions in the "Questions and Answers" section at the end of this chapter.
-
Which Windows feature is the primary tool for installing and removing devices in Windows XP?
-
Add Hardware Wizard
-
Device Manager
-
Ipconfig
-
Event Viewer
-
-
What are the three general steps for installing a new hardware device in Windows XP?
Lesson Summary
-
Plug and Play operation is supported in Windows XP, greatly simplifying the installation of devices that support that technology.
-
Windows XP does not detect some Plug and Play devices automatically when they are connected. You must restart the computer or use the Add Hardware Wizard to initiate the detection and installation.
-
Windows XP does not automatically detect and configure non-Plug and Play devices. You must use the Add Hardware Wizard to install non-Plug and Play devices. Often, you must also manually configure hardware resources for non- Plug and Play devices, as well.
EAN: N/A
Pages: 195