Lesson 4: Troubleshooting Windows XP Startup Problems
After you install Windows XP, the first opportunity for problems to occur happens when Windows XP starts. Understanding how Windows XP starts up is an important part of understanding Windows XP. After you understand the startup procedure, you will have a better idea of what you can modify about the way that Windows starts and how to troubleshoot startup problems. This lesson examines the startup process and covers important startup troubleshooting tools and techniques.
After this lesson, you will be able to
-
Explain how a computer starts.
-
Explain how Windows starts.
-
Check Event Viewer for startup problems.
-
Configure advanced boot options.
-
Use the Recovery Console to troubleshoot startup problems.
Estimated lesson time: 30 minutes
Understanding How a Computer Starts
When you press the power button on a computer, power is provided to all the components and the boot process begins. This process happens as follows:
-
When you supply power to the motherboard on a computer, the BIOS begins a process called power-on self test (POST). During POST, the BIOS tests important hardware that is on the computer, including the display adapter, memory, storage devices, and the keyboard.
-
BIOS first gives control of the testing process to the display adapter, which has its own testing routine built in. This is why the first screen you see when starting a computer is usually a blank screen with information at the top about your display adapter.
-
The display adapter then gives control back to the POST routine, and the main POST screen appears, as shown in Figure 2-9.
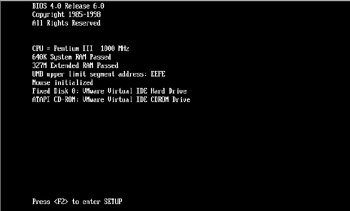
Figure 2-9: The main POST screen displays information about the hardware on a computer. -
POST tests your processor and displays the processor version on the screen.
-
After the processor test is complete, POST gives control of your computer back to the BIOS. At this point, you can press the Delete key (or whatever key allows you to enter the BIOS setup on your computer) to configure BIOS settings.
-
Assuming that you do not enter BIOS setup, BIOS tests your memory next. This step (the memory countdown) is probably the one that you will be the most familiar with. The memory is displayed on the next line after the processor.
-
BIOS then checks the connection to your various hard drives, CD drives, and floppy drives. If no connections are present, or if connections are different from what is listed in the BIOS settings, BIOS displays an error message, and the boot process halts. You must enter BIOS setup to correct these problems.
-
Assuming that all goes well, BIOS next displays a screen that summarizes the state of your computer.
-
BIOS then calls a special software code named the BIOS operating system bootstrap interrupt (Int 19h). This code locates a bootable disk by attempting to load each disk that is configured as a bootable in the BIOS settings.
-
After BIOS finds a bootable disk, it loads the program that is found at the Master Boot Record (MBR) of the disk into your computer’s memory and gives control of the computer to that program. Assuming that BIOS gives control to the MBR on the boot partition that contains Windows XP, the startup phase now moves from the starting of your computer to the starting of Windows.
Understanding How Window XP Starts
After the computer starts and hands off the process to the operating system, Windows XP continues to load in the following manner:
-
The MBR is a small program typically found on the first sector of a hard drive. Because the MBR is so small, it cannot do much. In fact, the MBR that is used in Windows XP has only one function: it loads a program named NTLDR into memory.
Tip NTLDR is probably a name that you recognize. When a computer tries to start from a disk that is not bootable, but has been formatted with a file system that is compatible with Windows XP, you will often see the message “NTLDR is missing. Press CTRL-ALT-DEL to restart” (or something like it). If you see this message, Windows is telling you that either the disk that you are trying to start from is not a valid boot disk (maybe a floppy disk is still in the drive) or that the NTLDR file is invalid.
-
NTLDR switches your computer to a flat memory model (thus bypassing the 640 KB memory restrictions placed on PCs) and then reads the contents of a file named BOOT.INI. The BOOT.INI file contains information on the different boot sectors that exist on your computer.
-
If a computer has multiple bootable partitions, NTLDR uses the information in the BOOT.INI file to display a menu. That menu contains options on the various operating systems that you can load. If a computer has only one bootable partition, NTLDR bypasses the menu and loads Windows XP.
-
Before Windows XP loads, NTLDR opens yet another program into memory named NTDETECT.COM. NTDETECT.COM performs a complete hardware test on your computer. After determining the hardware that is present, NTDETECT.COM gives that information back to NTLDR.
-
NTLDR then attempts to load the version of Windows XP that you selected in Step 3 (if you selected one). It does this by finding the NTOSKRNL file in the System32 folder of your Windows XP directory. NTOSKRNL is the root program of the Windows operating system: the kernel. After the kernel is loaded into memory, NTLDR passes control of the boot process to the kernel and to another file named HAL.DLL. HAL.DLL controls Windows’ famous hardware abstraction layer (HAL), which is the protective layer between Windows and a computer’s hardware that enables such stability in the Windows XP environment.
-
NTOSKRNL handles the rest of the boot process. First, it loads several low-level system drivers. Next, NTOSKRNL loads all the additional files that make up the core Windows XP operating system.
-
Next, Windows verifies whether there is more than one hardware profile configured for the computer (see Chapter 6 for more information on hardware profiles). If there is more than one profile, Windows displays a menu from which to choose. If there is only one hardware profile, Windows bypasses the menu and loads the default profile.
-
After Windows knows which hardware profile to use, Windows next loads all the device drivers for the hardware on your computer. By this time, you are looking at the Welcome To Windows XP boot screen.
-
Finally, Windows starts any services that are scheduled to start automatically. While services are starting, Windows displays the logon screen.
Using Advanced Boot Options
In addition to displaying the regular boot menu, there is another menu behind the scenes of the Windows startup process. Pressing the F8 function key during the Windows XP boot process displays the Advanced Options menu. Table 2-5 summarizes the functionality of each of the options on the Advanced Options menu. Options that require further description are explained in detail in the sections immediately following the table.
| Option | Summary Description |
|---|---|
| Safe Mode
| Loads only the basic devices and drivers that are required to start the computer. Devices that are initialized include mass storage devices, standard Video Graphics Adapter (VGA), mouse, keyboard, and other essential drivers and computer services. |
| Safe Mode With Networking | Same as Safe Mode, but with the addition of networking drivers and services. Use when troubleshooting problems that require network connectivity. |
| Safe Mode With Command Prompt | Same as Safe Mode, but starts a command prompt (Cmd.exe) instead of the Windows Explorer GUI. Generally used when Safe Mode does not function. |
| Enable Boot Logging
| Starts the computer normally, but records driver loading and initialization information to a text file for subsequent analysis. |
| Enable VGA Mode
| Currently installed video driver loaded in 640x480 mode. Useful when the display adapter is configured to a resolution that the monitor cannot support. |
| Last Known Good Configuration | The computer is started with the configuration that was in use the last time a user was able to log on successfully. |
| Debug Mode
| Enables debugging mode on the computer, allowing debug information to be sent over the computer’s COM2 serial port. |
| Boot Normally | Performs a standard Windows XP boot. |
| Exam Tip | The Safe Mode and Last Known Good Configuration options are two of the most useful tools to try first when troubleshooting Windows startup. Enabling Boot Logging is also useful when you are having trouble locating the source of the problem. |
Using Safe Mode
Safe mode is one of the most important tools for solving startup problems. In safe mode, Windows loads only essential drivers and services. Windows does not load programs referenced in the Startup folders and through the Run options in the Registry. Windows also does not process local or group policies when starting in safe mode.
Loading only essential driver and service items makes safe mode a useful tool for troubleshooting and resolving issues with faulty services, device drivers, and application programs that are automatically loaded at startup. From safe mode, you can make configuration changes that are necessary to solve a problem, and then restart the computer normally. Figure 2-10 displays the Windows XP desktop when started in safe mode.
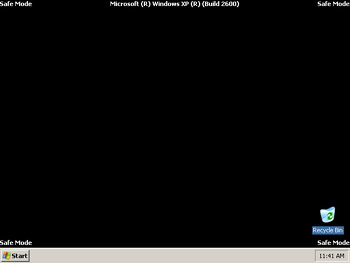
Figure 2-10: Safe mode often allows you to change settings you cannot change in normal mode.
You can use safe mode for troubleshooting the following types of situations:
-
The computer no longer starts after loading a new device driver or application program. If this is the case, start in safe mode and use Event Viewer to check the event logs. Most likely an error will be associated with the driver or application. If the error indicates that a reconfiguration is necessary, attempt to correct the problem and start normally. If you cannot correct the problem, start in safe mode, remove the newly installed component, and contact the manufacturer for further information.
-
The video is not displaying correctly (selecting the Enable VGA Mode option from the Advanced Options menu is also useful in this situation). This situation most commonly occurs when the computer is configured to a resolution that the monitor does not support. Starting in safe mode loads a standard VGA driver, and you can then reconfigure the resolution or load a different display device driver.
-
The operating system begins to perform slowly or stalls for extended periods of time, or the operating system simply does not seem to be working correctly. If starting in safe mode corrects the problem, the issue is with something that loads normally but does not load in safe mode.
Note If a computer fails shortly after installing a new device or application, the new component is usually the source of the problem. However, there is a chance that the newly installed component is not causing the problem and that something else went wrong at about the same time. If the problem persists after the newly installed component has been removed, look at other troubleshooting options.
Boot Logging
When you select the Enable Boot Logging option from the Advanced Options menu, the computer starts normally and records boot-logging information in a file named Ntbtlog.txt. This log file contains a listing of all the drivers and services that the computer attempts to load during startup and is useful when trying to determine which service or driver is causing the computer to fail. Figure 2-11 displays a sample boot log file.
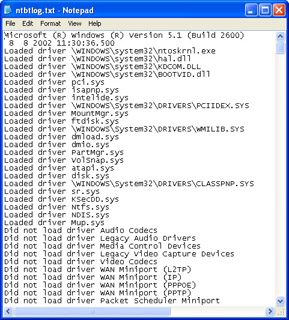
Figure 2-11: Use the boot log file (Ntbtlog.txt) to isolate startup problems.
| Note | Boot logging is enabled automatically when you start the computer with any of the safe mode boot options. |
Last Known Good Configuration
The Last Known Good Configuration holds the configuration settings that existed the last time that a user successfully logged on to the computer. This option is useful if you have added or reconfigured a device driver that subsequently has caused the computer to fail. Using Last Known Good Configuration may allow you to start the computer so that you can try again with a different configuration or driver.
When starting by using the Last Known Good Configuration, you lose all system-setting changes that have been made since the last successful boot. In some situations, this means you may have to reconfigure the computer to some degree. You should consider troubleshooting by using safe mode before using the Last Known Good Configuration option to avoid this issue.
| Note | Last Known Good Configuration does not solve problems associated with drivers or files that are missing or have become corrupt. It is useful only in situations where drivers have been added or reconfigured since the last successful boot. |
Using Recovery Console
Recovery Console is a command-line utility that gives you access to the hard disks when the operating system will not boot. You can use Recovery Console to access all partitions on a drive, regardless of the file system.
You can use the Recovery Console to perform the following tasks:
-
Copy files between hard disks and from a floppy disk to a hard disk (but not from hard disk to a floppy disk), which allows you to replace or remove items that may be affecting the boot process or retrieve user data from an unsalvageable computer
-
Control the startup state of services, which allows you disable a service that could potentially be causing the operating system to crash
-
Add, remove, and format partitions on the hard disk
-
Repair the MBR or boot sector of a hard disk or volume
-
Restore the Registry
Accessing the Recovery Console
You can permanently install the Recovery Console on a computer and make it accessible from the Boot menu. You can also access it at any time without having installed it by starting from the Windows XP installation CD.
To install the Recovery Console on a computer, access the Windows XP installation files (on the installation CD or at a network installation point) and execute the following command:
winnt32 /cmdcons
Windows XP Setup starts and installs the Recovery Console. After installation, the Recovery Console is accessible from a startup menu when the operating system is starting.
To access the Recovery Console on a computer in which Recovery Console is not installed, follow these steps:
-
Start the computer by using the Windows XP Professional CD.
-
When the text mode portion of Setup begins, follow the initial prompts. At the Welcome To Setup screen, press the R key to repair the Windows XP installation.
-
Enter the number that corresponds to the Windows XP installation that you want to repair (this is required even if only a single installation of Windows XP is on the computer).
-
When prompted, enter the local administrator’s password.
Table 2-6 shows the commands that are available in Recovery Console and provides brief descriptions of each.
| Command | Description |
|---|---|
| ATTRIB | Changes attributes on one file or directory (wildcards not supported) |
| BATCH | Executes commands specified in a text file |
| BOOTCFG | Scans hard disks to locate Windows installations and modifies or re-creates Boot.ini accordingly |
| CD | Displays the name of the current directory or switches to a new directory |
| CHDIR | Same as the CD command |
| CHKDSK | Checks a disk and displays a status report |
| CLS | Clears the screen |
| COPY | Copies a single file to another location (wildcards not supported) |
| DEL (also DELETE) | Deletes one file (wildcards not supported) |
| DIR | Displays a list of files and subdirectories in a directory |
| DISABLE | Disables a Windows system service or driver |
| DISKPART | Manages partitions on a hard disk, including adding and deleting partitions |
| ENABLE | Enables a Windows system service or driver |
| EXIT | Quits the Recovery Console and restarts the computer |
| EXPAND | Expands a compressed file |
| FIXBOOT | Writes a new boot sector to the system partition |
| FIXMBR | Repairs the MBR of the system partition |
| FORMAT | Formats a disk for use with Windows XP |
| HELP | Displays a list of available commands |
| LISTSVC | Lists all available services and drivers on the computer |
| LOGON | Lists the detected installations of Windows XP and prompts for administrator logon |
| MAP | Displays drive letter to physical device mappings |
| MAP ARC | Displays the Address Resolution Client (ARC) path instead of the Windows XP device path for physical device mappings |
| MD | Creates a directory |
| MKDIR | Same as MD command |
| MORE | Displays a text file to the screen |
| RD | Removes a directory |
| REN | Renames a single file (wildcards not supported) |
| RENAME | Same as REN command |
| RMDIR | Same as RD command |
| SET | Used to set Recovery Console environment variables |
| SYSTEM_ROOT | Sets the current directory to system_root |
| TYPE | Displays a test file to the screen (same as MORE command) |
Practice: Start the Recovery Console by using the Windows XP CD
-
Start the computer by using the Windows XP installation CD.
-
When the text mode portion of Setup begins, follow the initial prompts. At the Welcome To Setup screen, press the R key to repair the Windows XP installation.
-
Enter the number that corresponds to the Windows XP installation that you want to repair and then press Enter. Assuming that you are only running one Windows XP installation on your computer, you should choose 1.
-
When prompted, enter the local administrator’s password.
-
At the Windows prompt, type help and then press Enter to display a list of available commands. If your display does not show all of the commands, you can press Enter to scroll the list one entry at a time or press the spacebar to scroll a page at a time.
-
Type dir and then press Enter to display the files in the current directory (the Windows directory). You probably need to scroll the list to see all the files.
-
Type exit to exit the Recovery Console and restart the computer.
Lesson Review
The following questions are intended to reinforce key information presented in this lesson. If you are unable to answer a question, review the lesson materials and try the question again. You can find answers to the questions in the “Questions and Answers” section at the end of this chapter.
-
You believe that you have installed a faulty device driver and want to start up Windows XP to remove it. What mode should you start in to accomplish this?
-
A user reports to you that his computer running Windows XP Professional displays a series of errors on startup, stating that certain drivers are not loading. How could you have the user start the computer and easily send you a record of the startup process so that you can identify the problem drivers?
-
Which of the following advanced boot options loads only the basic devices and drivers required to start the computer and access the network?
-
Safe Mode
-
Safe Mode With Networking
-
Last Known Good Configuration
-
Safe Mode With Command Prompt
-
Lesson Summary
-
Because safe mode loads only essential driver and service items, it is a useful tool for troubleshooting and resolving problems with faulty services, device drivers, and application programs that are automatically loaded at startup. From safe mode, you can perform reconfigurations that will enable you to make appropriate changes and then restart the computer normally.
-
The Last Known Good Configuration restores the configuration settings that existed the last time that a user successfully logged onto the computer. This option is useful if you have added or reconfigured a device driver that subsequently has caused the computer to fail.
-
The Recovery Console is a command-line utility that gives you access to the hard disks when the operating system will not start. The Recovery Console can access all volumes on the drive, regardless of the file system type. As the administrator of a Windows XP computer, you should be familiar with the Recovery Console and how you can use it to correct operating system problems.
EAN: N/A
Pages: 195