Lesson 3: Activating and Updating Windows XP
After installing Windows XP for a home or small business user, you must activate Windows. If not activated, Windows can be used for only 30 days. Corporate installations typically do not need to be activated because most corporations use a volume licensing system. You will also need to install any available updates and preferably configure Windows to download and install critical updates automatically.
After this lesson, you will be able to
-
Activate Windows XP following installation.
-
Use the Windows Update site to scan a computer, display available updates, and apply the updates.
-
Configure Automatic Updates to download and install updates automatically.
-
Apply service packs.
Estimated lesson time: 30 minutes
Activating Windows Following Installation
Windows XP Professional requires that the operating system be activated with Microsoft within 30 days of installation. If the operating system is not activated within this time, Windows ceases to function until it is activated. You are not allowed to log on to the computer until you contact one of Microsoft’s product activation centers.
Windows Product Activation (WPA) requires each installation to have a unique product key. When you enter the 25-character product key during Windows installation, the Setup program generates a 20-character product ID (PID). During activation, Windows combines the PID and a hardware ID to form an installation ID. Windows sends this installation ID to a Microsoft license clearinghouse, in which the PID is verified to ensure that it is valid and that it has not already been used to activate another installation. If this check passes, the license clearinghouse sends a confirmation ID to your computer, and Windows XP Professional is activated. If the check fails, activation fails.
Windows XP prompts you to perform activation the first time Windows starts after installation. If you do not perform the activation, Windows continues to prompt you at regular intervals until you activate the product.
| Note | Microsoft does not collect any personal information during the activation process. Instead, an identification key is generated based on the types of hardware that is on your computer. |
Using the Windows Update Site
Windows Update is an online service that provides updates to the Windows family of operating systems. Product updates such as critical and security updates, general Windows updates, and device driver updates are all easily accessible. When you connect to the Windows Update website, shown in Figure 2-6, the site scans your computer (a process that happens locally without sending any information to Microsoft) to determine what is already installed and then presents you with a list of available updates for your computer.
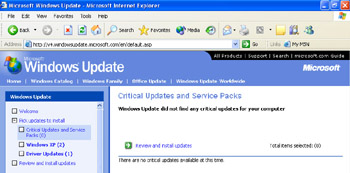
Figure 2-6: Using the Windows Update site.
You can access Windows Update in the following ways:
-
Through Internet Explorer, by selecting Windows Update from the Tools menu
-
Through any Web browser by using the URL http://www.microsoft.com/windowsupdate
-
Through the Help And Support Center by selecting Windows Update
-
Through the Start menu by selecting All Programs and then Windows Update
-
Through Device Manager by selecting Update Driver in the Properties dialog box of any device
Using the Windows Update Site
To obtain updates manually from the Windows Update site, follow these steps:
-
From the Start menu, choose All Programs, and then choose Windows Update.
-
On the Microsoft Windows Update website, click Scan For Updates.
-
After the scan is complete (a process that is performed locally—no information is sent to Microsoft’s servers), select a category under Pick Updates To Install, and then click Add for each update you want to install. After the updates have been selected, click Review And Install Updates. The following categories are available:
-
Critical Updates Critical updates are crucial to the operation of the computer, so you should always install them. These updates provide solutions to known issues, include patches for security vulnerabilities, and might contain updates to the operating system or other applications. Service packs are also included as critical updates.
-
Windows Updates Windows updates, which are less critical than the previously detailed updates, range from application updates for third-party software to updates for previously applied operating system service packs. Not everyone needs all updates, however, so you should read the descriptions prior to adding them to the installation list and add only necessary updates.
-
Driver Updates Driver updates offer new and updated drivers for a user’s particular computer and setup. When Windows Update scans the computer, it acquires information about the modem, network card, printer, and similar hardware; and then offers any available driver updates. Users often find that driver updates enhance the performance of the computer.
-
-
The Windows Update site selects critical updates and service packs for you automatically, but you must pay attention to the updates that you select. Some updates must be installed independently of other updates.
-
When prompted, click Install Now.
-
Click Accept after reading the license agreement. Wait while the updates are installed and then restart the computer if prompted.
Configuring Automatic Updates
Windows XP also supports Automatic Updates, a feature that automatically downloads and installs new critical updates on the computer when the updates become available. You should encourage users to configure the Automatic Updates feature in Windows XP.
If a user reports problems acquiring updates, verify that Windows Update is enabled and configured appropriately by following these steps:
-
Click Start, and then select Control Panel.
-
In the Control Panel window, select Performance And Maintenance.
-
In the Performance And Maintenance window, select System.
-
On the Automatic Updates tab, select the Keep My Computer Up To Date check box, as shown in Figure 2-7.

Figure 2-7: You can configure Automatic Updates in many ways. -
Under Settings, you can specify whether the user should be notified before downloading and installation, have downloads happen automatically and be notified before installation, or download and install automatically according to a schedule. For the highest level of security (and the least intervention required by users), use the fully automatic option and configure a time when the computer will not be used.
-
Click OK.
Exam Tip Enabling Automatic Updates and configuring it to download and install updates automatically according to a preset schedule is the recommended way to handle critical updates for Windows XP. To obtain critical updates for Office, you must visit the Microsoft Office Online site at http://office.microsoft.com/home/default.aspx/.
Applying Service Packs
Microsoft periodically releases service packs for Windows XP. A service pack is a collection of all updates released to that point and often includes new features. You must be familiar with the deployment of service packs to ensure that all operating systems on the network are up-to-date and to avoid issues later.
Windows XP ships with a utility called Winver.exe, which you can use to determine the version of Windows you are running and what level of service pack (if any) is installed. Figure 2-8 displays the output of Winver.exe prior to any service pack being installed. If a service pack has been installed, the version is noted after the build number.
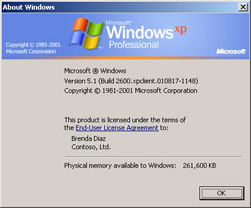
Figure 2-8: Use Winver.exe to determine the current Windows version and service pack.
Obtaining a Service Pack
Service packs are free, and you can get them in the following ways:
-
Use Windows Update to update a single computer with a service pack.
-
Download the service pack from Windows Update to deploy to many computers. The download is a single, large, self-extracting executable, which will have a different name depending on the service pack version that you are installing. The file is quite large (85 MB or more), so be sure that you have sufficient bandwidth available to support the download.
-
Order the service pack CD. You can order the service pack CD from Microsoft for a nominal fee that covers the cost of manufacture and shipping. In addition to containing the service pack, the CD contains operating system enhancements and other advanced utilities.
-
Use Microsoft subscription services. Microsoft has several subscription services, such as Microsoft TechNet, which will automatically provide you with service packs with the next issue after the release of the service pack.
Installing a Service Pack
Service pack setup programs can have various names, although most Windows Service Packs use a program named update.exe. Regardless of the file name, most Microsoft Windows updates support the same command-line parameters, which control how the service pack deploys. Table 2-4 lists these parameters.
| Switch | Function |
|---|---|
| /f | Forces all applications to close prior to restarting the computer. |
| /n | Does not back up Uninstall files. You cannot uninstall the service pack if this switch is used. |
| /o | Overwrites original equipment manufacturer (OEM)-provided files without prompting the user. |
| /q | Installation runs in quiet mode with no user interaction required (requires –o to update OEM-supplied files). |
| /s:[path to distribution folder] | Creates an integration installation point. |
| /u | Unattended installation (requires –o to update OEM-supplied files). |
| /x | Extracts files without starting Setup. This is useful if you want to move installation files to another location. |
| /z | Disables automatic restart when installation is finished. |
Service pack installations require a significant amount of disk space (hundreds of MBs). The uninstall folder consumes the majority of this disk space. You can install a service pack without saving uninstall files by using the –n switch when you install the service pack.
When applying service packs, you must choose an installation method from the following options:
-
Update installation The service pack executable is started locally, across the network, or through Windows Update.
-
Integrated installation Also called slipstreaming, this installation is one in which the service pack is applied to the installation files on a distribution server by using the –s switch, integrating the installation files and the service pack into a single set of updated installation files. You can then perform new installations that include the service pack by using the integrated distribution point. This eliminates the need to apply the service pack after the installation. However, you cannot uninstall the service pack if it is applied using this method.
-
Combination installation This installation involves using a combination of an integrated installation, an answer file to control the installation process, and a Cmdlines.txt file to launch additional application setup programs after the operating system setup has completed.
When you install new operating system components after installing a service pack, Setup will require the location of both the operating system and service pack installation files. This allows Setup to install the updated version of the component.
Uninstalling a Service Pack
By default, the service pack setup program automatically creates a backup of the files and settings that are changed during the service pack installation and places them in an uninstall folder named \$NTServicepackUninstall$. You can uninstall the service pack by using Add/Remove Programs in Control Panel or from a command line by running Spuninst.exe in the \$NTServicepackUninstall\Spunints folder.
| Note | If you installed a service pack without creating a backup, you cannot uninstall the service pack. |
Practice: Update Windows XP
In this practice, you will configure Automatic Updates to download and install critical updates automatically. You will also use the Windows Update site to manually update Windows XP.
Exercise 1: Configure Automatic Updates
-
From the Start menu, select Control Panel.
-
In the Control Panel window, select Performance And Maintenance.
-
In the Performance and Maintenance window, select System.
-
On the Automatic Updates tab, select the Keep My Computer Up To Date check box.
-
Under Settings, select the Automatically Download The Updates, And Then Install Them On The Schedule That I Specify option.
-
Click OK.
Exercise 2: Update Windows XP using the Windows Update Site
-
Log onto Windows XP using an account with administrator permissions.
-
From the Start menu, point to All Programs, and then select Windows Update.
-
If you see a Security Warning dialog box, select Yes.
-
The Windows Update site spends some time checking for updates to the scanning software that the site uses to scan your computer. When this scan finishes, on the Welcome To Windows Update page, click Scan For Updates.
-
In the Windows Update section on the left, expand Pick Updates To Install, and click Critical Updates And Service Packs.
-
On the Critical Updates And Service Packs page, click Review And Install Updates.
-
Scan through the list of critical updates and remove any updates that are marked with an asterisk to indicate that they must be installed separately from other updates.
-
Click Install Now to download and install all critical updates. If you see a dialog box asking whether you accept the End-User License Agreement, click I Agree.
-
A Windows Update dialog box appears and displays progress. After installation is complete, you might receive a Microsoft Internet Explorer message box asking if you want to restart the computer. If so, click OK. (If the computer does not restart automatically, restart it manually.)
Lesson Review
The following questions are intended to reinforce key information presented in this lesson. If you are unable to answer a question, review the lesson materials and try the question again. You can find answers to the questions in the “Questions and Answers” section at the end of this chapter.
-
List the types of updates that are available from the Windows Update site and explain the differences between them.
-
What is the recommended way to configure the Automatic Updates feature in Windows XP?
-
How many days will Windows XP function if you do not activate Windows or are not part of a volume licensing agreement?
-
10 days
-
14 days
-
30 days
-
60 days
-
120 days
-
Lesson Summary
-
You can use the Windows Update site to scan a computer and display available critical, Windows, and driver updates.
-
Automatic Updates is a Windows XP feature that downloads and installs critical updates automatically. Although you can specify that Automatic Updates prompts users before downloading or installing, Microsoft recommends that you configure it to download and install automatically according to a preset schedule.
-
Service packs are collections of updates (and sometimes new features) that Microsoft has tested to ensure that they work together correctly. Microsoft occasionally issues new service packs for its products.
EAN: N/A
Pages: 195