Managing Exchange 2000 Server in a Cluster Environment
Recall that Microsoft Exchange 2000 Server supports active/active clustering. With this configuration, multiple instances of Exchange 2000 Server can run simultaneously in a cluster. To run multiple instances, you need to create multiple resource groups.
A resource group is a container that holds an actual resource. Exchange 2000 Server is an application resource and considers each resource group to be a separate instance, called a virtual server. Thus, after you have installed Exchange 2000 Server into a cluster environment, you need to create a resource group. After that, you create the resources inside the group, such as the IP address and Exchange System Attendant resources.
Creating a Resource Group
When you install Windows Clustering, a default group, called Cluster Group, is created. Microsoft recommends that you not use the Cluster Group to house resources. Instead, you should create new groups for this purpose. To create a new group, within Cluster Administrator right-click the Groups container, point to New, and choose Group. The New Group Wizard starts.
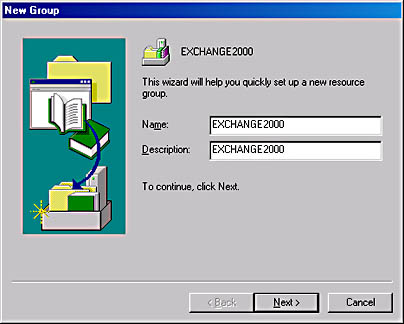
Figure 20-13. Naming a new Exchange group.
In the first screen, shown in Figure 20-13, you'll give the group a name and enter a description. In the second screen (Figure 20-14), you'll select the preferred owners of the group and list them in order of priority, top to bottom.
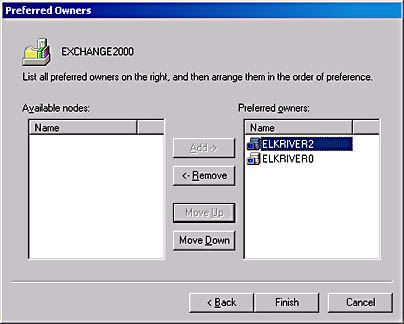
Figure 20-14. Listing preferred owners for a new Exchange group.
When you click Finish, the group is created but is off line. The icon for the group will show a yellow triangle with an exclamation point to indicate that it is off line. If you need additional groups to manage additional resources, repeat this process.
NOTE
You must have an independent drive and an IP address for each group that you create. The number of groups that can be created on a cluster is limited to the number of independent drives that are attached to the cluster and the number of storage groups that will exist in each group. Each node can support up to four storage groups, but it is recommended that you use only three and reserve the fourth storage group for recovery of the databases. No resource name in the cluster can be reused. In addition, only one public folder store is permitted in the cluster. Therefore, you must delete the public folder store in any new Exchange group that you create before bringing that group online.
Assigning Cluster Resources
Each virtual server in an Exchange group must have at least four resources to function correctly: an IP address, a network name, a disk, and the Exchange System Attendant. Let's discuss how to assign these resources to the new cluster group.
Assigning the IP Address Resource To create the IP address resource, right-click the group that you just created, point to New, and choose Resource. The New Resource Wizard starts. First, you'll be prompted to enter a name and description for the new resource (Figure 20-15). In the Resource Type drop-down list, select IP Address. If you plan to run the resource in a separate Resource Monitor, select the check box.
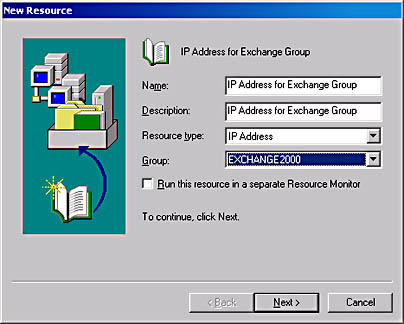
Figure 20-15. Creating an IP address resource for a new Exchange group.
NOTE
The New Resource Wizard is context sensitive and will present the screens necessary to configure and install the type of resource you've chosen.
Next, you'll need to specify the possible owners for this resource, as you did when you created the group. Then you'll be given the chance to create dependency resources that must be brought on line first before this resource can start. Generally, you'll want to verify that no resources appear on this screen. On the TCP/IP Address Parameters screen, shown in Figure 20-16, enter the unique static IP address and subnet mask for the virtual server. This will be the IP address for the Exchange virtual server; it does not refer to or bind to the physical card in the server.
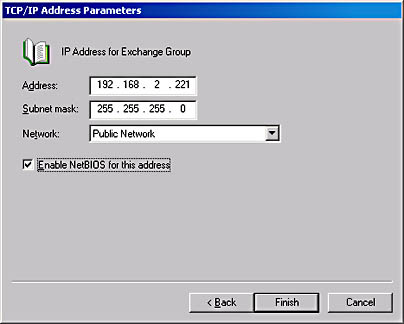
Figure 20-16. Specifying an IP address for the new IP address resource.
Assigning the Network Name Resource To create the network name resource for the resource group, start the process of creating a new resource as you did for the IP address resource. After selecting the possible owners, in the Dependencies screen, under Available Resources, select the IP address resource you just created and then click Add (Figure 20-17). In the next screen, you'll need to enter the network name for the Exchange virtual server. This is the name that will uniquely identify this Exchange virtual server on the network. Click Finish when you're done.
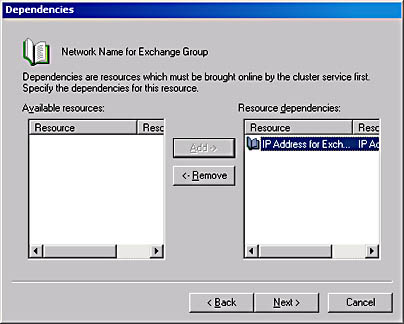
Figure 20-17. Specifying IP address dependency for a new network name resource.
Assigning a Disk Resource To assign a disk resource to a resource group, start Cluster Administrator, click Groups, and select the container that contains the drive you want to move to the cluster group node. Drag the drive into the group container. To verify that the drive is in the container, click the group to see the drive in the details pane, as shown in Figure 20-18. This will be the disk that holds the Exchange databases and transaction logs for the virtual server, which you will create as part of this group. You cannot assign a single physical disk or disk set (such as RAID-5) to more than one resource group.
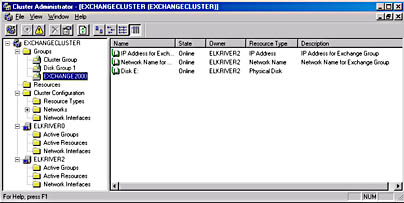
Figure 20-18. Drive resource in the details pane in Cluster Administrator.
REAL WORLD Resource Dependencies When Running Exchange 2000 Server In a Cluster EnvironmentIt is important to note that you must manually specify the dependencies for the resources installed in a cluster environment. Figure 20-19 shows the dependencies of the various services.
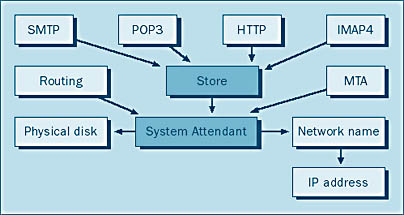
Figure 20-19. Resource dependencies.
When installing a resource into a resource group, use this figure to specify which resources depend on another resource. If you start at the bottom with the IP address and work your way up, you will find that all resources depend on the IP address resource being on line to work properly. For instance, the network name resource cannot start unless the IP address resource is running.
Hence, to start the services, you should start at the bottom of the figure and work your way up. Similarly, to stop the services, you'll start at the top of the figure and work your way down.
Creating Exchange System Attendant Resource Before you can create the Exchange System Attendant resource, the disk, IP address, and network name must be in the resource group and on line. Once you've installed this resource, the databases and Exchange services are moved to the shared disk. Install the Exchange System Attendant resource as you did the others, choosing Microsoft Exchange System Attendant for the new service and listing both nodes in the cluster as possible owners. On the Dependencies screen, add the network name and disk to the resource dependencies, as shown in Figure 20-20.
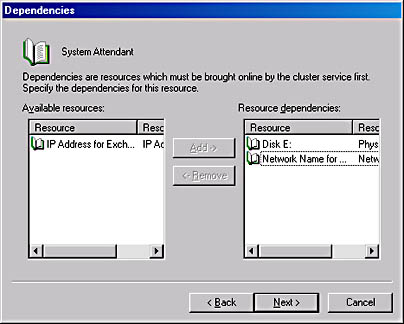
Figure 20-20. Resource dependencies for the Exchange System Attendant resource.
The next two screens ask you to choose which administrative group and routing group to place this resource in. Choose the same administrative and routing group that you installed the Exchange servers into. Otherwise, you may have unpredictable results.
NOTE
These two screens may not appear if administrative and routing groups are not enabled in Exchange System.
Once you've selected the appropriate administrative and routing group, the wizard asks for the path to the data directory. This path you enter here should be on the shared resource.
When you click Finish, the data files are moved, the configuration database for the Cluster service is updated, and you will have created the first Exchange virtual server. Figure 20-21 shows how the new cluster group will look like in Cluster Manager. Notice that after adding the System Attendant resource, most other Exchange resources are created automatically and installed into the Cluster group.
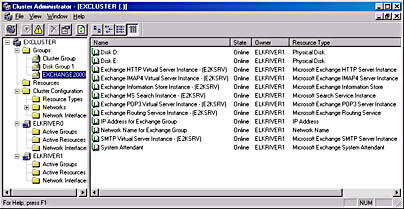
Figure 20-21. Exchange resources created in cluster group when System Attendant resource is created.
Figure 20-22 shows that the new virtual server that is running inside the Cluster group appears as a separate, physical server in the Exchange System Manager snap-in.
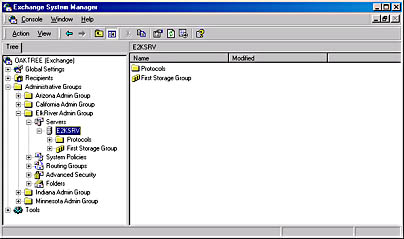
Figure 20-22. New Exchange virtual server named E2KSRV in System Manager
Information Store Limitations
You'll recall from Chapter 2 that the information store service is limited to six databases per storage group with a maximum of four storage groups. In a cluster environment, you'll need to plan your database and storage group configurations carefully and include the ramifications of a failover. In a nutshell, you don't want to create more databases or storage groups than one node can handle.
For instance, let's assume you have two virtual Exchange 2000 servers running on a two-node cluster. Each one has been configured with three storage groups consisting of four databases per group. Now let's assume that one of your nodes experiences a disaster and goes offline. During the failover process, all the databases will be moved to the other node. However, not all the databases will be mounted because the combined number of storage groups exceeds the hard-coded limit in Exchange 2000 Server. Therefore, design your storage group configuration as if all the nodes in the cluster will run all the databases and storage groups to avoid this type of problem during a failover situation.
Configuring Full-Text Indexing
When you create the System Attendant resource for the Exchange resource group, the Exchange MS Search Instance is added to the group. To enable full-text indexing, start Exchange System and navigate to the mailbox store. Right-click the mailbox store, and then choose Create Full-Text Index. Verify that the full-text index catalog will be created on the shared storage device, and then click OK. To learn more about full-text indexing, please see Chapter 11.
NOTE
Do not delete the Exchange MS Search Instance from the resource group unless you are sure you will never need it in the future. If you need to reinstall it after deleting it, you'll be forced to delete and re-create the Information Store resource on the virtual server.
Installation Tip
When installing Exchange 2000 Server, you might run across the error message in Figure 20-23 when attempting to add the System Attendant resource. This is due to the service account not being delegated permissions to the Exchange organization objects. To fix this problem, run the Delegation of Control wizard by right-clicking on the organization object, then selecting Delegation of Control. Give the service account full permissions to the organization hierarchy, and the System Attendant resource should install thereafter.
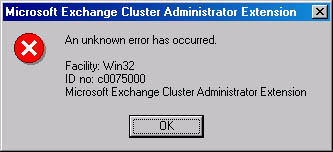
Figure 20-23. Win32 error due to absent organization permissions for the service account
EAN: N/A
Pages: 193
- A View on Knowledge Management: Utilizing a Balanced Scorecard Methodology for Analyzing Knowledge Metrics
- Technical Issues Related to IT Governance Tactics: Product Metrics, Measurements and Process Control
- Governing Information Technology Through COBIT
- The Evolution of IT Governance at NB Power
- Governance Structures for IT in the Health Care Industry
- Chapter IV How Consumers Think About Interactive Aspects of Web Advertising
- Chapter X Converting Browsers to Buyers: Key Considerations in Designing Business-to-Consumer Web Sites
- Chapter XIV Product Catalog and Shopping Cart Effective Design
- Chapter XVI Turning Web Surfers into Loyal Customers: Cognitive Lock-In Through Interface Design and Web Site Usability
- Chapter XVII Internet Markets and E-Loyalty