Configuring WebLogic
Before we get into the implementation details as discussed above, we need to set up some additional WebLogic settings.
Configuring JMS
Connection Factories
Create another connection factory by clicking on the Connection Factories node under JMS in the left-hand pane and then clicking on the Create a new JMS Connection Factory link on the right-hand pane.
Enter mailFactory for the name and JNDI name, leave the rest as default, and click on Create:
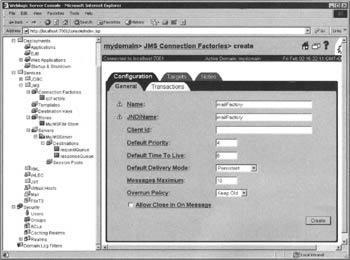
Click on the Target tab and select myserver in the Available list, move it to the Chosen list, and click Apply.
Destinations
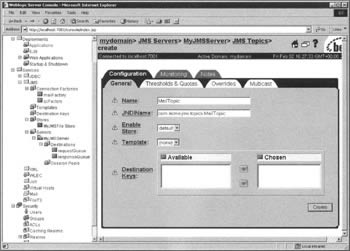
Go to the Destinations node under JMS I Servers I MyJMSServer and click on the link Create a new JMSTopic on the right-hand pane. Specify the name as MailTopic and JNDI name as com.acme.jms.topics.MailTopic, leave the rest as default, and click Create:
Configuring Startup and Shutdown Classes
We next need to configure our startup and shutdown classes for our EJB 1.1 examples.
Under the Deployments node, click on Startup & Shutdown. Next, in the right-hand pane, click on the Create a new Startup Class link. Enter MsgReceiverStartup for the Name value and com.acme. startup.MsgReceiverStartup as the ClassName value. Click the Create button to create this Startup class entry:
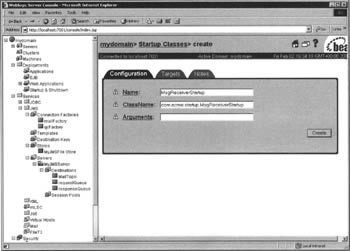
Make sure you go to the Targets tab and add this to the Chosen server selections.
Go back to the Startup & Shutdown screen. Click on this to repeat the same process, only choose the link Create a new Shutdown Class. Enter MyShutdownClass for the Name value and com.acme.startup.MsgReceiverShutdown for the ClassName value. Click the Create button to create this Shutdown class entry:

Again, make sure you go to the Targets tab and add this selection to the Chosen servers selections.
However, in order for WebLogic to be able to load these classes on startup and shutdown, it must be able to find them in its classpath. There are a number of ways to do this but one of the easiest is to edit the cmd file that starts WebLogic to lookup a serverclasses directory under the WebLogic domain. For example, if your WebLogic domain is mydomain then you would edit the following line in startWebLogic.cmd:
set CLASSPATH=.;\lib\weblogic_sp.jar;.\lib\weblogic.jar;. \config\mydomain\serverclasses
Then you would need to copy the com.acme.startup classes (and associated files) into the serverclasses directory.
Configuring the Mail Session
The final step in our configuration process is to create a JavaMail mail session in the WebLogic server.
In the left-hand pane of the console application, choose the Mail node. Click on the Create a new Mail Session link. Enter AcmeMail for the Name value and acme/Mail for the JNDIName value. In the Properties text area, enter the properties as shown. You will need to configure the mail.from and mail.smtp.host values for your own system. Click the Apply button:
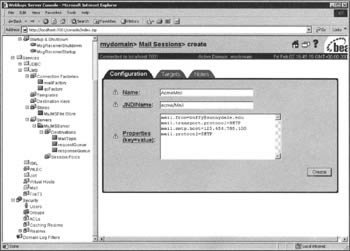
Make sure you go to the Targets tab and add this selection to the Chosen servers selections.
| Important | There is a bug in the current version of the WebLogic 6.0 server (GA) that causes the e-mail example to fail because a transport Provider (SMTP) has not been loaded. The simplest workaround for this is to download the JavaMail package from the Sun website at: http://www/javasoft.com/products/javamila.index.html. Install the JAR file mail.jar in your WebLogic \lib directory and add the JAR file to your classpath such that it comes before you load the WebLogic JAR files: set CLASSPATH=.;. \lib\mail.jar;.\lib\weblogic_sp0.jar;. \lib\weblogic.jar;.\config\mydomain\serverclasses If you are running WebLogic from the startWeblogic.cmd script, edit this file and change the classapth setting as shown above. Make sure you add the mail.jar file first in the classpath. This will cause WebLogic to use the class files in the mail.jar file instead of the class files packaged with the WebLogic server's weblogic.jar file and will load the mail transport providers so that the example application will run successfully. |
EAN: 2147483647
Pages: 154