Implementing the New Case Logging System
The following section describes the classes that make up the implementation of our application.
The MsgReceiverStartup Class
The MsgReceiverStartup class is a WebLogic Startup class that is used to delegate JMS messages to our version 1.1 EJB. The class registers itself as a MessageListener on our JMS topic, within the startup() method code. All incoming messages on this topic will be delivered to the onMessage() implementation of the class.
The class implements three interfaces:
-
IJMSConstants – Our constants' definitions from the previous chapter
-
MessageListener – As our class is going to act as a delegate for receiving asynchronous messages on the JMS topic, we implement MessageListener
-
T3StartupDef – This is a WebLogic-specific proprietary interface that must be implemented by any class that will be registered with WebLogic as a Startup class:
package com.acme.startup; import javax.naming.*; import javax.jms.*; import java.ejb.*; import java.util.*; import java.lang.reflect.*; import java.rmi.RemoteException; import weblogic.common.*; import com.acme.common.*; import com.acme.ejb.mail.*; public class MsgReceiverStartup implements MessageListener, IJMSConstants, T3StartupDef { We next declare a number of constants for the class:
-
JNDI_FACTORY – Defines the name of our JNDI context factory.
-
URL – The location of the WebLogic server (using the "t3" protocol).
-
JMS_FACTORY – Defines the name of our JMS connection factory, "mailFactory", which we have created in the WebLogic server.
-
TOPIC – This is the name of our JMS destination.
public static final String JNDI_FACTORY = "weblogic.jndi.WLInitialContextFactory"; public static final String URL = "t3://localhost:7001" ; public static final String JMS_FACTORY = "mailFactory"; public static final String TOPIC = "com.acme.jms.topics.MailTopic";
In addition there is a member variable for the JMSManager (this is public so it can be called from the Shutdown class that we will see shortly). There is also one private attribute - the T3ServicesDef attribute. This is set automatically by the WebLogic server on creation of the Startup class by a call to the setServices() method defined in the T3StartupDef interface:
public static JMSManager mgr; private T3ServicesDef serv; // Part of WebLogic Start-Up class support //WebLogic Start-Up Class public void setServices (T3ServicesDef s) { serv = s; } The startup() method is invoked on the class by the WebLogic server upon startup of the application server. As you can see, we create a new instance of JMSManager in our constructor. The startup() method initializes the JMSManager and starts it:
public MsgReceiverStartup () { mgr = new JMSManager (JNDI_FACTORY, URL, TOPIC, JMS_FACTORY, PUB_SUB_MODEL) ; } public String startup (String name, Hashtable args) throws Exception { System.out.printIn ("MsgReceiverStartup called on startup..."); if (mgr != null) { mgr.initializeJMS (CONSUMER, this, true); } else { throw new NamingException ("ReceiverStartup - initializeJMS: " + "Naming Exception was thrown"); } return "ok"; } The onMessage() method will be invoked upon delivery of a JMS message. The method performs the following tasks:
-
Gets an initial JNDI context
-
Uses the JNDI context to "lookup" the home interface
-
Uses the home interface to retrieve the remote interface
-
Calls the onMessage() method on the remote interface, passing off the JMS message to the EJB for processing
public void onMessage(Message msg) { try { // Locate the StdMailBean and delegate the JMS Message... Context ctx = mgr.getInitialContext (); StdMailHome mailhome = (StdMailHome) ctx.lookup ("StdMailHome) ctx.lookup ("StdMailBean"); StdMail mail = mailhome. create () ; MapMessage m = (MapMessage)msg; mail.onMessage(msg) ; } catch(NamingException ex) { System.out.printIn("MsgReceiverStartup.onMessage: " + "NamingException was thrown"); ex.printStackTrace () ; } catch (RemoteException ex) { System.out.printIn("MsgReceiverStartup.onMessage: " + "RemoteException was thrown"); ex.printStackTrace () ; } catch (CreateException ex) { System.out.printIn("MsgReceiverStartup.onMessage: " + "CreateException was thrown"); ex.printStackTrace () ; } } }
The MsgReceiverShutdown Class
The MsgReceiverShutdown class is a WebLogic Shutdown class that, as its name implies, and like the Startup class just shown, is called upon shutdown of the WebLogic server. The WebLogic server shutdown operation is typically initiated through the WebLogic console, or via the WebLogic SHUTDOWN command available via the WebLogic command line utility weblogic.Admin, for example:
java weblogic.Admin -url t3://localhost:7001 -username system -password password SHUTDOWN
This class is self-explanatory. In the same way that the Startup class was implemented, we implement the WebLogic-specific, proprietary interface T3ShutdownDef, and its shutdown() method. When invoked, this method simply calls jmsStop() on the JMSManager static variable of the MsgReceiverStartup class:
package com.acme.startup; import java.util.*; import weblogic.common.*; public class MsgReceiverShutdown implements T3ShutdownDef { private T3ServicesDef serv; // Part of Weblogic Start-Up class support public MsgReceiverShutdown () {} // Weblogic Start-Up Class public void setServices (T3ServicesDef s) { serv = s; } public String shutdown (String name, Hashtable args) throws Exception { System.out.printIn("Shutdown - MsgReceiverShutdown class called..."} ; if (MsgReceiverStartup.mgr != null) MsgReceiverStartup.mgr.jmsStop () ; return "ok" ; } } Now that we have created our Delegator class we can look at the EJB itself.
The Mail EJB (1.1)
Our Mail EJB 1.1 will be used to send e-mail alerts to a "HelpDesk" e-mail account. This will demonstrate the use of an EJB in concert with our delegator WebLogic Startup class, by allowing our EJB to accept an incoming JMS message from our delegate, extracting the contents of the message, and creating and sending an e-mail message using JavaMail and the parameters from the JMS message.
Our EJB will contain the following files:
-
StdMail.java – This is our remote interface
-
StdMailHome.java – This is our home interface
-
StdMailBean.java – The bean class containing our methods for accepting a JMS message, and for creating and sending an e-mail message usingJavaMail
-
ByteArrayDataSource.java – This class is a support class that converts a string into a DataSource
-
ejb-jar.xml – The deployment descriptor file containing our bean's deployment attributes and properties
-
weblogic-ejb-jar.xml – A WebLogic-specific XML file that contains deployment attributes unique and specific to the WebLogic server
The StdMail Interface
This file contains our EJB's remote interface definition. It contains only one method signature, the onMessage() method, which will be called by the WebLogic Startup class to delegate the handling of a JMS message to the EJB (remember, since the EJB itself cannot be called directly by JMS, the WebLogic Startup class will do this for us - receiving the incoming JMS message — but still allowing our EJB to handle the processing of the contents of the JMS message through calls to the onMessage() method defined in the bean's remote interface):
package com.acme.ejb.mail; import javax.ejb.EJBObject; import javax.jms.Message; import java.rmi.RemoteException; public interface StdMail extends EJBObject { public boolean onMessage(Message msg) throws RemoteException; }
The StdMailHome Interface
This file contains the EJB home interface. Since this is a stateless session bean, it contains only the create() method:
package com.acme.ejb.mail; import javax.ejb.EJBHome; import javax.ejb.CreateException; import java.rmi.RemoteException; public interface StdMailHome extends EJBHome { public StdMail create () throws RemoteException, CreateException; }
The StdMailBean Class
StdMailBean is the bean implementation class, which contains the logic for our EJB. Since it is a stateless session bean, it implements the javax.ejb.SessionBean interface. The EJB has a home interface, StdMailHome, and a remote interface, StdMail, which we saw up above.
This class contains the implementation of our own onMessage() method, and additional, generic, methods for sending an e-mail message. The e-mail in our example is generated by the contents of the message received in onMessage().
Our bean class implements the SessionBean interface, and we also declare a couple of constants to use for defaults:
package com.acme.ejb.mail; import java.io.*; import java.util.*; import javax.ejb.*; import javax.jms.*; import javax.naming.*; import javax.activation. DataHandler; import javax.mail.*; import javax.mail.internet.*; import java.rmi.RemoteException; public class StdMailBean implements SessionBean { private static final boolean VERBOSE = true; private static final String MAIL_HOST = "mail.smtp.host"; private static final String MAIL_SUBJECT = "Help Request"; private static final String JNDI_MAIL = "acme/Mail"; private SessionContext context; private String message; Then we have a series of standard EJB callback methods, which we won't be implementing:
public void ejbCreate () {} public void ejbRemove () {} public void ejbActivate () {} public void ejbPassivate () {} public void setSessionContext (SessionContext ctx) { context = ctx; } Next we have the onMessage() method. As you can see, it accepts a JMS message much like the version of the method defined in MessageListener, although ours returns a Boolean result to indicate status.
| Note | Remember, though, that even though the bean's method is also named onMessage() this method is not being called by JMS - it is only a naming convention we have used so that it is familiar. |
First, we check the message type in our if block, to make sure it is of type MapMessage and then print out some status messages to the console showing the content of our message body values. We extract the values into local variables that we will use in calling our method to send the e-mail:
public boolean onMessage (javax.jms.Message msg) { if (msg instanceof MapMessage) { try { System.out.printIn("Received new message : ") ; MapMessage message = (MapMessage) msg ; String location = message.getString ("location") ; if (location != null) System.out.printIn(" LOCATION = " + location) ; String problem = message.getString ("description"); if (problem != null) System.out.printIn(" PROBLEM = " + problem) ; String name = message.getString("name") ; if (name != null) System.out.printIn(" NAME = " + name); String helpdeskEmail = message.getString("helpdesk") ; if (helpdeskEmail != null) System.out.printIn(" HELPDESK EMAIL = " + helpdeskEmail) ; String caseID = message.getString("caseid") ; if (caseID != null) System.out.printIn(" CASE ID = " + caseID) ; String subject = MAIL_SUBJECT; Next we call a support method createBody() that will format the body of the message for HTML, and then we pass the extracted message body content to the bean's sendMail() method that will create and send our e-mail alert:
String body = createBody(problem, name, location, caseID); // Try and send this message via JavaMail... boolean val = sendMail (helpdeskEmail, subject, body, true); if (!val) System.out.printIn ("StdMailBean.sendMail returned with error") ; return val; } catch(JMSException ex) { ex.printStackTrace() ; } } return false; } The first thing our sendMail() method does is look up a JavaMail session from the WebLogic server that we configured earlier:
public boolean sendMail (String to, String subject, String body, boolean debug) { boolean result = false; try { // Get Mail Session from WebLogic Server... InitialContext ctx = new InitialContext(); javax.mail.Session session = (javax.mail.Session) ctx.lookup(JNDI_MAIL); We then call setDebug() on our session, which will display debug messages and output to the WebLogic server standard output — this will allow us to see the operations performed by the JavaMail session, so that we can see what's happening as our e-mail is sent out:
// Set Debug session.setDebug(debug); // Create new Message javax.mail.Message msg = new javax.mail.internet.MimeMessage(session) ;
The next set of operations construct our e-mail's header and content - the "To", "From", "Subject", and "Body" fields of the e-mail message. We call one support method, parseEmailAddress() to convert our string-based addresses into javax.mail.internet.InternetAddress types - the support method will parse multiple, comma separated addresses out of the string, if necessary:
if (msg != null) System.out.printIn("Created Message...") ; if (to == null || to.trim ().equals(" ")) return false; javax.mail.internet.InternetAddress[] addresses = parseEmailAddress(to) ; if (addresses != null) { System.out.printIn("TO = " + addresses[0].getAddress()) ; msg.setRecipients(javax.mail.Message.RecipientType.TO, addresses); } else { System.out.printIn("MailBean.sendMail: Error, Invalid " + "\"To\" E-Mail address list\n") ; return result ; } // Set the message... if (subject != null) { msg.setSubject(subject) ; } else { msg.setSubject("No Subject"); } // Set the date... msg.setSentDate(new Date()); // Set the message body... if (body == null) // Provide simple body 0x20 "space"... body = " " ; Finally, we set the "header" type of our e-mail - in this case we are creating an HTML mail message so we set the header type to "sendhtml". The next method packages the message content into an HTML template, which supplies the proper tags for wrapping the HTML formatted content of the body (supplying the <HTML><HTML> tags, wrapping the body in a <BODY>/<BODY> tag set, etc.).
Then the static method send() is called on the Transport class, which will locate a transport provider (such as SMTP) and send the e-mail message that we have created:
msg.setHeader("X-Mailer", "sendhtml") ; packageBody(msg, body) ; // Now send it; Transport.send(msg) ; if (debug) System.out.printIn("Sent email message \" " + subject + "\" to \" " + to + "\" ") ; result = true ; } catch(IOException ex) { System.out.printIn("StdMailBean.sendMail: EMail IOException") ; ex.printStackTrace () ; } catch(NamingException ex) { System.out.printIn("StdMailBean.sendMail: EMail NamingException") ; ex.printStackTrace () ; } catch(MessagingException ex) { System.out.printIn("StdMailBean.sendMail: EMail " + "MessagingException") ; ex.printStackTrace () ; } return result ; } The parseEmailAddress() method is used to create an array of InternetAddress types out of our string. If multiple, comma delimited e-mail addresses are supplied, this will convert them to a JavaMail InternetAddress, returning an array of the addresses extracted from the string:
public javax.mail.internet.InternetAddress[] parseEmailAddress(String addresses) { javax.mail.internet.InternetAddress[] addr = null ; StringTokenizer tokenizer = new StringTokenizer(addresses, ",", false); int toks = tokenizer.countTokens() ; try { if (toks <= 1) { System.out.printIn("Tokens <= 1") ; addr = new javax.mail.internet.InternetAddress[1] ; addr[0] = new javax.mail.internet.InternetAddress(addresses); } else { System.out.printIn("Tokens > 1") ; addr = new javax.mail.internet.InternetAddress[toks] ; int index = 0 ; while (tokenizer.hasMoreTokens()) { String temp = (String) tokenizer.nextToken () ; temp = temp.trim () ; addr[index++] = new javax.mail.internet.InternetAddress(temp) ; } } } catch(AddressException e) { // Log... e.printStackTrace() ; } return addr; } packageBody() wraps the body of our e-mail message in a simple HTML template which supplies the <HTML> and <BODY> tags, and a <TITLE> and then calls setDataHandler(), which supplies a new Data Handler object to the mail Mime message – with the data handler wrapping the Mime message content and type:
protected void packageBody (javax.mail.Message msg, String body) throws MessagingException, java.io.IOException { String line; String subject = msg.getSubject(); StringBuffer sb = new StringBuffer (); sb.append("<HTML>\n"); sb.append("<HEAD>\n"); sb.append("<TITLE>\n"); sb.append(subject + "\n"); sb.append("</TITLE>\n"); sb.append("</HEAD>\n"); sb.append("<BODY>\n"); sb.append(body); sb.append("\n"); sb.append("</BODY>\n"); sb.append("</HTML>\n"); msg.setDataHandler(new DataHandler( new ByteArrayDataSource(sb.toString(), "text/html"))); } We finish up with the createBody() method. This is another support method that takes the "problem" description of our help request, and formats it in HTML:
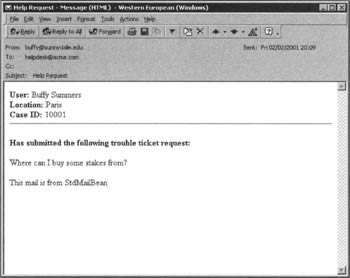
protected String createBody(String problem, String name, String location, String caseID) { StringBuffer buf = new StringBuffer(); buf.append("User: \n"); buf.append(name + "\n"); buf.append("<BR>\n"); buf.append("Location: \n"); buf.append(location + "\n"); buf.append("<BR>\n"); buf.append("Case ID: \n"); buf.append(caseID + "\n"); buf.append("<HR><BR>\n"); buf.append("Has submitted the following trouble ticket " + "request:\n"); buf.append("<BR><BR>\n"); buf.append(" " + problem + "\n"); buf.append("<BR>\n"); buf.append("<BR>\n"); buf.append("This mail is from StdMailBean\n"); return buf.toString(); } }
The ByteArrayDataSource Class
The ByteArrayDataSource class is a support class with code taken from the example source code provided with the WebLogic server. This is a support class that converts a string into a DataSource:
* * $Id: ByteArrayDataSource.java, v 1.6 2000/02/16 00:18:16 brydon Exp $ * Copyright 1999 Sun Microsystems, Inc. All rights reserved. * Copyright 1999 Sun Microsystems, Inc. Tous droits r$eAserv$eAs. */ package com.acme.ejb.mail; import java.io.ByteArrayInputStream; import java.io.InputStream; import java.io.IOException; import java.io.OutputStream; import java.io.UnsupportedEncodingException; import java.util.Date; import javax.activation.DataSource; /** * Used to create a DataSource for the mail message. */ public class ByteArrayDataSource implements DataSource { private byte[] data; // data for mail message private String type; // content type/mime type /** * Create a DataSource from a String * @param data is the contents of the mail message * @param type is the mime-type such as text/html */ public ByteArrayDataSource(String data, String type) { try { // Assumption that the string contains only ascii // characters ! Else just pass in a charset into this // constructor and use it in getBytes() this.data = data.getBytes("iso-8859-1"); } catch (UnsupportedEncodingException uex) { } this.type = type; } //DataSource interface methods public InputStream getInputStream() throws IOException { if (data == null) throw new IOException("no data"); return new ByteArrayInputStream(data); } public OutputStream getOutputStream() throws IOException { throw new IOException("cannot do this"); } public String getContentType() { return type; } public String getName() { return "dummy"; } } This code is used to help package the string containing our body into a DataSource that we can set as the content of our Mime message in the sendMail() method of our StdMailBean.
| Note | The WebLogic server ships with a set of example source code that provides an excellent reference for developing J2EE applications on the WebLogic platform. The sample source for WebLogic 6.0 is available under the standard installation directory at: %weblogic_install%\samples\. |
The Deployment Descriptors
The EJB 1.1 and EJB 2.0 specifications require that a deployment descriptor file called ejb-jar.xml be packaged with an EJB archive. To properly package our EJB we need to create this deployment descriptor file. As we are using WebLogic, we also have to create the file weblogic-ejb-jar.xml for archive. This file is needed by the WebLogic server (this file is a WebLogic construct, and is not part of the EJB specification) and contains specific properties for fully configuring and registering the EJB in the WebLogic server environment.
ejb-jar.xml
This file includes information that the server uses to configure the EJB within the server environment; the bean's home interface, the bean's remote interface, the type of EJB (ours is a session bean), transaction information that instructs the EJB container on how the EJB participates in transactions, and references to resources the EJB uses, such as our JavaMail session, etc.:
<?xml version="1.0" encoding="Cp1252"?> <!DOCTYPE ejb-jar PUBLIC "-//Sun Microsystems, Inc.//DTD Enterprise JavaBeans 1.1//EN" "http://java.sun.com/j2ee/dtds/ejb-jar_1_1.dtd"> <ejb-jar> <enterprise-beans> <session> <description>EJB 1.1 Mail Bean</description> <ejb-name>StdMailBean</ejb-name> <home>com.acme.ejb.mail.StdMailHome</home> <remote>com.acme.ejb.mail.StdMail</remote> <ejb-class>com.acme.ejb.mail.StdMailBean</ejb-class> <session-type>Stateless</session-type> <transaction-type>Container</transaction-type> <resource-ref> <description>description</description> <res-ref-name>mail/MailSession</res-ref-name> <res-type>javax.mail.Session</res-type> <res-auth>Container</res-auth> </resource-ref> </session> </enterprise-beans> <assembly-descriptor> <container-transaction> <method> <ejb-name>StdMailBean</ejb-name> <method-name>*</method-name> </method> <trans-attribute>NotSupported</trans-attribute> </container-transaction> </assembly-descriptor> </ejb-jar>
Let's examine some of the important properties of the file:
-
The <resource-ref> tag wraps the description of an EJB reference to an external resource, in this case our JavaMail session:
-
<res-ref-name> This is the "name" of the resource manager connection factory.
-
<res-type> This specifies the name of the data source - this is the Java interface or class expected to be implemented by the data source, since this is a JavaMail data source ours is javax.mail. Session.
-
<res-auth> This specifies whether the EJB container signs on to the resource manager on behalf of the EJB or the EJB itself signs on to the resource manager. In our case we set this to "Container" – the other option for this tag is "Application".
-
weblogic-ejb-jar.xml
Along with the standard deployment descriptor information required by the EJB specification in the ejb-jar.xml file, the WebLogic server also requires its own information for deploying the EJB within the WebLogic server environment. Here is the weblogic-ejb-jar.xml file:
<?xml version="1.0"?> <!DOCTYPE weblogic-ejb-jar PUBLIC "-//BEA Systems, Inc.//DTD WebLogic 6.0.0 EJB//EN" "http://www.bea.com/servers/wls600/dtd/WebLogic-ejb-jar.dtd"> <weblogic-ejb-jar> <weblogic-enterprise-bean> <ejb-name>StdMailBean</ejb-name> <stateless-session-descriptor> <pool> <max-beans-in-free-pool>200</max-beans-in-free-pool> <initial-beans-in-free-pool>20</initial-beans-in-free-pool> </pool> </stateless-session-descriptor> <reference-descriptor> <resource-description> <res-ref-name>mail/MailSession</res-ref-name> <jndi-name>mail/Session</jndi-name> </resource-description> </reference-descriptor> <jndi-name>StdMailBean</jndi-name> </weblogic-enterprise-bean> </weblogic-ejb-jar>
This file uses the <ejb-name> defined name of the ejb-jar.xml file (in our case "StdMailBean") to configure the bean in the WebLogic server. Again, let's review the important information here:
-
The <stateless-session-descriptor> tag contains configuration settings for a stateless session bean such as information on the object pool settings for our bean:
-
<max-beans-in-free-pool> Instructs the EJB container on the maximum number of beans that will be cached in the object free pool.
-
<initial-beans-in-free-pool> The number of beans that will be created in the free pool upon initialization.
-
-
The <jndi-name> tag contains the actual name under which the bean's home interface will be registered in the JNDI directory service. In the case of our bean, the name its home interface will be registered under is StdMailBean.
-
The <reference-descriptor> wraps an external reference set up in the ejb-jar.xml file.
-
The <res-ref-name> is the same name as the resource reference defined in the <res-ref-name> tag defined in the ejb-jar.xml file.
-
The <jndi-name> is the name of the resource as it is registered in JNDI.
-
The Web Application
For our web application, we're going to add on to our Chapter 6 example application. All we need to do is add a new custom JSP tag and modify the application to use our new tag instead of the old one.
The CreateCaseEJBTag Class
This is the main change in the application. The CreateCaseEJBTag is a JSP tag library that receives the data via the CreateCase.jsp and uses the JMSManager class to send the form data within a MapMessage to our JMS topic. This tag will be replacing the CreateCaseTag from the previous chapter.
First, it retrieves a number of initialization parameters from the servlet context that are configured in the web.xml file:
package com.acme.user; import javax.servlet.jsp.*; import javax.servlet.jsp.tagext.*; import javax.servlet.*; import javax.servlet.http.*; import javax.jms.*; import com.acme.common.*; public class CreateCaseEJBTag extends TagSupport { public int doStartTag () throws JspTagException { try { ServletContext ctx = pageContext.getServletContext(); HttpServletRequest req = (HttpServletRequest)pageContext.getRequest(); String jmsFactory = ctx.getInitParameter("jmsFactory"); System.out.println("jmsFactory: " + jmsFactory); String ctxFactory = ctx.getInitParameter("ctxFactory"); System.out.println("ctxFactory: " + ctxFactory); String qcFactory = ctx.getInitParameter("qcFactory"); System.out.println("qcFactory: " + qcFactory); String requestQueue = ctx.getInitParameter("requestQueue"); System.out.println("requestQueue: " + requestQueue); String provURL = ctx.getInitParameter("provURL"); System.out.println("provURL: " + provURL); String topic = ctx.getInitParameter("topic"); System.out.println("topic: " + topic); String helpDeskEmail = ctx.getInitParameter("HelpDesk"); System.out.println("helpDeskEmail: " + helpDeskEmail); Then we need to create and initialize two JMSManager objects. We need to create two, because unlike the previous chapter we are publishing new messages to a topic and not a queue, however, to make sure that the Case Management system still works we still need to post to the queue:
JMSManager topicMgr = new JMSManager(ctxFactory, provURL, topic, jmsFactory, IJMSConstants.PUB_SUB_MODEL); JMSManager queueMgr = new JMSManager(ctxFactory, provURL, requestQueue, qcFactory, IJMSConstants.P2P_MODEL); topicMgr.initializeJMS(IJMSConstants.PRODUCER, null, true); queueMgr.initializeJMS(IJMSConstants.PRODUCER, null, true);
Once we have the Manager objects, we can construct the message from the HTTP request and send it:
MapMessage msg = queueMgr.createMapMessage(); String caseId = IDGenerator.getNextId); msg.setString("caseid", caseId); msg.setString("name", req.getParameter("name")); msg.setString("location", req.getParameter("location")); msg.setString("description", req.getParameter("description")); msg.setString("helpdesk", helpDeskEmail); topicMgr.sendMessage(msg, true); topicMgr.closeJMS(); queueMgr.sendMessage(msg, true); queueMgr.closeJMS(); pageContext.setAttribute("caseId", caseId); return EVAL_BODY_INCLUDE; } catch(Exception e) { System.out.println("Exception in doStartTag: CreateCaseEJBTag"); System.out.println(e.getClass() ); System.out.println(e.getMessage() ); e.printStackTrace (); throw new JspTagException(e.getMessage()); } } public int doEndTag () throws JspTagException { return EVAL_PAGE; } }
The web.xml Descriptor
As you recall from the previous chapter, we add our servlet and JSP configuration information to the standard J2EE web application configuration file web.xml, this contains our application initialization arguments, URL mapping, etc. We need to modify the web.xml file to add look as follows:
<?xml version="1.0" encoding="Cp1252"?> <!DOCTYPE web-app PUBLIC "-//Sun Microsystems, Inc.//DTD Web Application 2.2//EN" "http://java.sun.com/j2ee/dtds/web-app_2_2.dtd"> <web-app> <display-name>ACME</display-name> <description>ACME Helpdesk System</description> . . . <context-param> <param-name>jmsFactory</param-name> <param-value>mailFactory</param-value> </context-param> <context-param> <param-name>topic</param-name> <param-value>com.acme.jms.topics.MailTopic</param-value> </context-param> <context-param> <param-name>HelpDesk</param-name> <param-value>helpdesk@acme.com</param-value> </context-param> . . . </web-app> | Important | Be sure to change the HelpDesk parameter to a valid e-mail address of your own. |
We next need to modify our user.tld file to add our CreateCaseEJBTag.
The user.tld Descriptor
We need to add our CreateCaseEJBTag to our tag library definition file user.tld. We will modify it as follows:
<?xml version="1.0" ?> <!DOCTYPE taglib PUBLIC "-//Sun Microsystems, Inc.//DTD JSP Tag Library 1.1//EN" "web-jsptaglib_1_1.dtd"> <taglib> <tlibversion>1.0</tlibversion> <jspversion>1.1</jspversion> <shortname>User</shortname> <info> This tag library contains tag extensions </info> <tag> <name>createCase</name> <!--<tagclass>com.acme.user.CreateCaseTag</tagclass> --> <tagclass>com.acme.user.CreateCaseEJBTag</tagclass> <teiclass>com.acme.user.CreateCaseTagVariableInfo</teiclass> <bodycontent>JSP</bodycontent> </tag> <tag> <name>caseHistory</name> <tagclass>com.acme.user.CaseHistoryTag</tagclass> <bodycontent>JSP</bodycontent> </tag> </taglib>
Deploying the System
The application uses both standard J2EE features, and one proprietary feature of the WebLogic application server - the WebLogic Startup class. You could deploy the web application features on one server, JMS on another, and the EJBs on a third, if you so desired. As with the previous chapter, though, we will run ours on the same WebLogic instance using a single Enterprise Application Archive (EAR) file. We'll explain how to build, deploy, and run the applications below.
Compiling the Classes
If you download the source code for this chapter from the Wrox web site (http://www.wrox.com) you will be provided with a series of build scripts that will compile and deploy the application into your WebLogic server. Simply edit them to point to your WebLogic installation and then run archivell.bat.
However, a guide to the compilation and deployment process is provided here.
Currently, our application comprises three parts:
-
The WebLogic Startup classes
-
The web application
-
The EJB application
The WebLogic Startup Classes
The Startup classes need the following directory structure:
com/ acme/ common/ IJMSConstants.class JMSManager.class ejb/ mail/ StdMail.class StdMailBean.class StdMailHome.class startup/ MsgReceiverStartup.class MsgReceiverShutdown.class
We recommend that these files be simply copied into a serverclasses subdirectory of your WebLogic domain. In other words:
c:\bea\wlserver6.0\config\mydomain\serverclasses\com\...
The Web Application
The web application needs the following directory structure:
WEB-INF/ web-xml user.tld classes/ com/ acme/ common/ IJMSConstants.class JMSManager.class user/ CaseHistoryTag.class CaseResponse.class CreateCaseEJBTag.class CreateCaseTagVariableInfo.class IDGenerator.class ResponsePool.class banner.jsp casehistory.jsp createcase.jsp index.jsp login.jsp newcase.jsp
These files should be packaged as a WAR file, called for example, help.war.
The EJB Application
The EJB application should have the following directory structure:
com/ acme/ ejb/ mail/ ByteArrayDataSource.class StdMail.class StdMailBean.class StdMailHome.class META-INF/ ejb-jar.xml weblogic-ejb-jar.xml
These files should be packaged together into an EJB JAR file, called for example std_ejb_mail.jar.
WebLogic also requires that the various stubs and skeletons be generated for EJBs to be deployed in its container. It provides a utility called ejbc in the weblogic.jar file for this purpose. A standard example of its use would be:
java -classpath c:\bea\wlserver6.0\lib\weblogic.jar weblogic.ejbc std_ejb_mail.jar ejb_mail.jar
Creating the Enterprise Archive File
The enterprise archive file can simply be created by packaging up the WAR file and the EJB JAR file(s) into a single archive.
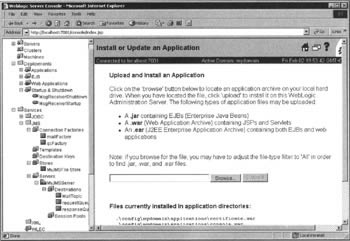
This EAR file can then be copied to your WebLogic domain's applications directory. Or you can use the WebLogic administration console application to deploy your EAR:
Running the Application
To test out our EJB application, start the WebLogic server running and browse to http://localhost:7001/help. This will present you with the same web application as we saw in the previous chapter.
Submit a new case to the system, and watch the output in the server window to see the EJBs in action:
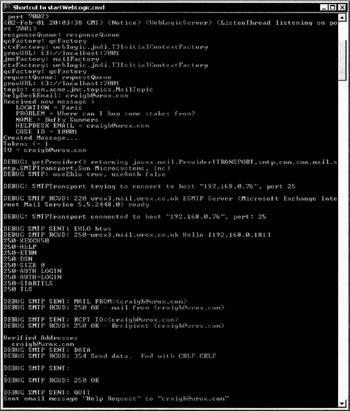
If you check the e-mail account for the helpdesk you should find you have received the corresponding mail:
EAN: 2147483647
Pages: 154