Painterly Illustration
|
Painterly illustration effects differ from printmaking effects in the sense that there is more evidence of the artist's hand. Where printmaking is more of a mechanical transfer of ink from plate to substrate, illustrational effects typically reveal evidence of drawing or painting. Although you can set up a lot of the effect using filters or Photoshop effects, at some point you'll have to create a blank layer and start drawing. Working on a separate layer allows you to erase and redraw as many times as necessary without changing the underlying marks or lines. This freedom should allow you to draw more expressively, knowing that you have a reliable safety net. On the other hand, it should also make you more discerning. Don't be easily satisfied with your first few attempts unless you've really nailed it. In fact, even if you think it's perfect on the first try, create a few additional layered attempts and compare the results. It's pretty hard to create any meaningful results without a digitizing tablet and stylus. The movement of the mouse is too unnatural and doesn't offer adequate control. Use the mouse to follow along and get the general idea of how to achieve the effect, but don't expect your best results with this effect until you've invested in a drawing tablet. Ghiberti Head
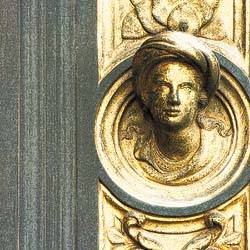
About the Original Image Michelangelo described Ghiberti's massive carved doors as "the Gates of Paradise." The immense doors that adorn Saint John's Baptistry in Florence are covered with numerous relief sculptures depicting biblical scenes and figurative details. The photo I'm starting with is of a small decorative adornment on the right side of the south doors, roughly six inches high. Although some of the sculpted heads are significantincluding a Ghiberti self-portraitI'm not sure exactly who this might be. I do know that it's an example of the excessively beautiful and detailed ornamentation that fills every corner and side street of Florence. Building the EffectThis effect starts by using the same Filter Gallery settings I used in the "Printmaking Effects" exploration. It's a good example of how one idea or direction can open up other possibilities. I started by dragging the Background layer to the Create New Layer icon in the Layers palette to create a duplicate image layer. I then selected Filter, Filter Gallery, opened the Artistic filter grouping in the cen ter column, and selected the Fresco filter. I set the Brush Size to 2, Brush Detail to 8, and Texture to 1. I then clicked the New Effect Layer icon at the bottom-right of the dialog box and chose the Poster Edges filter, which is also in the Artistic filter grouping. I set the Edge Thickness to 2, Edge Intensity to 1, and Posterization to 2. I repeated the process to add a third filter: I selected Diffuse Glow from the Distort filter grouping, set the Graininess to 6, Glow Amount to 1, and Clear Amount to 19. After clicking OK to apply the filter effects, I double-clicked the new layer in the Layers palette to highlight it. I renamed it DG PE F as sequential shorthand for the filters I'd applied to the layer (see Figure
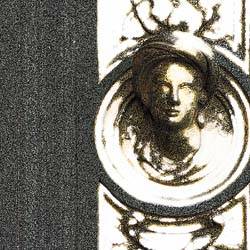
I liked the grain that resulted in the left side, in the area with the green vertical stripes. But in this case, I felt that the dark and heavy modulations were filling in the shadows with a dull, flat gray. The color felt a bit heavy around the face, which worked against the delicate and ornate details. To lighten things up, I started by setting the filtered layer's opacity to 75% and its blending mode to Overlay. From there, I selected Curves from the Adjustment Layer pull-down menu to create a Curves adjustment layer and dragged a single Input/Output point to Input: 41, Output: 76 (see Figure
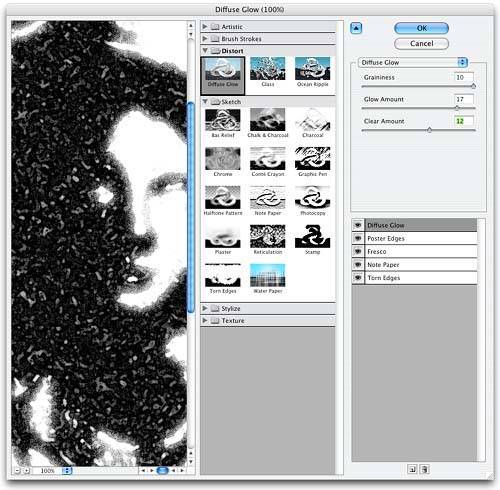
Adding a Graphic Effect to the FaceBecause the green striped area on the left was working so well, I decided to try to infuse that graphic effect on the right side. I dragged the Background layer to the Create New Layer icon to create another duplicate image layer and positioned it at the top of the layer stack, above the Curves adjustment layer. I then selected Filter, Filter Gallery, to relaunch the Filter Gallery dialog box. It opened with the Diffuse Glow, Poster Edges, and Fresco filters already active and set to their previous settings. I clicked the New Effect Layer icon to create a new filter effect. To add the bright bleached effect, I selected Note Paper from the Sketch filter grouping and dragged the filter tile to the bottom of the effects stack on the right. I set the Image Balance slider for this effect to 17, Graininess to 8, and Relief to 0. I then clicked the New Effect Layer icon a second time and selected Torn Edges, which is also in the Sketch filter grouping. I set the Image Balance to 37, Smoothness to 11, and Contrast to 23. I then selected the Diffuse Glow tile in the lower-right area of the dialog box to modify its settings: I increased Graininess to 10, increased Glow Amount to 17, and set Clear Amount to 12. After clicking OK to apply the filter effects (see Figure
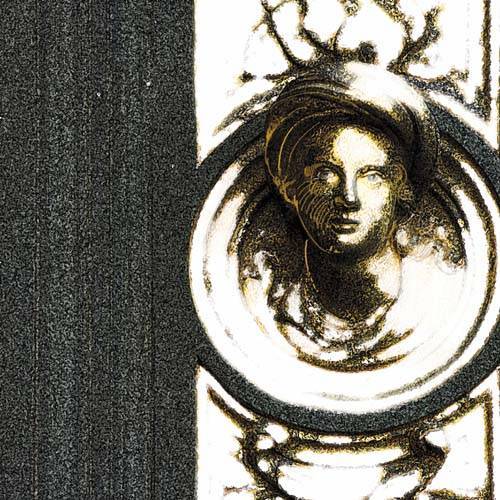
 To integrate the filter effect with the composite image, I highlighted the second filter layer in the Layers palette and selected Pin Light from the Blending Modes menu. This blending mode retained only the white areas on the selected layer, leaving the green stripes on the right and some of the facial features. To bring back more of the face details, I highlighted the DG PE F TE NP layer and clicked the Add Layer Mask icon in the Layers palette. I selected a 35-pixel bush, set the foreground color to a middle gray, and set Opacity in the Options bar to 27%. Because black in a mask conceals the current layer and white reveals it, a middle gray will reveal the underlying image as a transparency (see Figure
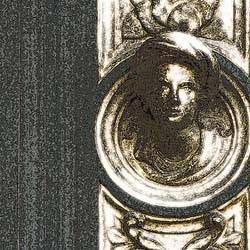
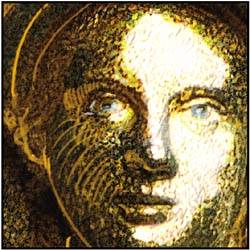
Drawing Additional DetailNow it was time to add the drawing. I created a new layer by clicking the Create New Layer icon in the Layers palette, and dragged it to the top of the stack. Using my digitizing tablet, I selected the Brush tool with a 9-pixel hard-edged brush. I held down the Option key (the Alt key in Windows), momentarily turning the Brush icon into the Eyedropper tool, and sampled a medium orange from the fringe at the edge of the black texture around the face. I drew outlines to define the neck and turban, as well as a series of hatched lines to articulate the cheek and eye socket. To clean up some of the marks, I switched to the Eraser tool with the same brush tip and erased line ends or edges to make them feel more fluid and natural. Remember that you can also run the eraser across a line to create a dotted-line effect, as I did in the line defining the turban above the figure's left eye (see Figure
About the EyesI finished the piece by adding details around the eyes and nose. Because these details overlapped other marks, I created new layers to isolate the activity: I created a new layer to draw in reflected light details around the nose and lip, erasing and modifying the marks until I achieved the right balance. For the eyes, I created an additional layer and drew in the blue coloring, and then added yet another layer just for the highlights (see Figure
|

EAN: 2147483647
Pages: 141