Shift Depth of Field
|
|
|
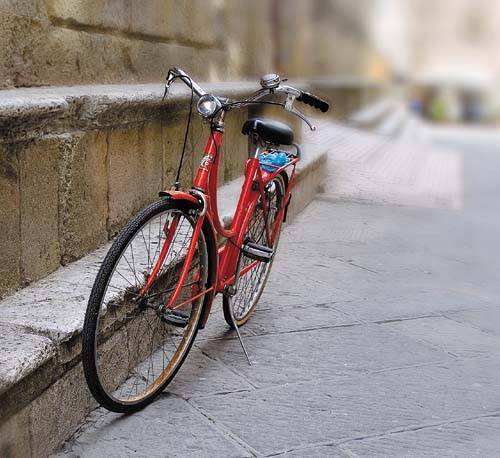
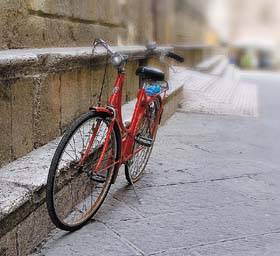
There was a time when creating extreme depth of field effects was a task reserved for view cameras with ground-glass viewing backs that could tilt and swivel to throw various sections of the image out of focus. This was important because controlling focus (or the lack thereof) was a great way to emphasize objects or specific sections of the frame. Photoshop makes fast and easy work of depth-of-field effects, especially if you set up the image properly and understand how the camera interprets focus and detail. Much of the theory is covered in Chapter 2, "Digital Exposure," but the practical application is to understand that the focus point is actually plotted along a plane that runs through the composition. It's usually parallel with the camera's film plane, although the view camera's shifting film back goes against this axiom, and is exactly how it achieves its control over extreme focus. With this in mind, I like to run the focus plane slightly askew from traditional linear perspective where things just get softer as they move away from the camera. Instead I throw things out of focus at a slight angle. In this exploration, the blurred background creeps up the wall on the left in a way that suggests that the focus plane is running slightly parallel with the wall. Don't get too technical or scientific as you make these decisions, but be aware of how the traditional tools achieve their effects if you want a convincing result. Red Bike
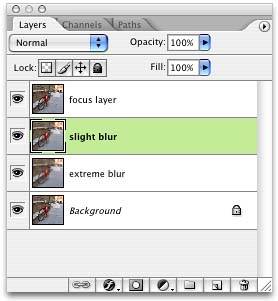
About the Original Image A red bicycle in front of the town hall in Pienza is the subject for this exploration. Considering the dominant gray stonework in most Tuscan towns, a bright spot of color is pretty irresistible. I chose a low point of view and did my best to emphasize the perspective that ran along the wall, anchoring the back of the composition with the café in the background. When selecting an image for this exploration, be sure to find one that has detail in the full focusrange, from foreground to middle ground, to background. For example, landscapes where everything is in the distance don't work well. This image had detail in the street, in the middle ground steps, and in the background café. I could control the degree of focus at each of these points, as dictated by the composition. Building the EffectI began by creating three layers of the main image. One layer has everything is in sharp focus; the second is blurred slightly and is used to represent the blur in the middleground. The third layer has a more extreme blur effect and represents the background focus level. To keep the layer contents straight as I'm working, I double-clicked each layer name to highlight it and renamed them Focus Layer, Slight Blur, and Extreme Blur. Finally, I arranged the layer sequence from top to bottom: Focus Layer, Slight Blur, Extreme Blur (see Figure
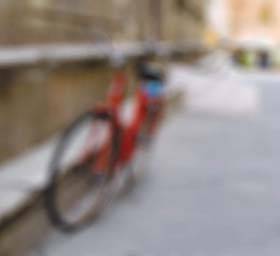
Using Lens BlurFor this exploration, I decided to use the Lens Blur filter instead of the Gaussian Blur filter. Lens Blur is supposed to emulate the look of camera optics, including the impact of iris shapes, iris blade curvature, and iris rotation. I'm not sure if the wealth of controls actually delivers a superior result, or if you can really tell the difference between a blur with a six-blade iris as opposed to an eight-blade iris, but the filter does produce an excellent result. I clicked the Slight Blur layer in the Layers palette and selected Filter, Blur, Lens Blur. In the dialog box that appeared, I focused all my attention on the Iris section, ignoring the other options. I set the iris shape to an 8-sided iris by selecting Octagon (8) from the Shape pop-up menu; I set the Blade Curvature to 21, and Rotation to 65. The main control for the effect is Radius, which I set to 42 to create the blur effect I was looking for in the middleground area. I clicked OK to apply the effect. I then selected the Extreme Blur layer and relaunched the Lens Blur dialog box. I left all other settings the same as before, and adjusted the Radius slider to 78 (see Figure
I clicked the visibility icon for the Slight Blur layer to temporarily hide it, and then selected the Focus Layer. I clicked the Add Layer Mask icon at the bottom of the Layers palette to add a mask, and selected the Gradient tool from the toolbox. I set the foreground colors to black and white, clicked the Gradient Picker in the Options bar, and selected the Foreground to Background preset swatch. After selecting the Linear Gradient option in the Options bar, I dragged a gradient from the upper right to the middle of the image, masking the Focus Layer so that the Extreme Blur layer was visible in the upper-right half of the image, and the Focus Layer dominated the lower-left half. To adjust the orange building in the background, I added a Hue/Saturation adjustment layer above the Extreme Blur layer and set the Saturation to -56 and the Lightness to +22 to tone down the bright orange (see Figure
To add the moderate blur to the middle ground, I turned on visibility for the Slight Blur layer and added another layer mask. I selected the Gradient tool with the same settings as before and drew a gradient starting in the extreme upper-right corner to the top of the central steps. This gradient created a mask for the upper-right corner, through which the Extreme Blur layer was still visible (see Figure
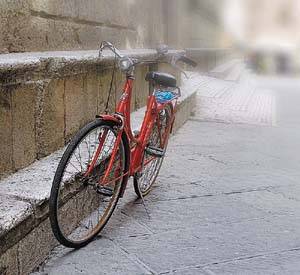
Selecting the BikeI wanted to bring back the color and sharpness for the entire bike, and the easiest way to do this was to create a path around the entire object, which I could convert to a selection repeatedly as needed. By selecting the Path tool with the Paths option selected in the Options bar, I started drawing the shape of the bike. I converted corner points from curved to angled by Option-dragging (Alt-dragging in Windows) on the point itself. The I closed the outside shape of the bike and then created smaller path shapes for the negative space areas around the seat and handlebars. When the paths were complete, I double-clicked the work path tile in the Paths palette and named the path Bike. With the Bike path active (pun intended), I chose Make Selection from the Paths palette menu. In the Make Selection dialog box that appeared, I left the Feather Radius set to 0, enabled the Anti-aliased check box, and chose New Selection in the Operation section. I clicked OK to create the selection. With the selection active, I highlighted the Mask icon for the Focus Layer in the Layers palette, set the background color to white, and pressed Delete. This action removed the mask from the bike shape, hiding the blurred layers (see Figure
A Brighter RedThe final step in this exploration was to brighten the bike a bit. It was such a great red, and that blue bag on the back of it really popped against the gray stone. The blue bag also resonated with the two patches of blue in the background. I added a Curves adjustment layer to the top of the layer stack to bring out the colors, selecting Curves from the Adjustment Layer pull-down menu in the Layers palette. I created an S-shaped curve, with data points of Input: 43, Output: 33, and Input: 150, Output: 201. Clicking OK applied the curve to the entire image. To restrict the curve to just the bike, I opened the Paths palette and selected the path of the bike shape. I chose Make Selection from the Paths palette menu and clicked OK, using the same settings as before. I chose Select, Inverse and selected the Mask thumbnail for the Curves adjustment layer. With black as the foreground color, I selected the Paintbucket tool and clicked to fill the selection with black, restricting the curve effect to only the bike (see Figure
|

|
|
EAN: 2147483647
Pages: 141