Custom Black and White Conversions
|
|
|
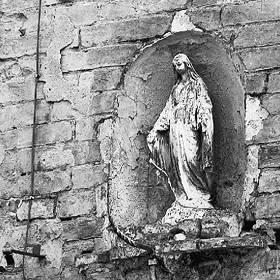
Photoshop offers lots of options for converting photos from color to black and white. For example, you can use the Desaturate, the Convert to Grayscale, or the Hue/Saturation command to create a black-and-white image, but these options by themselves offer very little control over how the colors in the image are converted to black and white. Hue, saturation, and tone combine to determine the resulting shades of gray when Photoshop converts an image to black and white. If you can control these variables as you're converting an imageas I'll show with the Channel Mixer and Hue/Saturation controlsyou can control the tone in a specific area as well as the tonal relationships between different areas. You can also create solid results if you can map specific shades of gray to the colors in an image using the gradient map adjustment layer. This exploration combines these two approaches into a single exercise. Sometimes you can use the Channel Mixer and Hue/Saturation controls on their own; with other images, you'll want to use the gradient map approach. I like the first method when I'm going for a subtle photographic effect that doesn't stretch the tonal mapping in an image. If I'm trying to create more dynamic range and contrast, I like the gradient map method, or even a combination of the two, as shown in this example. Siena Madonna
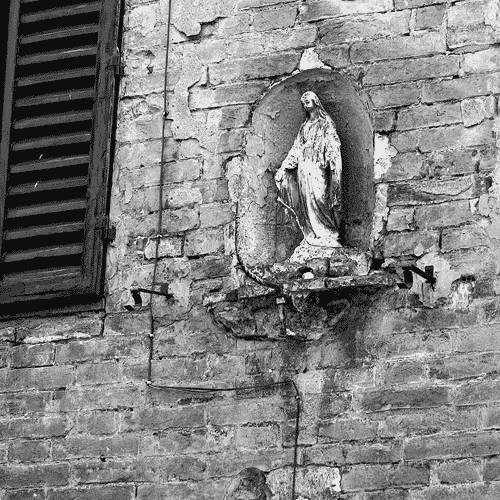
About the Original Image The winding streets in the hill towns of Tuscany are adorned with small statues representing patron saints. These idols are associated with a given neighborhood (or the entire town if it's a small one). The statues sit in small niches high in the building walls, embedded within the social fiber of the community just as surely as they're embedded within the stone walls themselves. This photo stood out to me for the texture and patina of the wall and the sculpture, as well as the way the space was divided compositionally. The wire that runs vertically is an interesting division of space, and the shutter anchors the upper-left corner as an effective counterpoint to the main subject. The goal of this exploration was to create contrast in the brick wall while enhancing the texture of the Madonna statue. It was a challenge to do this while still maintaining a wide tonal range in the Madonna, but it's ultimately what set this image apart as a successful exploration. Building the EffectThe first step in converting to grayscale is to desaturate by adding a Channel Mixer adjustment layer. Select it from the Adjustment Layer pull-down menu in the Layers palette. Enter the following values in the dialog box that appears: Red +20%, Green +70%, Blue +10%. Enable the Monochrome check box and click OK to create a grayscale image (see Figure
Adjusting Tone with Hue/SaturationSelect the Background layer in the Layers palette and select Hue/Saturation from the Adjustment Layer pull-down menu. This command places the new adjustment layer below the Channel Mixer layer and above the Background layer. In the Hue/Saturation dialog box that appears, click the Edit pop-up menu and select a color area to make modifications to that specific color within the image. The choices are Reds, Yellows, Greens, Cyans, Blues, and Magentas. Selecting a color restricts the edits to only that color range, which is represented in the color spectrum at the bottom of the dialog box. For this image, I adjusted the sliders within each color space as follows: Reds: Hue: +1, Saturation: -91, Lightness: -100; Yellows: no change; Greens: Hue: -1, Saturation: 0, Lightness: -99; Cyans: Hue: 0, Saturation: 0, Lightness: -100; Blues: Hue: -1, Saturation: -100, Lightness: 0; Magentas: no change (see Figure
Advanced AdjustmentsThe two-step process described thus far is the standard approach for using the Channel Mixer and Hue/Saturation adjustment layers to desaturate an image. These instructions will suffice for most of the images you work with, but if you want to bring out more details, consider the additional steps in this exploration. While making global corrections in the previous steps, I lost the opportunity to bring out additional detail in the teal alcove behind the statue. To bring it back, I added a second Hue/Saturation layer above the first, but still below the Channel Mixer layer. For the second Hue/Saturation layer, I adjusted the sliders within each color space as follows: I clicked in the teal section of the primary image layer (behind the Madonna) with the Eyedropper tool and set the sliders to Reds: Hue: 0, Saturation: +100, Lightness: 0; Yellows: no change; Greens: no change; Cyans: no change; Blues: no change; Magentas: Hue: 0, Saturation: +100, Lightness: 0. As a final step, I selected Master from the Edit Menu and modified the global settings to Hue: +98, Saturation: +100, Lightness: 0 (see Figure
To restrict the effect to only the teal alcove, I concealed the rest of the effect with a mask. I also made one final adjustment to the Channel Mixer settings. I double-clicked that layer in the Layers palette and set the sliders as follows: Red: +32%, Green: +48%, Blue: +26%, and Constant: +6% (see Figure
Gradient Map AdjustmentsAt this point, I felt that the Madonna figure was very striking and the rest of the image was a bit flat in comparison. To bring out just a bit more detail in the rest of the image, I added a gradient map adjustment layer to the top of the layer stack. This approach also works great as a standalone technique for converting to grayscale. After selecting Gradient Map from the Adjustment Layer pull-down menu in the Layers palette, I clicked the gradient strip in the Gradient Map dialog box, launching the Gradient Editor. I double-clicked the left color stop and selected black from the Color Picker, and clicked OK . In like manner, I set the far-right color stop and set it to white to create a black-to-white gradient. To set a middle-gray color in the proper spot, I clicked just next to the color midpoint diamond along the gradient strip in the Gradient Editor to create a new color stop in the middle of the gradient. The color of the stop was white, based on the previous selection, but I positioned the mouse pointer in the gradient strip above the right midpoint diamond and clicked to set the new color stop, which should approximate middle gray. I set one more color stop at the color midpoint diamond between middle gray and white, selecting the color in the gradient strip just above the far right midpoint diamond (the quartertones). If you want to be exact, you can double-click each color stop and set each RGB value to 128 for the middle-gray color and to 64 for the quartertones. Thus far we've replicated the default tonal range, with midtones and quartertones properly placed. The next step is to adjust the midpoint diamonds to tweak the tonal transitions between the color stops without altering the overall tonal mapping as dictated by the color stops. To stretch the highlights, I highlighted the white color stop and dragged the associated color midpoint diamond location to 20% (see Figure
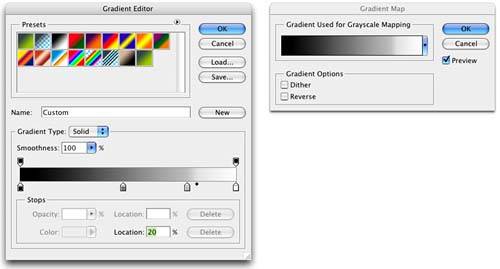 This correction opened up the details in the wall, but washed out some detail in the Madonna, so I added a layer mask to bring back the detail in the statue. I also wanted to brighten a few highlights in the brick wall at the bottom of the image. With the Background layer selected, I selected the Dodge tool with a 200-pixel brush, set the range to Highlights in the Options bar, and the Exposure to 11%. I painted in a few more highlights at the bottom to complete the image (see Figure
|


|
|
EAN: 2147483647
Pages: 141