Starting with a Template
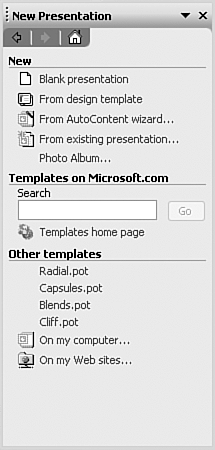
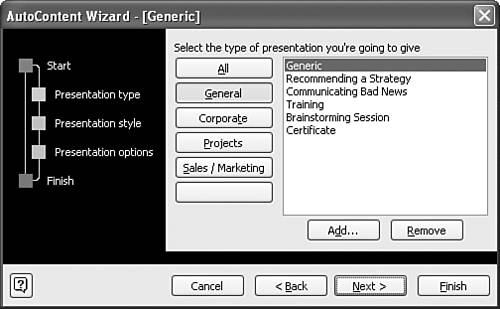
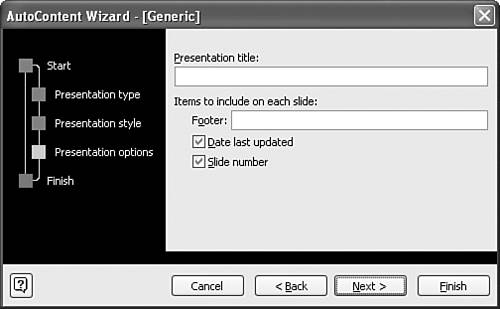
| Now that you've become familiar with the layout of the PowerPoint screen, you're ready to explore a wider range of possibilities in designing PowerPoint presentations. In Chapter 2 you started with a blank presentation so you could see how to put together a simple slide show. You added text and even changed the overall slide design. Knowing that most of us are neither accomplished artists nor experienced presenters, the PowerPoint folks have created a variety of slide shows and formats to help us start out on the right foot. These predesigned shows are templates; all you have to do is fill in a little information, and PowerPoint does the rest. Well, mostly. Using the AutoContent WizardThe most fully developed templates are those found in the AutoContent Wizard. When you first start PowerPoint, the Getting Started task pane offers the choice of opening an existing presentation or creating a new one. Click Create a New Presentation to access the New Presentation task pane (see Figure 3.6). In the New area, you can choose from Blank Presentation (as you did in Chapter 2), a design template, the AutoContent Wizard, or a template from the Microsoft Web site. Figure 3.6. The New Presentation task pane provides several options for creating a new presentation, including the AutoContent Wizard. If you click From AutoContent Wizard, PowerPoint displays the AutoContent Wizard dialog box. Click Next to get started (see Figure 3.7). Figure 3.7. The AutoContent Wizard leads you through the steps required to prepare presentations with specific content. The first step is to select a presentation type. You'll notice right away that most of the presentations are geared for the corporate world. You can choose from various categories, or you can select All to see all the templates you can choose from. When you find the one you want, select it and then click Next. The second step is to choose the presentation style. Typically, you'll be making an onscreen presentation, but you can also create a presentation targeted for the Web, for printed overhead transparencies, or for 35mm slides. Stick with the onscreen presentation for now. After you select it, click Next. The third step (see Figure 3.8) is to choose certain basic options, which include the following: Figure 3.8. AutoContent options include presentation title, footer, date, and slide numbers.
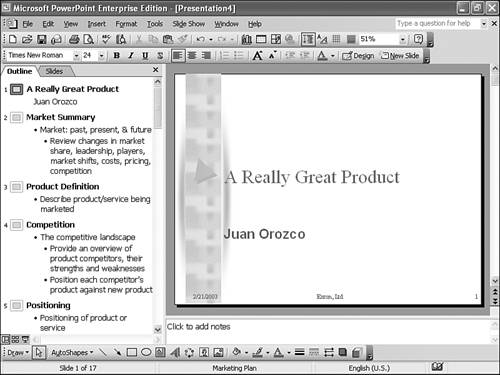
After you make your choices, click Next, and then on the final wizard screen, click Finish. PowerPoint displays the title slide with the options you chose, and it also closes the task pane and displays an outline with predefined text to the left of the slide (see Figure 3.9). Figure 3.9. The AutoContent Wizard gets you started, but you have to fill in the details yourself by changing the generic content. You can scroll through the outline to get a sense of suggested elements for a successful presentation on the topic you chose. For example, if you chose a marketing plan, you see slides showing market summary, production definition, competition, and so on. You may or may not use all the sample slides, and you'll likely add others. In any case, you'll certainly want to change the text in the sample slides. To change a slide's text content, you follow these steps:
Repeat these steps for the other slides until you've inserted your marketing information into the template. You can also delete slides or slide information. To delete information from a slide, simply click the object you want to remove (for example, a graph or graphic image) and press Delete. To delete an entire slide, click the slide icon in the outline area at the left and press Delete. PowerPoint does not warn you that you're about to lose an entire slide. If you accidentally delete a slide, simply click the Undo button on the toolbar. So how useful are the templates from the AutoContent Wizard? It depends on how much experience you already have in designing presentations. If you're just beginning, these templates can be a good way to learn about the fundamental components of a good presentation. But if you're more experienced, more likely than not you'll find these templates somewhat limiting. Tip
Starting with a PowerPoint Design TemplateIf you're not satisfied with the content or approach of the AutoContent Wizard's templates, you might want to start by choosing a design template that matches the mood or tone of your presentation. You can then add whatever content slides you want to present, in any sequence you want.
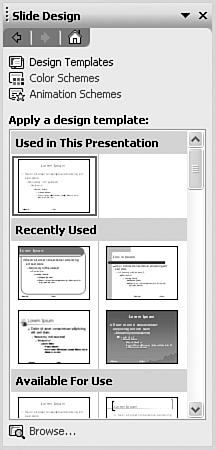
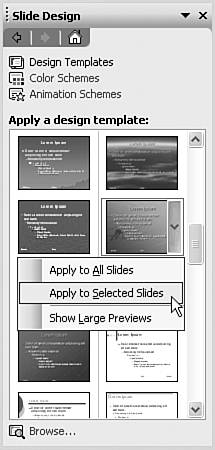
Figure 3.10. PowerPoint provides a variety of designs that can reinforce the tone and content of a presentation. You can change the design any time, even after you've created an entire slide show. However, by default PowerPoint changes the design for all slides in the presentation, and changes in fonts and colors may make it necessary to edit the slide show to make text and other objects fit the new layout. For example, a title that fits nicely in one design layout might be too long for another. If possible, try to select a design that you'll stick with for the entire presentation. You can, however, apply a design to just a single slide in a slide show. To do so, simply go to the slide you want to change and then click the right side of the design in the gallery to get a menu of choices (see Figure 3.11). Click Apply to Selected Slides if you want to change just this slide, but not the rest of the slide show. Figure 3.11. Although you usually use only one design in a slide show, you can also change the design for selected slides. Caution
Starting with a Blank Slide ShowIn Chapter 2 you created a slide show that starts with a blank design. Although you should stick to basics as you learn PowerPoint, a blank slide show is going a bit too far. Nevertheless, there are times when you simply don't need a slide design. For example, if you're displaying photos or screen shots that take up the whole screen, the design won't be seen anyway. Some advanced users start with a blank screen so that they can create their own custom designs. Creating your own design, however, can be extremely time-consuming, and you also need to have a fair amount of graphics design experience to make a custom design work.
|


EAN: 2147483647
Pages: 154