Finding Your Way Around the PowerPoint Screen
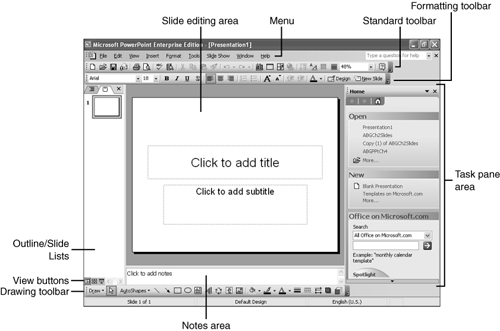
| In some ways PowerPoint looks like a lot of other Windows-based programs. That's to be expected because one of the purposes of Windows is to create a common user interface. But PowerPoint also uses a lot of unique tools, and its editing and other screens are unique to the tasks you need to accomplish. When you first start PowerPoint, it comes up in the Normal view (see Figure 3.1). Some of the menus and toolbar items are probably familiar to you. Other elements, however, may be new to you. We're not going to explore everything in this chapter, but we will take a look at things that are likely to be useful to you not only as you get started but also as you later apply some of PowerPoint's more complex features. Figure 3.1. The Normal view provides most of the menus, toolbars, task panes, and editing screens you need to create and edit effective slides. When you open PowerPoint, you find four distinct types of areas (refer to Figure 3.1): menus; toolbars; work, or editing, areas; and task panes. Exploring Menus and ToolbarsIn some ways, menus and toolbars are likely to be familiar to you. However, if you're coming from another type of operating system, for example, or from another program, the way Windows and Microsoft Office use menus and toolbars might be a bit confusing. You're probably familiar with menus that are organized from File on the left to Help on the right. You can choose Edit to see a relatively short list of options. If you hover the mouse over a menu long enough, the list expands to include all the options found there. Or you can expand a menu more quickly by clicking the double down arrows at the bottom of the menu list. As you use menu items, they appear immediately, but items that you haven't ever used don't appear unless you click the double arrows. Some folks like this approach; others don't.
By default, PowerPoint displays three important toolbars. The Standard and Formatting toolbars appear at the top, beneath the menu bar. The Drawing toolbar can be found at the bottom of the screen (refer to Figure 3.1). If you're not sure what a button represents, you can simply hover your mouse pointer over it, and PowerPoint displays a ScreenTip a label that names or describes the button's function. A toolbar button may have a drop-down arrow at its right. You can click this arrow to choose from an expanded palette or menu of choices. Choosing a different option often changes the default choice displayed on the button. The next time you click the button, you get your most recent choice (for example, green text instead of black). Note
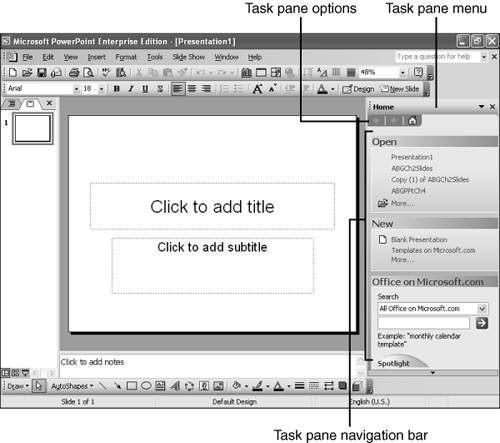
Understanding Task PanesYes, I spelled panes correctly, even if sometimes knowing what to do with them can certainly be a pain. In the Windows environment, the smaller divisions of the large window are called panes. In Figure 3.2, the task pane is the section at the right that looks like a mini-browser, complete with back, forward, and home buttons. Figure 3.2. The task pane changes depending on the task you're working on. When you first start PowerPoint, the Home task pane appears, and you can do the following:
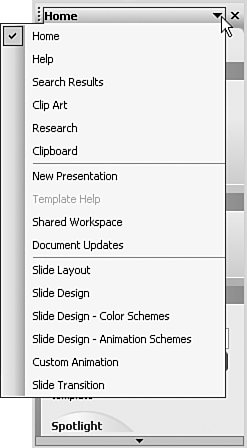
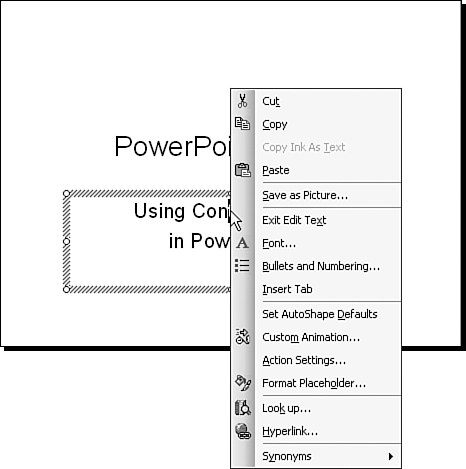
Click the task pane menu bar to see a list of the PowerPoint task panes that are available (see Figure 3.3). Some of these you can choose yourself, but many of them automatically appear when you begin a certain activity. For example, when you insert a new slide in a slide show, PowerPoint automatically displays the Slide Layout task pane, assuming that you want to choose a layout before you add content to the slide. Figure 3.3. PowerPoint groups related tasks together in task panes, making it easy for you to use the tools you need. You'll find that task panes often replace what you used to find in dialog boxes. For example, in earlier versions of PowerPoint, you select a design or layout from a dialog box; now you do that from a task pane. You can use the task pane navigation bar to return to the Home task pane or to go back or forward among task panes you have recently used. I won't take time now to describe each task pane. Rather, I do that as you use them. Using Context MenusOne extremely helpful method for quickly accessing a needed feature is to use context menus. These menus pop up when you click the secondary mouse button while hovering over an item. Typically, the secondary mouse button is the right mouse button. Therefore, this text talks about clicking the right mouse button, or right-clicking. If you've switched your buttons because you're left-handed, you need to translate right to left. Suppose you are ready to put the final touches on a slide. If you right-click a text placeholder (for example, a title box), you get a menu that provides editing and wordsmith tools, as well as options for animating the placeholder and doing other tasks (see Figure 3.4). On the other hand, if you right-click the slide toward the edges, outside the placeholders, you get a shorter context menu that lets you choose design, layout, slide transition, and other options. Figure 3.4. Access context menus by right-clicking on an area of an object that you want to modify. Tip
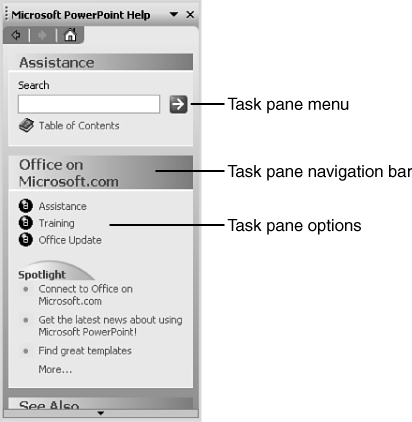
After you bring up a context menu, you can move the mouse pointer to the menu item you want and click the left mouse button to choose it. Finding HelpWhen was the last time you opened a manual? Oh, right. You've got this book open! Well, besides this one? Some time ago, software makers decided that providing printed manuals was just too expensive. Instead, they now provide extensive Help screens built into their programs or give you links to online sources where you can find the help you need. Some of us still prefer books, but if you don't have one handy, you can use PowerPoint's built-in Help. To get PowerPoint help, start by choosing Help, Microsoft PowerPoint Help or simply pressing F1. PowerPoint displays the Microsoft Office Help task pane (see Figure 3.5). In this pane you can browse the Table of Contents of the online Help tool, or you can type a simple question or keyword in the Search box and click the Start Searching button to search Microsoft's help database. Figure 3.5. PowerPoint provides nearly everything, except a printed book, to help you. PowerPoint indeed, Office 2003 comes with a cutesy Office Assistant. Fortunately, the Office Assistant isn't quite as obnoxious as it was in earlier versions of Office. The Office Assistant pops up when you choose to use a wizard and also at unexpected times. If you don't like it, you can right-click the Office Assistant and choose Hide. Or you can let the Office Assistant teach or help you. It's your choice.
|


EAN: 2147483647
Pages: 154