Upgrading from Earlier Versions
3 4
If your site already contains Microsoft SQL Server 6.5 or Microsoft SQL Server 7 data, you can painlessly upgrade the data to SQL Server 2000. For upgrading SQL Server 6.5 installations, you will use the Version Upgrade Wizard. SQL Server 7 installations are upgraded automatically during the setup process for SQL Server 2000.
Upgrading from SQL Server 7 to SQL Server 2000
The process that upgrades SQL Server 7 data to SQL Server 2000 format is an integral component of the SQL Server 2000 installation. Once the installation process has completed, SQL Server 2000 runs a series of upgrade scripts on the SQL Server 7 data. Depending on the number of databases and tables you are upgrading, this process might take some time. You will see status messages as the upgrade process progresses. Figure 7-7 shows an example of an upgrade status message box.

Figure 7-7. SQL Server 7 upgrade status.
Upgrading from SQL Server 6.5 to SQL Server 2000
Before starting the SQL Server Upgrade Wizard to upgrade SQL Server 6.5 data to SQL Server 2000 formats, you will need to verify that the items in the following checklist are correct in your SQL Server 6.5 installation:
- Verify that the user connections parameter in sp_configure has a run-time value of at least 25. The new network libraries might require more than the default of 15 connections to perform the upgrade.
- Ensure that all of your SQL Server 6.5 database files, including the master database, are backed up.
- Run all database consistency checks (using DBCC) on your SQL Server 6.5 databases to ensure that they are in a consistent state.
- Set your tempdb to at least 10 megabytes (MB). The recommended size is 25 MB, but 10 MB will suffice.
- Disable all startup stored procedures you have enabled.
- Stop all replication services and make sure that the replication log is empty.
- Install SQL Server 6.5 Service Pack 3 or later, if you haven't already.
To upgrade SQL Server 6.5 data to SQL Server 2000 formats (after you have installed SQL Server 2000), complete the following steps:
- Click Start, point to Programs, point to Microsoft SQL Server-Switch, and then click SQL Server Upgrade Wizard to display the welcome screen of the SQL Server Upgrade Wizard, as shown in Figure 7-8. Click Next to begin the upgrade process.
- The Data And Object Transfer screen of the SQL Server Upgrade Wizard appears, as shown in Figure 7-9. By default, the SQL Server Upgrade Wizard will convert all database objects and data from SQL Server 6.5 to SQL Server 2000 format. To verify that this conversion was successful, select the Validate Successful Object Data Transfer check box. The verification can be time consuming, but it is best to make this check.
If you are concerned about the consistency of your converted data, select the Exhaustive Data Integrity Verification check box. This option will cause the conversion process to take even more time but will ensure the highest level of integrity. If you have not recently run the SQL Server 6.x DBCC, you should select this option to ensure that database corruption will not affect the conversion process. If you have a tape drive present in your system, an option will be provided to use tape rather than named pipes as the data transfer method. Click Next to continue.
Figure 7-8. The welcome screen of the SQL Server Upgrade Wizard.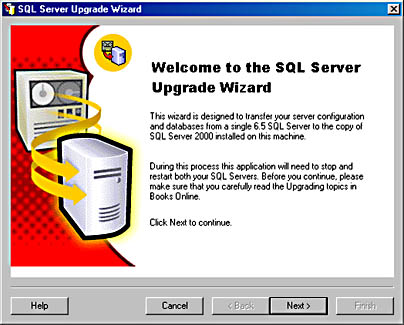
Figure 7-9. The Data And Object Transfer screen.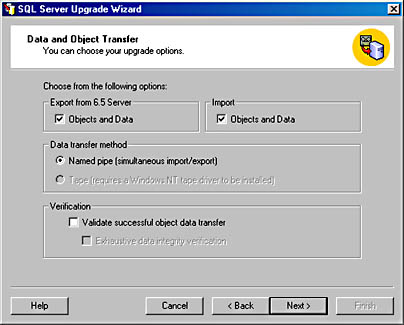
- The Logon screen of the SQL Server Upgrade Wizard appears, as shown in Figure 7-10. You select the server name from the drop-down list and type the SQL Server system administrator password for the SQL Server 6.5 database you are converting. You must also type the SQL Server system administrator password for the target SQL Server 2000 database. If you want any startup arguments for either server, type them in the appropriate Optional Startup Arguments text box. These options can include trace flags. If you choose not to include startup arguments, leave these text boxes blank. (For additional information, go to the Books Online index and look up "startup options.") Click Next to continue.
Figure 7-10. The Logon screen of the SQL Server Upgrade Wizard.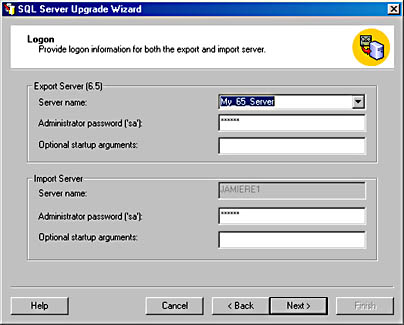
- A SQL Server Upgrade Wizard screen displays a message warning that the SQL Server Upgrade Wizard needs to stop and restart your SQL Server 6.5 and SQL Server 2000 databases and that there should not be any users logged on to either database server while the conversion is being performed. Click Yes to continue.
NOTE
At this point, the system will switch between SQL Server 6.5 and SQL Server 2000.
- The Code Page Selection screen appears. This screen lets you specify the scripting code page (which determines the character set) to use for the conversion. Unless you have a special need for character sets other than those your system has previously been set up for, you should accept the default setting. Click Next to continue.
- The SQL Server Upgrade Wizard communicates with your SQL Server 6.5 database to determine the available databases to convert and displays a list of these databases in the Upgrade Databases To SQL Server 2000 screen, as shown in Figure 7-11.
Figure 7-11. The Upgrade Databases To SQL Server 2000 screen.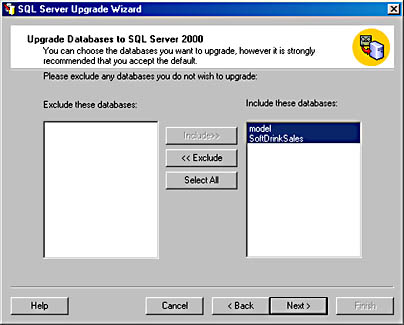
The databases to be converted appear in the list box on the right. To exclude a database from the conversion process, select its name in the Include These Databases list box and then click Exclude. The excluded database will then appear in the list box on the left. Unless you won't be using a particular database any longer, there is no reason to exclude any databases. Click Next to continue.
- The Database Creation screen appears, as shown in Figure 7-12. This screen lets you specify how your databases are created. Typically, you will want the default configuration. Change the configuration if you want to specify a new location for the data files. Click Next to continue.
Figure 7-12. The Database Creation screen.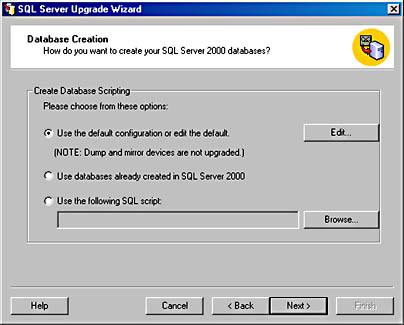
NOTE
For the default configuration, SQL Server creates files that are large enough to hold the data and objects (as they are loaded in the SQL Server 6.5 databases) to be converted. However, it does not create any free space for these files. A log file is also created for each converted database. You can change the name and file path for the log files, the initial file size, and the growth increment by clicking Edit.The second option for creating the databases is Use Databases Already Created In SQL Server 2000. With this option, you will create the data and log files with SQL Server 2000 before you start the Upgrade Wizard, and SQL Server will use those databases for the converted data.
The third option is to use an SQL script for your database file creation. This script should contain the CREATE DATABASE statement needed to create the data and log files you will use for the conversion. Click Browse to locate this script.
The second and third options are not recommended because you must use the same database names for SQL Server 2000 that you used in SQL Server 6.5, and the SQL Server 2000 files might take more disk space than the original SQL Server 6.5 files. If you use the default option, SQL Server will estimate this data growth for you.
- The System Configuration screen appears, as shown in Figure 7-13. This screen lets you specify which system objects and settings to transfer to your new database. If you select the Server Configuration check box, all logins and remote login registrations are converted. If you select the SQL Executive Settings check box, all scheduled tasks are converted. If you select the Replication Settings check box, the replication support will be converted. (The Replication Settings check box is disabled in our example because replication was not used in our SQL Server 6.5 databases, so nothing is available to transfer here. Database replication is covered in Chapter 26.)
Figure 7-13. The System Configuration screen.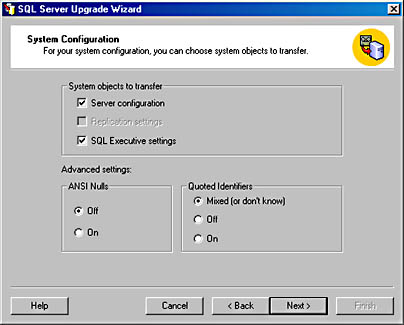
Under Advanced Settings on the Upgrade Wizard, you can set the ANSI Nulls option and the Quoted Identifiers option. ANSI Nulls affects the comparisons that use null values. If this is set to On, the comparison operators (= and <>) will always return NULL when one of the operator's arguments is NULL. If it is set to Off, these operators return TRUE if both arguments are NULL, and the operators return FALSE if one argument is NULL and the other argument is NOT NULL.
The Quoted Identifiers option determines how SQL Server 2000 will handle double quotation marks. If this option is set to On, double quotation marks indicate an identifier such as a column name. If it is set to Off, the marks indicate a character string, just as single quotation marks do. If you click Mixed, SQL Server 2000 will convert the objects with Quoted Identifiers set as it was under SQL Server 6.5. If you are not sure about this option, it is best to click Mixed. Click Next to continue.
- After a short delay, the Completing The SQL Server Upgrade Wizard screen appears, as shown in Figure 7-14. This screen enables you to review all of the conversion options you have selected. If you need to make any changes, click Back and change your settings. Otherwise, click Finish to proceed with the conversion process.
Figure 7-14. The Completing The SQL Server Upgrade Wizard screen.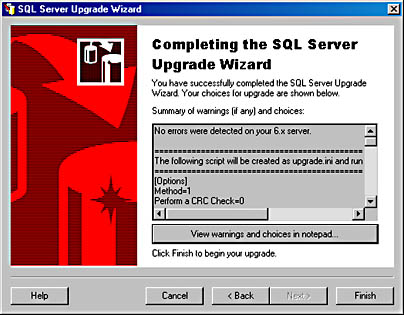
- The SQL Server Upgrade Script Interpreter dialog box appears, as shown in Figure 7-15. This dialog box displays a running list of the items upgraded, allowing the administrator some feedback on the progress of the upgrade process.
Figure 7-15. The SQL Server Upgrade Script Interpreter dialog box.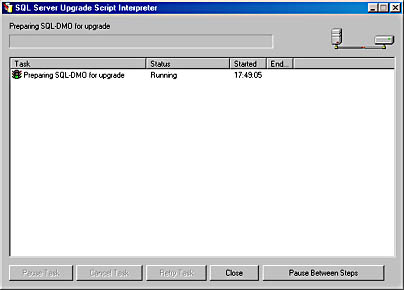
NOTE
Depending on the size of the databases you are converting and whether you choose to extensively verify your converted databases, this conversion process could take several hours.When the upgrade process is complete, the Upgrade Complete dialog box appears. Click OK to dismiss the dialog box, and then click Close to close the SQL Server Upgrade Script Interpreter dialog box.
Congratulations! You have just upgraded your SQL Server 6.5 database to SQL Server 2000.
EAN: N/A
Pages: 264