Server Installation
3 4
There are three ways to install SQL Server. You can perform a local, remote, or unattended installation. A local installation installs SQL Server onto the computer that you are currently using. With a remote installation, you can install SQL Server onto another computer that is on your network. An unattended installation allows you to install SQL Server without your having to be present to respond to any prompts. Instead, you store all prompt replies in a file ahead of time, and the setup program automatically reads these replies as it needs them.
Each of the three installation options is described in this chapter. If this is your first time installing SQL Server 2000, perform a local installation before you try either of the other two options. That way, you will be familiar with the general installation procedure.
Local Installation
If you've done your preinstallation homework, as described in Chapters 4, 5, and 6, the installation process will run a lot more smoothly. For a local installation, follow these simple steps to get SQL Server installed and running on your server:
- Place your SQL Server CD in your server's CD drive. If your server's operating system is set up to automatically start CDs, the Microsoft SQL Server 2000 setup dialog box appears, as shown in Figure 7-1. Otherwise, you will need to manually run the Autorun.exe program (located in the top-level directory of the CD).
Figure 7-1. The SQL Server setup dialog box.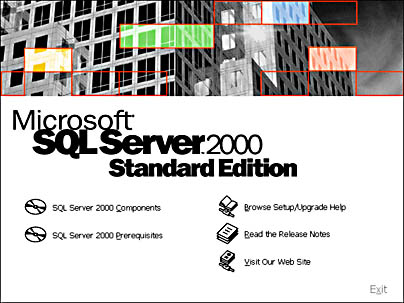
- If you have not installed the required operating system service packs or the required version of Microsoft Internet Explorer, or if you simply want to examine the list of prerequisites, click SQL Server 2000 Prerequisites to display the SQL Server 2000 Prerequisites dialog box.
Click the appropriate operating system to view its prerequisites, and then click the prerequisite you would like to install. If you have all the appropriate software already loaded, go to step 3.
NOTE
If you need to install Microsoft Internet Explorer or the service packs required by Microsoft Windows 2000 or Microsoft Windows NT 4, you might be required to reboot your system and rerun Autorun.exe before you can proceed with the SQL Server installation.Once the prerequisites have been installed, return to the master setup dialog box by clicking Back.
- Click SQL Server 2000 Components to begin installing SQL Server.
- The Install Components dialog box appears, as shown in Figure 7-2. Click Install Database Server to begin installing the primary SQL Server components.
- The SQL Server 2000 Installation Wizard welcome dialog box appears. If you are running any other programs, you should close them. Click Next to continue the installation process.
- The Computer Name dialog box appears. Click Local Computer and then click Next.
- The SQL Server 2000 Installation Selection dialog box appears. Click Create A New Instance Of SQL Server and click Next to continue.
Figure 7-2. The Install Components dialog box.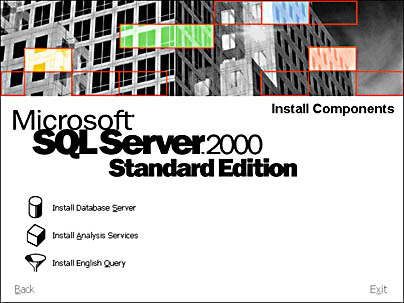
- The User Information dialog box appears. Verify that your name and company name are correct. Click Next to continue.
- The Software License Agreement dialog box appears. Click Yes to accept the license agreement and continue the installation process.
- The CD Key dialog box appears. Enter the 25-character CD key found on the yellow sticker on your CD jewel case, and click Next.
- The Installation Definition dialog box appears. Click Server And Client Tools and then click Next.
- The Instance Name dialog box appears. If you want to name this instance of SQL Server something different from the default, clear the Default check box and type the name you want. Click Next to continue the installation process.
- The Setup Type dialog box appears, as shown in Figure 7-3. You can select a Typical, Minimum, or Custom installation. The Typical installation includes all of the options except for the Development Tools and Full-Text Search options. The Custom installation allows you to add those options as well as to remove any options that you do not desire. The Minimum installation is equivalent to the Typical installation without the Upgrade Tools, Books Online, and Management Tools options.
In most cases, you'll want to perform a Typical installation, so we will click Typical in our practice installation. You can also specify where to install the program and data files for SQL Server by clicking the Browse buttons in the Destination Folder group box. Click Next to continue.
Figure 7-3. The Setup Type dialog box.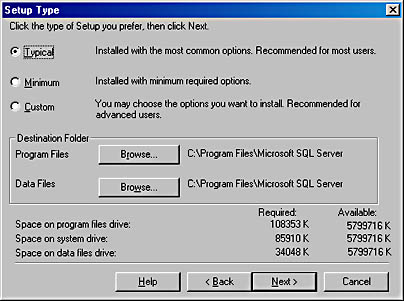
- The Services Accounts dialog box appears, as shown in Figure 7-4. You can use either a Windows NT or Windows 2000 user account, or the Administrator account. In either case, the account must have Log On As A Service rights. If you are unsure how to create these user accounts, consult your system administrator or your Windows NT or Windows 2000 documentation. Type the name and password of the account you created for the SQL Server service in the appropriate text boxes here. If you are installing SQL Server on a stand-alone workstation, click Use The Local System Account. Click Next to continue.
Figure 7-4. The Services Accounts dialog box.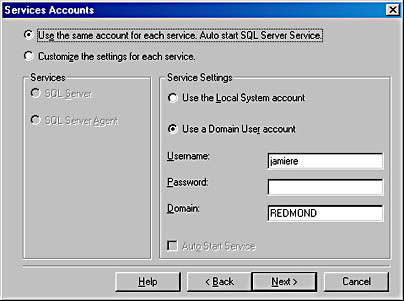
- Next the Authentication Mode dialog box appears, as shown in Figure 7-5. This dialog box determines the level of security for your SQL Server installation. You can choose Windows Authentication Mode or Mixed Mode. If you select Windows Authentication Mode, all user rights to the database are inherited from the Windows User Security settings. If you select Mixed Mode, you can define and administer database security separately. If you select Mixed Mode, you must set a password for the sa, or SQL Server system administrator, account. You can choose to leave this password blank, but doing so will severely lessen the security of your SQL Server installation. After you select an authentication mode, click Next to continue.
Figure 7-5. The Authentication Mode dialog box.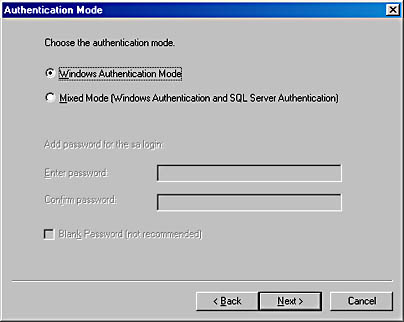
- The Start Copying Files dialog box appears. Click Next to continue.
- The Licensing Mode dialog box appears. You have two options for licensing your SQL Server clients. You can license the clients per seat or per processor.
Per seat licensing requires a Client Access License for each client computer that will access the server. Once a computer is licensed, it can access any computer running SQL Server 2000 on the network at no additional charge. Per processor licensing requires a license for every processor on which SQL Server will execute. For example, if you are running SQL Server on a four-processor machine, you need to purchase four processor licenses to use all four processors. You could choose to limit SQL Server to just two of the four processors. In that case, you would be required to purchase only two processor licenses. After you have purchased the appropriate number of processor licenses, you are allowed to connect an unlimited number of clients.
Click Continue to begin installing the SQL Server application and data files. SQL Server will install the required files on your system and configure the necessary components. The installation might take just a few minutes, or it might take longer, depending on the speed of your system.
- Once installation is complete, the Setup Complete dialog box appears. Click Finish to complete the installation process.
Congratulations! You have installed SQL Server on your server!
Remote Installation
If you want to use your computer to install SQL Server on a server over the network, you'll want to perform a remote installation. A remote installation differs slightly from a local installation. The following steps detail how to perform a remote installation.
- Perform steps 1 through 5 of the instructions for a local installation.
- In the Computer Name dialog box, click Remote Computer and type the computer name of the remote system. Click Next to continue.
- The SQL Server 2000 Installation Selection dialog box appears. Click Create A New Instance Of SQL Server and then click Next to continue.
- The User Information dialog box appears. Verify that your name and company name are correct. Click Next to continue.
- The Software License Agreement dialog box appears. Click Yes to accept the license agreement and continue with the installation process.
- The CD Key dialog box appears. Enter the 25-character CD key found on the yellow sticker on your CD jewel case, and click Next.
- The Remote Setup Information dialog box appears, as shown in Figure 7-6.
Type the account name, password, and domain for the computer you wish to install SQL Server on. Ensure that the account that you are using has the authority to install software on the computer. You must also type in the Target Path text box the installation path on the remote computer. The installation path must be in Universal Naming Convention (UNC) format, for example, \\remoteserver\c$\Program Files\Microsoft SQL Server. Click Next to continue.
- The Installation Definition dialog box appears. Click Server And Client Tools and then click Next.
Figure 7-6. The Remote Setup Information dialog box.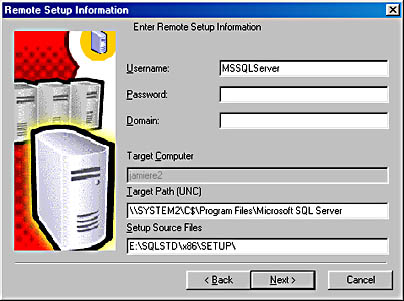
- The Instance Name dialog box appears. If you want to name this instance of SQL Server something different from the default, clear the Default check box and type the name you want. Click Next to continue the installation process.
- The Setup Type dialog box appears. As with a local installation, with a remote installation, you can select a Typical, Minimum, or Custom installation. The Typical installation includes all of the options except for the Development Tools and Full-Text Search options. The Custom installation allows you to add those options as well as to remove any options that you do not desire. The Minimum installation is equivalent to the Typical installation without the Upgrade Tools, Books Online, and Management Tools options.
- In most cases you'll want to perform a Typical installation, so we will click Typical in our practice installation. You can also specify where to install the program and data files for SQL Server by clicking the Browse buttons in the Destination Folder group box. Click Next to continue.
The Services Accounts dialog box appears, as shown in Figure 7-4. Type the name and password of the account you created for the SQL Server service in the appropriate text boxes here. (If you didn't create a separate account, you can use the Windows NT or Windows 2000 Administrator account and password.) Click Next to continue.
- The Authentication Mode dialog box appears. This dialog box determines the level of security for your SQL Server installation. You can choose Windows Authentication Mode or Mixed Mode. When you select Windows Authentication, all user rights to the database are inherited from Windows User Security. If you select Mixed Mode authentication, you can define and administer database security separately. If you select Mixed Mode authentication, you must set a password for the SQL Server system administrator ("sa" in the dialog box) account. You can choose to leave this password blank, but doing so will severely lessen the security of your SQL Server installation. After you select an authentication mode, click Next to continue.
- The Licensing Mode dialog box appears. As with a local installation, with a remote installation, you have two options for licensing your SQL Server clients. You can license the clients per server or per seat. See step 16 of the local installation procedure for more information on the two licensing methods.
- Once the SQL Server installation process has connected to the remote computer and verified that the connection can be established, the remote installation will proceed just as the local installation did. All of the selections and options are chosen in the same manner as with the local installation.
During the SQL Server remote installation process, SQL Server creates a file called Sqlstp.log. This file resides in your %Systemroot% folder on a Windows NT or Windows 2000 system. The %Systemroot% folder is typically C:\Winnt. This file lists each step executed as well as any errors or trouble the installation process encountered. If, by chance, the remote installation fails, this file can aid in the troubleshooting process.
Unattended Installation
SQL Server provides utilities that allow the installation process to be automated. These utilities enable you to perform an installation without being present, which is especially useful when installing SQL Server on a large number of servers. The steps for creating an unattended installation are as follows:
- From the command prompt, change directories to the CD-ROM drive.
- Run one of the batch (.bat) files that have been provided for unattended installation. These files are as follows:
- Sqlins.bat, for performing a Typical installation of SQL Server on Windows 95/98, Windows NT, or Windows 2000. This batch file uses the initialization file Sqlins.iss.
- Sqlcst.bat, for performing a Custom installation of SQL Server on Windows 95/98, Windows NT, or Windows 2000. This batch file uses the initialization file Sqlcst.iss.
- Sqlcli.bat, for installing the client utilities. These utilities are installed using the initialization file Sqlcli.iss. The client utilities are installed to the C:\Program Files\Microsoft SQL Server\80\ folder.
- Sqlrem.bat, for removing all SQL Server components from the system. You must specify the SQL Server installation folder as a parameter.
Prior to running the appropriate batch file, you can customize the associated .iss file for your particular systems. For example, you might want to change the licensing mode from the default of per server to per seat. To accomplish this, you would change the [License] section of the appropriate .iss file from LicenseMode=PERSERVER to LicenseMode=PERSEAT.
EAN: N/A
Pages: 264